Catalina - Capri - 25s International Assocaition Logo(2006)  
Assn Members Area · Join
Association Forum
Association Forum
Home | Profile | Register | Active Topics | Forum Users | Search | FAQ
Username:
Password:
Save Password
Forgot your Password?

 All Forums
 Catalina/Capri 25/250 Sailor's Forums
 Catalina 25 Specific Forum
 Forestay failure
 New Topic  Topic Locked
 Printer Friendly
Previous Page
Author Previous Topic Topic Next Topic
Page: of 3

pastmember
Master Marine Consultant

Members Avatar

2402 Posts

Response Posted - 10/05/2012 :  09:26:50  Show Profile
Thought... You have great ideas for Bimini hardware.
Idea... No standing rigging should should be "easy" to remove. Interjecting "mechanisms" adds potential failure points.

Edited by - on
Go to Top of Page

Stinkpotter
Master Marine Consultant

Members Avatar

Djibouti
9076 Posts

Response Posted - 10/05/2012 :  09:45:05  Show Profile
<blockquote id="quote"><font size="1" face="Verdana, Arial, Helvetica" id="quote">quote:<hr height="1" noshade id="quote"><i>Originally posted by MrKawfey</i>
<br />...Thoughts, Ideas, Purchase Orders?<hr height="1" noshade id="quote"></font id="quote"></blockquote id="quote">Chris--you must remember that this connection will be resisting a <i>very large upward force</i>--that of the forestay being tensioned by its own turnbuckle, the backstay, a backstay tensioner, and the entire sailplan going to windward. Your first drawing, especially, does not seem intended for that. The others I'm not so sure about. But as Frank says, every one of those hinges and very small pins will tend to be another failure point.

Edited by - on
Go to Top of Page

MrKawfey
Navigator

Members Avatar

USA
124 Posts

Response Posted - 10/05/2012 :  12:30:59  Show Profile

I am getting a little frustrated with the lack of mechanical understanding that is masquerading as "wisdom".

Let me be perfectly blunt for a moment and speak as an engineer (putting my sailor's hat aside). Regardless of what nomenclature you choose to use, a split ring or a cotter pin is just another form of quick release. PERIOD. Neither one is designed to act as a load bearing member. PERIOD. Any mechanism designed to be a quick release needs to make sure that the removable parts are not subject to load bearing duty. They should only be relied on for positioning or retaining the actual load bearing parts. PERIOD. Using clevis pins like we do on our rigging is a misapplication of a common system. PERIOD.

We get away with using these systems because the spreading loads are small enough that your factor of safety with a cotter pin is large. The only way any competent engineer would approve of using a cotter pin to bear a load would be if the cotter pin could be specified with some kind of strength rating. Otherwise you end up with an uncontrolled variety of parts out in the field after one replacement cycle.

One hypothetical question, Would you buy cotter pins from Harbor Freight (or other cheap-o tool importer) and trust them on your rigging? My guess is you would answer “no”. The trouble is, when you walk into West Marine to buy a cotter pin you may be buying a pin from the exact same Chinese factory that made the Harbor Freight one. That is because there is no strength specification for cotter pins. West Marine has no obligation to maintain a certain level of shear strength in the cotter pins they sell. They also have no liability because you are not supposed to use them where you have a constant shearing force. We trust that they don't because they need to maintain a reputation for quality, but there is no technical or leagal reason they couldn't.

Let me recap in case the above wasn't clear. This is not my opinion; this is well established industry practice.
1) Never use anything for load bearing duty unless its strength rating can be controlled.
2) Positioning/retention mechanisms like cotter pins and split rings are not manufactured or sold with strength ratings.
3) The design of our forestays imparts a spreading force on the clevis due to large clearances and misalignment of the parts. You can see the spreading in the pictures posted and this is what caused my forestay failure.
4) Therefore, using positioning/retaining mechanisms to prevent the clevis from spreading is bad engineering practice.

If you wanted to honor good engineering practice you would add another load bearing part to the system that is designed to keep the clevis from spreading. It would then be acceptable to use a cotter pin or other form of quick removal system to keep THIS NEW part in place. This could be a shoulder bolt with a castellated nut and cotter pin.

The parts I presented are one attempt to rectify one of the shortcomings of the systems we all use today while adding and additional ease-of-use feature.

The clevis pin strength should be unaffected by the addition of other retention mechanisms. It is loaded in double shear between the ears of the clevis and that is no different than the traditional pin. It will also have a bending force because of the clearance between the clevis and the tang, also no different than before. The ability of the pin to withstand these forces is based on the properties of the pin between the clevis ears. What happens outside the ears is irrelevant.

The “keeper” I modeled will be better suited to withstanding the spreading force of the clevis than a cotter pin or split ring. The fact that the keeper pivots out of the way for removal is irrelevant to its ability to resist the spreading force.

The roll pin (or other pivot) and the keeper latch take no load at all from the forestay or the clevis. That is an appropriate application of a retention/positioning mechanism.

While I will agree that more parts = more failure modes, that is an over-simplification of the situation. It is a combination of the likelihood of each part failing times the number of failure modes (even that is an over-simplification). The devices I showed may have more failure modes, but if each has a significant reduction in failure probability then it could be safer than the original “simpler” design. I am not implying that I believe mine to be safer, only showing that it MAY be safer. After all, my designs respect the limitations of retaining/positioning devices while the
use of a clevis and cotter pin ignores it.

In conclusion, I am not advocating that everyone stops using clevis and cotter pin arrangements. They are simple and they work. Even though they are a misapplication of the system, they can be safely used because there is so much factor of safety built in. I do, however, have a serious concern that the cotter rings are not safe either. For some of us, however, we need to be able to raise and lower our masts often, and in some cases quickly. After studying this area of the boat in great detail, I believe that the quick release pin that Catalina Direct and West Marine sell is dangerous to use on the forestay (and probably any stay). I think that finding a solution that makes pin removal tool-less and quick while remaining safe for use on the water would be of great help to many of the sailors out there.

What I am looking for is feedback on how to make this happen. I would appreciate input like “If you angle X over here then you add strength there.” Or “If you round this over you get an additional Y”. Or “You need some extra clearance here to account for Z”.

What I don’t appreciate is: “The only safe way to do it is the way we have always done it.” It’s a totally illogical argument and just scares people away from sharing their ideas. At one point in history people looked at the clevis/cotter pin arrangement and said the same thing.

Edited by - on
Go to Top of Page

glen
Captain

Members Avatar

359 Posts

Response Posted - 10/05/2012 :  13:32:34  Show Profile
Personally Chris I like your idea “shoulder bolt with a castellated nut and cotter pin”. I am mentioning this because I have a long “Quick release pin” like the pin and ball type you show on your first posting, but not in any critical component like the standing rigging. I use this pin to position my BBQs orientation (It does not even secure the BBQ, it only stops it from flopping back and forth). The diameter of this pin is maybe 3/8” SO MAYBE instead of the cotter pin locking the castellated nut, one of these pins could be substituted. This may ease the process of removing the anchor, and you don’t have to risk dropping your long nose pliers over board working on that cotter pin. (Not that I have ever “Splashed Tested” any tools)

Edited by - on
Go to Top of Page

MrKawfey
Navigator

Members Avatar

USA
124 Posts

Response Posted - 10/05/2012 :  13:43:14  Show Profile
I tell you Glen, I could probably justify renting scuba gear if I knew for sure I could find all the tools I have dropped over the side of my boat.

Writing that long winded post got me thinking again. Here is an idea that allows the Quick release pin to be used safely as designed. It is a simple machined block that prevents the clevis from spreading and keeps any load off the retaining balls. If the clearances are snug, it also removes the bending force from the pin and puts it solely in shear.


Simple to machine, could even be made from aluminum.


Could be slipped over the bow tang first, then slid up over the clevis and then stick the pin in.


(Obviously I didn't bother to show the tang from the bow fitting going up through the center)

May need to use a slightly longer pin, but there are plenty of fastener suppliers where you can buy them in different lengths.


Thoughts?

Edited by - on
Go to Top of Page

MrKawfey
Navigator

Members Avatar

USA
124 Posts

Response Posted - 10/05/2012 :  13:58:45  Show Profile
Glen, I just went and did a quick look for the components to do what you were suggesting. Starting with a 1/4 inch bolt (I think that's what the pin is, but I don't have one to measure) I went and looked for a 1/4 castle nut.
1/4 castle nut takes a 1/16 cotter pin. I could not find a quick pin with a 1/16 diameter. The best I could come up with is something like this:


or there is always the hairpin style


What I like about that is you could stick the bolt through, thread the nut and then you are secure for a short time. Then you can mess with the pin after you motor out of the way after launching.

Edited by - on
Go to Top of Page

dmpilc
Master Marine Consultant

Members Avatar

USA
4593 Posts

Response Posted - 10/05/2012 :  15:38:52  Show Profile
I like the gizmo that slips over the bow tang. Pretty cool!

Edited by - on
Go to Top of Page

MrKawfey
Navigator

Members Avatar

USA
124 Posts

Response Posted - 10/05/2012 :  16:20:38  Show Profile
At the moment the safest, proven, solution is the standard clevis pin with cotter pin to retain it. As I mentioned, even though it is not technically within the scope of a cotter pin's job, the system is plenty reliable enough to do the task.

If I was concerned with that arrangement (and I am not, but everyone has a different risk tolerance) I would use a grade 8 bolt with a castle nut and cotter pin. The trick is to make sure that the unthreaded portion of the bolt is long enough to go all the way through the clevis. That way the clevis ears are not digging into the threads of the bolt. I would add a washer to the bolt before running the nut all the way to the end of the threads.

You shouldn't tighten the nut, you are not trying to compress the clevis, just taking up the gap around the clevis. Then pin it with a cotter pin. This would be the most bomb proof method I could think of for the moment, but keep in mind that I am not aware of any real world experience with this method. Therefore I can't, in good conscience, advocate something other than the old standby for use by someone other than myself.

I can point out that the automotive industry uses this style on all steering components (tie rod ends, ball joints, etc). The forces and impacts that are experienced there are much more severe than our application and the consequences of failure could be worse. At least when your mast on the boat crashes down it only kills you or your crew. In a car a steering failure could send you into a bus load of nuns.

If the tang was thicker and took up all the space in the mouth of the clevis and the tang and forestay were in good alignment there would be no need for this. The propensity of the clevis to open would be almost eliminated.

If you are one of us who are looking for a solution that is easier to remove and connect then stay tuned. At the moment, I have yet to see something for sale that I trust.

Edited by - on
Go to Top of Page

MrKawfey
Navigator

Members Avatar

USA
124 Posts

Response Posted - 10/05/2012 :  16:46:36  Show Profile
Hmmmmm....the post I was replying to just disappeared.
The gist of the post that disappeared was "having read all this, what should I do?"

Edited by - on
Go to Top of Page

MrKawfey
Navigator

Members Avatar

USA
124 Posts

Response Posted - 10/05/2012 :  17:01:48  Show Profile
Someone reading over my shoulder just pointed out something that I may need to clarify:

I do not mean to imply that standing rigging is an inappropriate application for a clevis/cotter pin arrangement. I am specifically referring to our forestays and the way the arrangement is implemented. Catalina did a poor job of designing this union. The two major issues that are causing the problem are the fact that the tang does not fill the clevis and the tang is not in alignment with the forestay.

The tang not being wide enough causes a bending of the pin, even if it's not visible by the naked eye. The misalignment causes the pin to cock in the holes and means the pulling force is not perpendicular to the pin. Again, a small effect, but these are big forces we are talking about. The combination of the two problem also causes the ears of the clevis to be loaded unevenly. Because the tang will never be perfectly centered on the clevis, one ear (or leg) of the clevis will always have a higher load on it.

It is mostly these factors that cause the pin to be loaded in a way that makes it want to spread. The friction of the clevis on the pin goes a long way to stopping it from spreading, but that is not something I would want to bet my life on.

Edited by - on
Go to Top of Page

Stinkpotter
Master Marine Consultant

Members Avatar

Djibouti
9076 Posts

Response Posted - 10/06/2012 :  08:03:32  Show Profile
<blockquote id="quote"><font size="1" face="Verdana, Arial, Helvetica" id="quote">quote:<hr height="1" noshade id="quote"><i>Originally posted by MrKawfey</i>
<br />The tang not being wide enough causes a bending of the pin, even if it's not visible by the naked eye. The misalignment causes the pin to cock in the holes and means the pulling force is not perpendicular to the pin. Again, a small effect, but these are big forces we are talking about. The combination of the two problem also causes the ears of the clevis to be loaded unevenly. Because the tang will never be perfectly centered on the clevis, one ear (or leg) of the clevis will always have a higher load on it.<hr height="1" noshade id="quote"></font id="quote"></blockquote id="quote">Two suggestions: (1) Bend the tang slightly, just above the weld, to align it more precisely with the forestay (easier said than done), and (2) put some washers on the pin inside the clevis with an equal number on each side of the tang, to center the clevis and perhaps distribute any remaining "spreading" force on it.

I agree that cotter pins are better for this application than rings. The shape of a ring could cause more wear at a smaller point if the pin shifts so the ring is in contact with the clevis. A pin is flatter relative to the wear point, and probably thicker (although somewhat softer).

Edited by - Stinkpotter on 10/06/2012 08:04:23
Go to Top of Page

Stu Jackson C34
Admiral

Members Avatar

844 Posts

Response Posted - 10/06/2012 :  10:34:26  Show Profile
Was your pin installed the opposite of the first picture? From the back to the front? It could have wiggled itself out.

The toggle on the bottom of the forestay fitting should alleviate the need to bend the tang. Do you have a toggle at the top, too? The second picture appears to be an incorrect installation without a toggle installed.

On our C34, the aft chainplates for the backstay are nbot quite in line with the backstay angle. We installed toggles when we re-rigged.

There are no babystays on our boats. They are called lowers.


We used quick release pins like that on our C22 for 4 years with no issues, trailer sailed it during the winter, lake sailed from a slip in the summers. Our C25 used cotter pins, FK, in the water all the time for 12 years.

<blockquote id="quote"><font size="1" face="Verdana, Arial, Helvetica" id="quote">quote:<hr height="1" noshade id="quote"><i>Originally posted by delliottg</i>
<br />Here's an update on my forestay pin. I checked it yesterday & it indeed does have the exact same quick release as shown in the OP with the edition of a thin cable keeper. Guess what was ring cottered to the keeper that I never noticed before? Quite possibly the original pin although it looked kinda short for the job. It's the exact same diameter as the quick release pin but only about 3/4" in total length with very shallow shoulders. I don't plan to use it, but I will find a somewhat longer SS pin to replace the quick release. I also noticed that the jaws (?) attached to the forestay had spread marginally, so that the underside one is maybe 1/8" away from it's side of the tang. The upper is almost right against it, so there's been a bit of spread, but I've also got a bit of room to move it "forward" to gain another 1/8" or so of throw. I tried to close down the spread with a pair of vise grips but wasn't able to budge it under load. It's still 1/8-1/4" from the ball detent so I'm not overly concerned.

You can just see the ring cotter in just beneath the quick release pin:

<hr height="1" noshade id="quote"></font id="quote"></blockquote id="quote">

<blockquote id="quote"><font size="1" face="Verdana, Arial, Helvetica" id="quote">quote:<hr height="1" noshade id="quote"><i>Originally posted by Davy J</i>
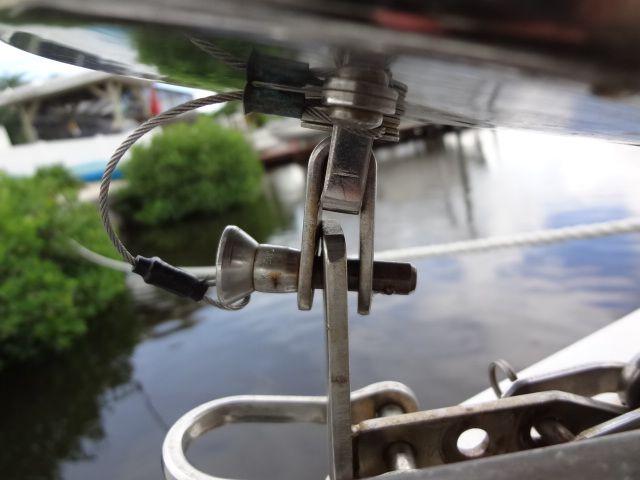
<br />Having used the quick release pin to release the forestay hundreds upon hundreds of times I still cannot figure out how the U-strap on the turnbuckle could have opened enough to come apart. Here is a close-up photo of my quick release pin.


It seems the u-strap would bind up on the pin before being able to open up wide enough to release. Additionally, when I took the photo, I tried to move the pin. It would not budge. Also the bearings on the pin could not be pushed in.
<hr height="1" noshade id="quote"></font id="quote"></blockquote id="quote">

Edited by - Stu Jackson C34 on 10/06/2012 10:39:37
Go to Top of Page
Page: of 3 Previous Topic Topic Next Topic  
Previous Page
 New Topic  Topic Locked
 Printer Friendly
Jump To:
Association Forum © since 1999 Catalina Capri 25s International Association Go To Top Of Page
Powered By: Snitz Forums 2000 Version 3.4.06
Notice: The advice given on this site is based upon individual or quoted experience, yours may differ.
The Officers, Staff and members of this site only provide information based upon the concept that anyone utilizing this information does so at their own risk and holds harmless all contributors to this site.