Notice:
The advice given on this site is based upon individual or quoted experience, yours may differ.
The Officers, Staff and members of this site only provide information based upon the concept that anyone utilizing this information does so at their own risk and holds harmless all contributors to this site.
I got a new Depth Finder with a 2" display that I plan to install in place of the antique depth gauge. So, before I started drilling and unscrewing things, I thought I'd try shooting the sensor through the hull.
So I got a wax ring for the toilet, and wedged the sensor down on the inside of the hull, hooked up the sensor to the gauge and powered it up.
After the damned thing beeped for a minute or two, I noticed it read 999 for a while, then it settled down to 000.
I pressed every button, held the buttons, powered it down, held the button down and powered it up. Just about every trick of the SW trade to see whether I could get it to read 26 foot, the MLW under my keel on the slip. But no-o-o-o-o!
I moved the sensor forward, I moved the sensor aft - nothing.
Then I picked it up and placed it along side the boat, just touching the surface of the water. And wouldn't you know it! 26 feet. Worked like a charm.
This sensor does NOT work through the hull. It works fine in the water.
I need to figure out (1) how to mount the sensor on the transom and (2) where to mount it, so it will be away from the rudder and the engine.
Any suggestions?
Bruce Ross Passage ~ SR-FK ~ C25 #5032 Port Captain — Milford, CT
Make sure when your mounting the sensor with the wax ring that you don't knead the wax or disturb it much from the way it comes in the package. If you disturb it much at all it will get air in it and that will prevent it from getting a good reading.
Just cut out a piece of wax, stick it to the hull, and press the transducer down into the wax very firmly until it almost touches the hull. Mines mounted just inside the V-berth storage area.
As Gary said, air is likely the culprit. The TB wax I've seen comes in a ring--you need to be sure there is nothing but wax between the entire sounding-surface and the fiberglass. You might be able to do a quick test by temporarily sealing an open-bottomed container to the hull, filling it with water, and then placing the sounder into the water. If it reads, then you know the fiberglass isn't the issue. Some people have installed internal sounders with mineral oil inside a sealed container. Worst case, you already have a hole...
I TRIED THE MINERAL OIL IN A ZIP LOCK BAG BUT TO NO AVAIL...SKIPPED THE TOILET BOWL WAX, HANGING IT OVER THE SIDE TO BE SURE IT WORKED, AND IT DID, SO I REPLACED THE OLD WITH THE NEW.
You need to cut a chunk out of the wax ring... you don't use the whole thing. Put the [appropriately sized] chunk under the transducer and smoosh the tranducer down so it is nearly touching the hull.
Worked fine for me... I've done this on several boats.
I took about a golfball volume of Vaseline and smeared it on the face of the new transducer. I then slowly pushed and twisted the transducer in place against the hull so that the Vaseline oozed out evenly around the transducer. Finally, I tied it with string to the old transducer so that it wouldn't slide away or move (probably not needed, but it made me feel better). The transducer will send and receive signals thru water, oil, solid (not cored) fiberglass, epoxy, and vaseline, but not air. The vaseline is used to conduct the signals and eliminate the air between the transducer and the hull. It also won't send/receive thru silicone. I tried that first. I didn't want to use epoxy because I knew the install was only temporary.
Garmin has an in-hull transducer and mount that has been around for a few years. I have it on my 250WK and it works very well. The mount glues down on the inside of the hull, gets filled with mineral oil and the transducer then goes into it. The mount and the transducer are manufactured with different angle which allow for straight down aiming of the beam by rotating the transducer. It cost a few bucks but sure looks better than the gob of brown wax I tried at first.
I have a Standard Horizon model. When I found out it would not work when layed it on the hull, I talked to other sailors who were using them. The general consensus was to lay the transducer in liquid epoxy, which meant placing a small cardboard ring snugly against the hull, pouring epoxy into the ring to create a pool and laying the transducer in the pool.
Things to keep in mind:
Before you opt for any kind of permanent fixture, test the transducer by making a wax dam (sounds like you did this already) pour water into the dam and lay the transducer in the water. If you get a valid reading using this method, the transducer will read through the hull.
Clean the area where you intend to lay the transducer so whatever medium you choose for it will not have bubbles or other interference.
Lay a bullseye level on top of the transducer to get it level when you make the final placement. A bullseye level is a common construction level, it's round with a dot in the center and a bubble of air which you can line up with the dot. Home Depot, Lowe's, etc. carry these for about $3.00.
The more permanent you make it, the less likely it will be to work loose and malfunction or give false readings. You really don't want it to fail or give false readings in shallow water.
Apparently, when I mashed the transducer down on the fibreglass bottom, there was still a thin layer of air between the trx and the inner hull.
I've got the wax ring, I'll take an appropriate sized chunk and place it on the bottom, then I'll push the trx down into the wax.
Should I try to warm the wax in my palms to soften it up? I don't plan to knead the wax like dough, as that will introduce air, just warm the wax to make it pliable.
<blockquote id="quote"><font size="1" face="Verdana, Arial, Helvetica" id="quote">quote:<hr height="1" noshade id="quote"><i>Originally posted by Voyager</i> <br />Should I try to warm the wax in my palms to soften it up?<hr height="1" noshade id="quote"></font id="quote"></blockquote id="quote">Can't hurt. When you put it down, make the center slightly higher than the sides so when you push the transducer down, air will be pushed outward rather than being trapped inward.
It makes sense to mount your depth finder forward so it has a clear field of view. Mine is under the V-berth, forward of the keel. You want it to be as level as you can get it so it gives an accurate reading. You also have to keep in mind that it is going to be mounted below the water line. When you're in very shallow water you have to do the math to determine how close the bottom of your keel is to ground. For example; your depth sounder says 4', it's mounted 3' above the bottom of your keel, so you really only have 1' of water under you.
My Garmin shoot thu hull sensor is in the forward berth as well. It is level, as per the instructions that came with the boat. Stardog is correct in indicating you should be aware of the placement of the sensor in relationship to the measurements that is is reading.
Before I place the sensor I tested the unit by placing it in a plastic bag with water, then I added some water to the area of the forward berth on the inside. By doing so, I ensured there were no air trapped between the plastic bag and the hull.
After traveling about for several hours, I was confident that the sensor was behaving correctly.
I used Silicon II to place the housing of the sensor to the Hull. The sensor is attached to a cap that screws into the housing.
I have Garmin GPS/Sounders on both Quiet Time and Magic. Both use the standard Garmin transom mount transducers. On Quiet Time, which has a small "skeg" under the transom (typical of C-25's), I epoxied the transducer bracket directly to the skeg a few inches forward of the rudder. It has hung on there quite nicely since 2004.
On Magic (my C-22), which has a smooth underwater hull shape with no projections to attach anything to, I fabricated a bracket for the transducer out of a piece of 1/8" x 1.5" x 8" aluminum plate (stainless steel would be preferable in salt water). The plate is attached to the transom under the lower gudgeon with a couple of screws and some 3M 5200 polyurethane adhesive, projecting down into the water a couple of inches, then the transducer is attached to this plate with a plastic spacer block so that it projects forward under the hull and doesn't interfere with the rudder. If I ever swap the standard rudder for a C-25 style balanced rudder, I'll have to move the transducer somewhere else, but it's unlikely I'll ever need or want a new rudder. (Magic needs too many other, higher priority replacements, things like new sails, new upholstery, and upgrade of the standard winches to self-tailers. A new rudder would come last after those other upgrades).
The in-hull transducers are too problematical, especially for someone like me who has only dry storage and therefore no easy way to experiment with different locations to test proper performance. I hate punching big holes through boat hulls, so a through-hull was not even under consideration when I bought my sounders. The transom mount transducers are designed for powerboats that go up to 50 knots, so they are far and away strong enough for a sailboat that only goes 6 knots max. Putting the transducer under the transom isn't the best location if you frequently like to beach your boat bow-first, but it works good enough for me, plus it puts the transducer out of danger of smacking it against the trailer while launching or retrieving the boat.
Did you have any problem using Silicon II? My 250 is on a trailer right now and I can not test the transducer. I installed it forwared of the keel in the V-berth just in front of the water tank. I used the Silicon II and was carefull about not trying to let air get in.
I also have used the toilet bowl wax ring with a Humminbird Matrix 17 Depthfinder mounting the transducer under the VBerth area with no problems. I first tried it off the transom to ensure it worked and then used a glob of the wax and smooshed the transducer into it (in the Vberth area). Then overlapped the wax along the perimeter of the transducer to ensure it stayed put. It has been there for over 2 years with no issues.
Troybleshooting getting the signal is usually one of two issues: Air between the fluid/sealant and the transducer/hull or that the hull has voids/cored or whatever. When there is solid matl from the transucer thru the medium and the hull, it usually works like a charm. I am also somewhat familair with the use of ultrasonic flowmeters for measuring pipe flow and that works fine as well and that is thru pipe using a transducer paste between the pipe and transducer. In this case, two transducers are used and the signal is bounced off the opposite side of the pipe and then picked up by the second transducer. We have had these flowmeters tested on provers and the results are repeatable and generally very accurate. I am not aware (or have used) this set up for measuring speed on a boat. maybe it can be used but can tell you it is commonly used for monitoring pipe flows and pump performance on industrial plants, etc.
The other day when it was 95 degrees down below, I attached the sounder transducer with some hot wax to the inside of the hull just behind and to starboard of the companionway ladder.
I tried it this way and that, then checked the guage, and viola, there it was 18.6 foot and with the tide coming in, we reached 20 foot within two hours.
So there you have it. Now all I have to do is remove the old unit, come up with a filler / mounting disk to fill the 4" hole and mount the new unit, wire it in and enjoy it.
No more marine growth fouling the through-hull by July, and next winter, I may choose to remove the old transducer. Or I may not, since its solid and secure, I might just leave it in.
I'm wondering whether I should use Teak or Mahogany as a filler, or some kind of plastic? All the brightwork on the boat was refinished this year, so perhaps wood is the better bet.
<blockquote id="quote"><font size="1" face="Verdana, Arial, Helvetica" id="quote">quote:<hr height="1" noshade id="quote"><i>Originally posted by jerlim</i> <br />Do the depth finders read down or forward? I'd like to know what I'm heading into, not where I already am.<hr height="1" noshade id="quote"></font id="quote"></blockquote id="quote">Jerry: For a good return and proper depth readings, it should point straight down. Whatever danger you're detecting if it's pointed a few feet forward, you're gonna hit anyway.
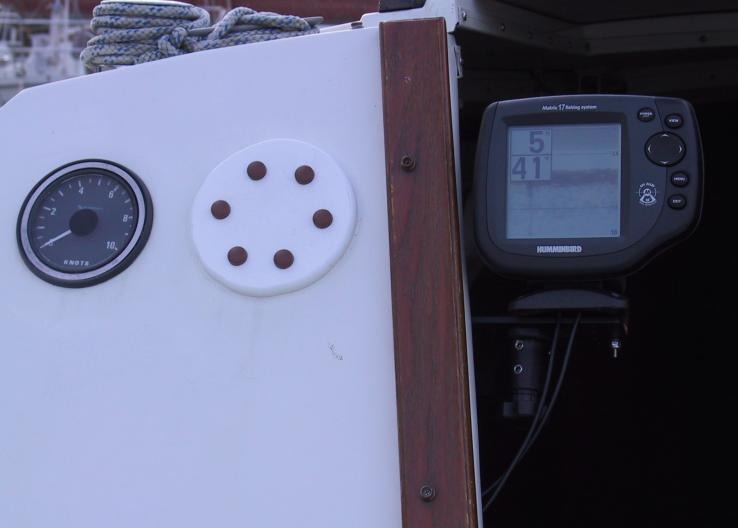
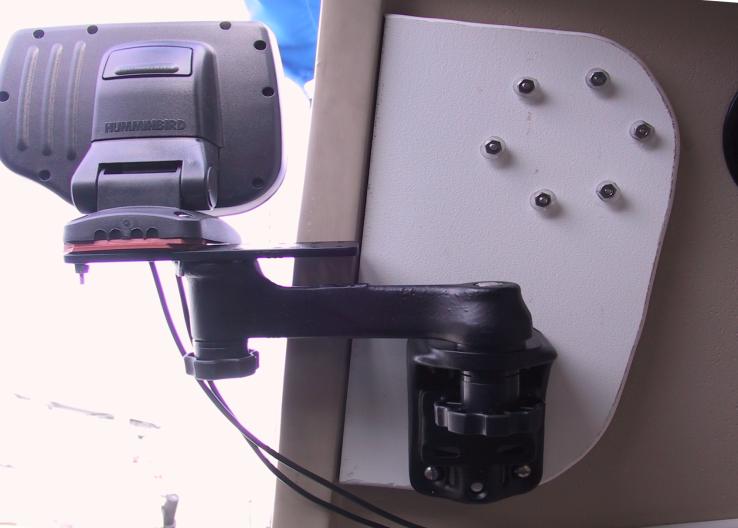
A wood or starboard filler piece will work. In my case, I decided to cover the hole with a starboard circle cut using a scroll saw and then bevel4d the edge with a Dremel. I then sealed it with 3M sealant and thru bolted it inside the hole to a starboard piece mounted from the inside. The Starboard piece inside the cabin then serves to hold the circle and to support a RAM Swing mount that I used to mount the fishfinder. if it starts to rain, i can put the 2 lower companionway hatch boards in place and the fishfinder is visible just above the second hatch board. The RAM Swing mount is a bit expensive but has a nice design compared to others (ie. West Marine mounts) that I have seen. Here are some photos of the arrangement:
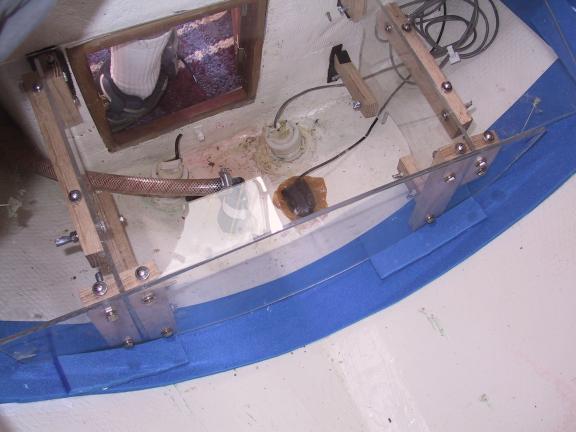
The photo below shows the transducer in the toilet bowl wax. It also shows the plexiglas shelf I installed to protect those hookupws and allow storage to be thrown in there without regard to disturbing anything.
Dave - What do you mean by <blockquote id="quote"><font size="1" face="Verdana, Arial, Helvetica" id="quote">quote:<hr height="1" noshade id="quote"> ...How about a little bronze port? <hr height="1" noshade id="quote"></font id="quote"></blockquote id="quote"> I liked the wood idea, as it matches the crib boards, but the bronze glinting in the sun is very appealing.
As you know, the housing for both the current Depth Meter and the Knot Meter is black metal, and since the Knot Meter still works, I planned on keeping it.
Now I gave this idea a moment's thought: so why not take the current Depth Meter's housing and modify it to accept the new depth meter? I wouldn't mind cleaning both up and modifying it, but I really hate to deface antiquities like that.
I have been using my new shoot thru hull transducer for several weeks. I am very pleased with the following:
1) the location - in the v berth almost center of hull ahead of the keel 2) the use of silicon II to secure the housing of the transducer 3) the operation of the transducer - accurate
I filled the transducer container with mineral oil as per the instructions. I have no leaks. The Silicon II is applied the to rim of the transducer container, and the actual transducer sensor is screwed to the container from the top.
I bought the Garmin 440 with the transducer. I tested the location by placing the transducer in a plastic bag with water.
The Garmin system is on a RAM arm that is attached to the side of the steps of the companionway. I took the idea of from Larry, and made some changes. Rather that having the RAM arm attached to the bulk head, it is attached to the steps. The arm has 2 ball joints that allows me to position the Garmin almost anywhere.
Ill take a few pictures this weekend and post so others can get ideas.
I would be interested in seeing your photos showing how you hooked up your swing arm.
Bruce, The knotmeter is an SR Mariner. SR Mariner instruments are no longer manufactured but they will repair units. I passed up on getting the depthfinder fixed and opted for the fishfinder. The knotmeter still works but sometimes has a mind of it's own. It will not be working sometimes for an hour or so and then it starts to operate. It's not a loose connection....it seems to act up more when I know it's time for me to get the bottom cleaned. I keep the boat in the water all year and so some debris probably clogs it up. When it's out for a pressure wash, the guys usually hit the impeller with a bit of the spray.
Notice: The advice given on this site is based upon individual or quoted experience, yours may differ. The Officers, Staff and members of this site only provide information based upon the concept that anyone utilizing this information does so at their own risk and holds harmless all contributors to this site.