Catalina - Capri - 25s International Assocaition Logo(2006)  
Assn Members Area · Join
Association Forum
Association Forum
Home | Profile | Register | Active Topics | Forum Users | Search | FAQ
Username:
Password:
Save Password
Forgot your Password?

 All Forums
 Catalina/Capri 25/250 Sailor's Forums
 Catalina 25 Specific Forum
 What have you fixed/upgraded today?
 New Topic  Topic Locked
 Printer Friendly
Previous Page | Next Page
Author Previous Topic Topic Next Topic
Page: of 11

DavidBuoy
Admiral

Members Avatar

USA
707 Posts

Response Posted - 01/25/2015 :  14:47:06  Show Profile
Installed my dehumidifier, 2 gear hammocks and a cigarette lighter socket one of the side coaming stash boxes for charging phones and such.

Edited by - on
Go to Top of Page

Stinkpotter
Master Marine Consultant

Members Avatar

Djibouti
9044 Posts

Response Posted - 01/25/2015 :  19:05:46  Show Profile
quote:
Originally posted by DavidBuoy

...and a cigarette lighter socket...
Still lighting up?

Edited by - on
Go to Top of Page

sailboat
Navigator

Members Avatar

USA
149 Posts

Response Posted - 01/25/2015 :  21:38:18  Show Profile
I leave them on all the time. Don't worry about the vent.

Edited by - on
Go to Top of Page

DavidBuoy
Admiral

Members Avatar

USA
707 Posts

Response Posted - 02/03/2015 :  16:54:01  Show Profile
Picked up some cam cleats to install for the spin sheets on my secondary winches. They're not self tailing and didn't like fixing them on the cleats as you couldn't pull the ripcord quick enough if a good puff hit.


Captain Rob & Admiral Alyson
"David Buoy"-1985 C25 SK/SR #5053
Go to Top of Page

DavidBuoy
Admiral

Members Avatar

USA
707 Posts

Response Posted - 03/03/2015 :  20:00:25  Show Profile
Just finished the spring to-do list and thought I would share. Keep in mind I just purchased a house and have been renovating it before we move in at the end of april... so I've got my hands full. I'm gonna need some more friends!

David Buoy To-Do List
1. Motor
a. Install Alternator
i. Need to bring motor and parts to Shane’s to pull the flywheel.
ii. Need to splice wire loom to engine and at boat
1. Determine method of connecting to existing wiring.
b. New drain plug at bottom
c. Install spark Plug
d. Change oil before season
e. Purchase new motor lock
f. Check if transmission is connected correctly
2. Random Rigging
a. Install spinnaker cam cleats
i. Need bolts and washers
1. Measure length and size.
b. Install line organizers
i. New shock cord in the mail
ii. Need to measure and decide mounting method (bolts or screws)
c. Mast slot gate
i. Need good weather to file and test fit
ii. Need threadlocker
3. Fix keel winch cable on drum
4. Electrical
a. Check and secure stern light wire
b. Find loose wires on cabin lights
c. Install second battery volt meter
d. Final mount the blue light receiver
e. Purchase and install 2nd battery
i. Need to measure for battery box and purchase battery box
ii. Determine size and type of battery
iii. Need fuse and connection for battery charging wire for second battery.
f. Find bow navigation light and purchase.
g. Verify mast base wiring schematic
h. Solar Panel
i. Determine size and method of connecting.
i. Wire phone charger in bow
i. Need wire. Maybe use old solar panel wiring.
5. Companionway doors
a. Install inside door lock on hatch boards
b. Check if Dad is going to finish the screen
i. Install lock
c. Find way to screen front hatch.
6. Rudder
a. Sand down and repaint
i. Pick up sander from Dad
ii. Buy paint from West Marine
b. Fabricate plate to hold up tiller
c. Purchase and install a tiller tamer
d. Install new gudgeon.
7. Mast Drop Stuff
a. Get friends to help drop mast
b. Prep mast to drop (unplug electrical, mark turnbuckles, create rig)
c. Replace mast wiring and wire new lights
d. Replace sheeves
e. Install topping lift
f. Replace halyards
g. Check VHF antenna
h. Install flag line
i. Determine profile of spreader and create solution to mount a pulley
ii. Measure and purchase line, flag holders & cleat that attaches to stay
i. Remove mast plate and measure halyard plate to drill
i. See if Shane can help with his drill press
j. Install new halyard and mast plate.
i. See if I need bolts or lags
k. Lubricate mast slot
l. Raise mast
i. **Must take it to a rigger to tension the stays
8. Install vent in locker
9. Make cockpit cushions
10. Clean boat for the season
a. Dumpster locker
i. Bleach fenders
b. Powerwash cockpit
c. Mildew scrub inside
d. Clean cushions
11. De-winterize
a. Flush all the antifreeze and rinse the tanks
b. Empty and rinse the holding tank
c. Organize tools and equipment
d. Install Lifeline
i. Purchase man overboard system.
Items to Purchase:
1) Motor Lock
2) Bolts for spinnaker cleats
3) Bolts for line organizers.
4) Threadlocker
5) Second Battery and Box
6) Fuses (round and plate)
7) Bow light
8) Solar Panel and charge controller
9) Front hatch screen
10) Materials and Paint for Rudder
11) Flag line and hardware
12) Mast slot dry lube
13) Mast plate bolts
14) Locker Vent
15) Man overboard system


Captain Rob & Admiral Alyson
"David Buoy"-1985 C25 SK/SR #5053
Go to Top of Page

redeye
Master Marine Consultant

Members Avatar

3475 Posts

Response Posted - 03/04/2015 :  08:41:52  Show Profile
<< Fabricate plate to hold up tiller >>

Ok.. this is not a classy solution but here goes..

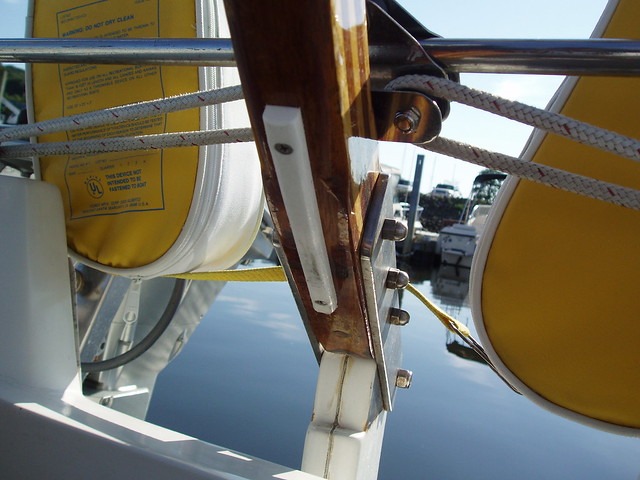
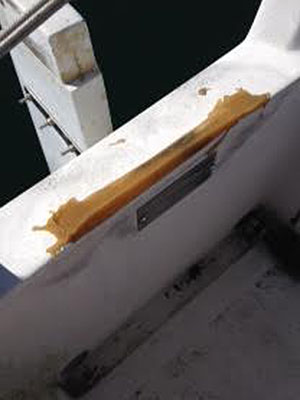
I made a dam of duct tape and poured gflex into it. My metal brackets on the back of the tiller were wearing into the fiberglass.

I put oil on the glex at the beginning of most trips and the tiller slides on it quietly.

I had added some rather large pieces to to hold the tiller to the rudder..

One Way to do it

Ray in Atlanta, Ga.
"Lee Key" '84 Catalina 25
Standard Rig / Fin Keel
Go to Top of Page

DavidBuoy
Admiral

Members Avatar

USA
707 Posts

Response Posted - 03/04/2015 :  09:04:04  Show Profile
quote:
Originally posted by redeye

<< Fabricate plate to hold up tiller >>

Ok.. this is not a classy solution but here goes..

I made a dam of duct tape and poured gflex into it. My metal brackets on the back of the tiller were wearing into the fiberglass.

I put oil on the glex at the beginning of most trips and the tiller slides on it quietly.

I had added some rather large pieces to to hold the tiller to the rudder..

One Way to do it


OOoOO. Great idea, and simple! Sold.


Captain Rob & Admiral Alyson
"David Buoy"-1985 C25 SK/SR #5053
Go to Top of Page

islander
Master Marine Consultant

Members Avatar

USA
4010 Posts

Response Posted - 03/04/2015 :  10:29:19  Show Profile
If your talking about the tiller rubbing on the transom my fix was to screw a small strip of plastic cutting board to the underside of the tiller. The plastic is softer than the fiberglass so it takes the wear and eliminates squeaking. It also raised the tiller just enough that it now clears my legs without having to lift it up. I also put a dab of grease between the metal brackets and the rudder to stop the wear on the rudder head. In a perfect world the tiller isn't supposed to touch the transom and is supposed to be supported by the small indentation molded into the rudder head but over time and wear and tear.......

Scott-"IMPULSE"87'C25/SR/WK/Din.#5688
Sailing out of Glen Cove,L.I Sound


Go to Top of Page

DavidBuoy
Admiral

Members Avatar

USA
707 Posts

Response Posted - 03/04/2015 :  10:35:00  Show Profile
My problem is actually that the end of the tiller sticks out past the indentation and hangs down without touching the transom. I drilled the hole in the new rudder a little to far forward. I really think the rope solution is ideal.


Captain Rob & Admiral Alyson
"David Buoy"-1985 C25 SK/SR #5053
Go to Top of Page

redeye
Master Marine Consultant

Members Avatar

3475 Posts

Response Posted - 03/04/2015 :  10:58:07  Show Profile
Rope Solution???

I think you might be referring to the tiller tamer..

Anuyhoo... Scott, that plastic strip looks like a winner. I was left with some extra gflex after another repair and it was a spur of the moment action.


Ray in Atlanta, Ga.
"Lee Key" '84 Catalina 25
Standard Rig / Fin Keel
Go to Top of Page

DavidBuoy
Admiral

Members Avatar

USA
707 Posts

Response Posted - 03/04/2015 :  13:37:39  Show Profile
Haha, dual purpose!


Captain Rob & Admiral Alyson
"David Buoy"-1985 C25 SK/SR #5053
Go to Top of Page

redeye
Master Marine Consultant

Members Avatar

3475 Posts

Response Posted - 03/08/2015 :  10:25:58  Show Profile

Ray in Atlanta, Ga.
"Lee Key" '84 Catalina 25
Standard Rig / Fin Keel
Go to Top of Page

DavidBuoy
Admiral

Members Avatar

USA
707 Posts

Response Posted - 03/13/2015 :  04:55:34  Show Profile
Picked up these bad boys for $30 for the pair on ebay. Stout pieces. Going to be part of my adjustable genoa car system.


Captain Rob & Admiral Alyson
"David Buoy"-1985 C25 SK/SR #5053
Go to Top of Page

DavidBuoy
Admiral

Members Avatar

USA
707 Posts

Response Posted - 03/16/2015 :  06:43:23  Show Profile
Recently been so busy working on the new house that I haven't had much time designated to DB, but finally got some time yesterday. I installed cam clutches for the spin-sheets. Installed 6 line organizers behind the cabin-top winches. Installed the mast-gater from CD. Took the flywheel of the outboard and installed an alternator and wiring.

I have been having a problem with the shift linkage on the outboard however, which is the only thing stopping me from putting it back on the boat. See thread here...

http://www.catalina-capri-25s.org/forum/topic.asp?TOPIC_ID=29056


Captain Rob & Admiral Alyson
"David Buoy"-1985 C25 SK/SR #5053
Go to Top of Page

DavidBuoy
Admiral

Members Avatar

USA
707 Posts

Response Posted - 04/15/2015 :  17:32:44  Show Profile
Started something today I hoped to never embark on again.. Sanding my rudder down. Only one season of use but after scrubbing the algae off in prep for a fresh coat of paint I noticed small bubbles/blisters forming underneath. Took that to mean my barrier coat didn't stick so back down to the gel coat. Don't mind the bottom painted topside which I a can thank a local marina for. Don't even have it in me to take that down so another season of looking goofy. Another solid day of sanding until I can start applying a new barrier.


Captain Rob & Admiral Alyson
"David Buoy"-1985 C25 SK/SR #5053
Go to Top of Page

DavidBuoy
Admiral

Members Avatar

USA
707 Posts

Response Posted - 04/16/2015 :  17:07:04  Show Profile
Another full day of sanding. Some final touches tomorrow and start barrier coating. This weekend is spreader bracket and other misc rigging. Finish the rudder and other odd items next week and hopefully raise the mast and be sailing for the season next weekend.


Captain Rob & Admiral Alyson
"David Buoy"-1985 C25 SK/SR #5053
Go to Top of Page

DavidBuoy
Admiral

Members Avatar

USA
707 Posts

Response Posted - 04/17/2015 :  19:05:20  Show Profile
Had no idea interlux 2000E had max time before reapplication including before antifoul so I'm pulling an all nighter. 2 coats of the sealer on now, maybe do 5 total tonight and bottom paint. Used gluvit last time and obviously disappointed with the results so hopefully this works out.


Captain Rob & Admiral Alyson
"David Buoy"-1985 C25 SK/SR #5053
Go to Top of Page

Stinkpotter
Master Marine Consultant

Members Avatar

Djibouti
9044 Posts

Response Posted - 04/17/2015 :  19:21:11  Show Profile
quote:
Originally posted by DavidBuoy

Had no idea interlux 2000E had max time before reapplication including before antifoul so I'm pulling an all nighter.
Ya, that's also true with various "no-sand" primers. They want the paint to go on before they completely set up, so the undercoat bonds with the overcoat. Otherwise, the epoxy primer becomes an impervious surface, sorta like Teflon. An Interlux rep at a boat show once told me they had taken a "no-sand" primer off the market because people wouldn't read the instructions, so their paint peeled off. If nobody reads, what can you do??

Dave Bristle
Association "Port Captain" for Mystic/Stonington CT
PO of 1985 C-25 SR/FK #5032 Passage, USCG "sixpack" (expired),
Now on Eastern 27 $+!nkp*+ Sarge
Go to Top of Page

DavidBuoy
Admiral

Members Avatar

USA
707 Posts

Response Posted - 04/17/2015 :  19:33:23  Show Profile
Yea, I'm normally not one for instructions so it almost got me. I just didn't want to do it a third time so I looked into it a bit. It is caustic as hell to! I think I'm dying. Thing will be good to go for years after tonight.


Captain Rob & Admiral Alyson
"David Buoy"-1985 C25 SK/SR #5053
Go to Top of Page

DavidBuoy
Admiral

Members Avatar

USA
707 Posts

Response Posted - 04/17/2015 :  19:52:58  Show Profile
It's funny, looking at pot times and re application times I thought I was screwed. But I cranked up a heater to decrease reapplication times and kept the primer in the fridge to increase pot times. Beat the system suckers!! 4 coats on now, waiting to put the bottom paint on now


Captain Rob & Admiral Alyson
"David Buoy"-1985 C25 SK/SR #5053
Go to Top of Page

Voyager
Master Marine Consultant

Members Avatar

USA
5312 Posts

Response Posted - 04/18/2015 :  08:36:08  Show Profile
Wow! Talk about a boatload of stuff to do! I appreciate you posting your list as it reminded me about changing the oil and spark plugs in the engine and dropping the mast. I've got two 2x4s to make an Aframe. Does anybody know the dimensions center to center for the board lengths? I've got the hardware: pipe nipples and cross bolt and hooks for the forward end. I've got to check my wind vane and replace the bird spike.
I like the idea of adding a set if burgee blocks and halyards to the spreaders. Mine actually hangs off the backstay about 2/3 of the way up. I tied up a small block using an Icicle Hitch knot that I slide up the backstay without dropping the mast. As they say an Icicle Hitch can be tied securely to an icicle and not slide off.

Bruce Ross
Passage ~ SR-FK ~ C25 #5032

Port Captain — Milford, CT
Go to Top of Page

islander
Master Marine Consultant

Members Avatar

USA
4010 Posts

Response Posted - 04/18/2015 :  11:52:30  Show Profile
quote:
Does anybody know the dimensions center to center for the board lengths?

Bruce, If your talking about the distance from the pipe nipple bolt to the bolt up by the stem fitting, Its not that critical but use a tape measure from the forward lower chainplate to a few inches short of the stem fitting. If you remember mine is about 8" or more short of the stem fitting and it works just fine. Don't forget to round the corners of the 2x4 on the pipe fitting side so as it rotates up the corners don't dig/wedge into the deck. Make the bolt holes and bolts loose so the A frame can flex and not bind. I agree, Rob is wearing me out!

Scott-"IMPULSE"87'C25/SR/WK/Din.#5688
Sailing out of Glen Cove,L.I Sound


Edited by - islander on 04/18/2015 11:58:41
Go to Top of Page

DavidBuoy
Admiral

Members Avatar

USA
707 Posts

Response Posted - 04/18/2015 :  12:18:20  Show Profile
New spreader brackets, delrin caps and boots for the spreaders exept the port side that had the bracket slightly bent. Turns out the spreader was slightly bent as well. Going to have a new one expressed Monday. Also removed the step and installed and bedded the mast plate today. Last thing is to get that spreader in and pull the halyards then ready for the season! Rudder is all finished now as well.


Captain Rob & Admiral Alyson
"David Buoy"-1985 C25 SK/SR #5053
Go to Top of Page

DavidBuoy
Admiral

Members Avatar

USA
707 Posts

Response Posted - 04/18/2015 :  12:25:36  Show Profile
Haha and yea I think we've been good caretakers of the boat. Really taken it to a great condition and functioning boat.


Captain Rob & Admiral Alyson
"David Buoy"-1985 C25 SK/SR #5053
Go to Top of Page

islander
Master Marine Consultant

Members Avatar

USA
4010 Posts

Response Posted - 04/18/2015 :  13:20:47  Show Profile
Rob, Being that you are working on the spreaders, Take a very good look at the SS seizing wire under the boots. If its worn or cut replace it now while the boots are off. That wire holds the upper shrouds from jumping off the end of the spreader and that could be a dismasting. It is loosely looped around the shroud to allow the shroud to slide through it as the shroud tightens and loosens from tac to tac. This loosening and tightening has a sawing effect on the seizing wire.http://www.catalina-capri-25s.org/manbro/pictures/4-1-5.gif

Scott-"IMPULSE"87'C25/SR/WK/Din.#5688
Sailing out of Glen Cove,L.I Sound


Edited by - islander on 04/18/2015 13:32:47
Go to Top of Page
Page: of 11 Previous Topic Topic Next Topic  
Previous Page | Next Page
 New Topic  Topic Locked
 Printer Friendly
Jump To:
Association Forum © since 1999 Catalina Capri 25s International Association Go To Top Of Page
Powered By: Snitz Forums 2000 Version 3.4.06
Notice: The advice given on this site is based upon individual or quoted experience, yours may differ.
The Officers, Staff and members of this site only provide information based upon the concept that anyone utilizing this information does so at their own risk and holds harmless all contributors to this site.