Catalina - Capri - 25s International Assocaition Logo(2006)  
Assn Members Area · Join
Association Forum
Association Forum
Home | Profile | Register | Active Topics | Forum Users | Search | FAQ
Username:
Password:
Save Password
Forgot your Password?

 All Forums
 Catalina/Capri 25/250 Sailor's Forums
 Catalina 25 Specific Forum
 Sliding hatch flanges repair
 New Topic  Topic Locked
 Printer Friendly
Author Previous Topic Topic Next Topic  

Tomas Kruska
Admiral

Member Avatar

Czech Republic
522 Posts

Initially Posted - 05/16/2012 :  02:20:23  Show Profile  Visit Tomas Kruska's Homepage
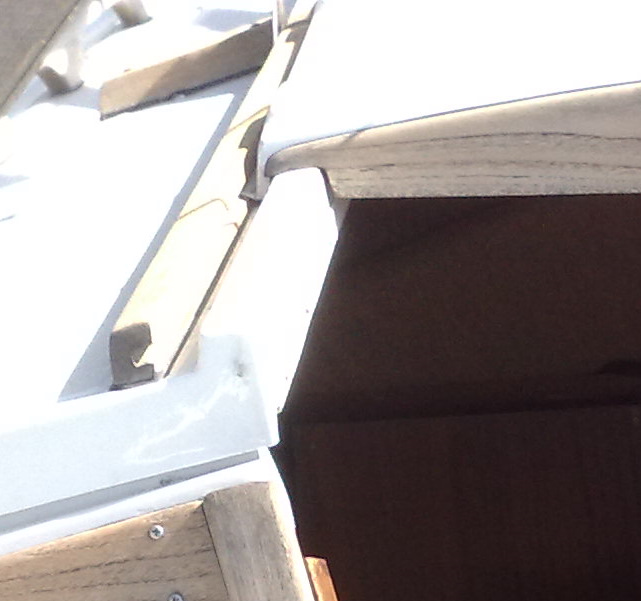
I have worn sliding hatch flanges that needs urgent repair like this guy http://home.comcast.net/~catalina22fleet20/news/rpts/200605/200605.htm but my problem is that the hatch rails are glued to the top deck with black Sikaflex making it nearly impossible to remove it.
Is it possible to remove and reinstall the sliding hatch without removing at least one teak rail? I think its not, but any idea is welcome


Thanks

Dalpol Phobos 21, 2013, Sole Mio, hull #27, current adventures - We sail Phobos 21

PO of Catalina C25, 1978, High Anxiety, hull #701, SR, FK, L-dinette, inboard diesel Volvo Penta MD2010C w/saildrive - more info

Edited by - Tomas Kruska on 05/16/2012 02:21:56

dlucier
Master Marine Consultant

Members Avatar

Virgin Islands (United Kingdom)
7583 Posts

Response Posted - 05/16/2012 :  06:10:04  Show Profile
I had the same problem, worn flanges that caused the screeeeech when opening the hatch. Until a proper rebuild of the hatch could be done, I temporarily installed thin nylon chair slides under the hatch to lift it back up to its original position which eliminated the screech and made the hatch slide so much easier.

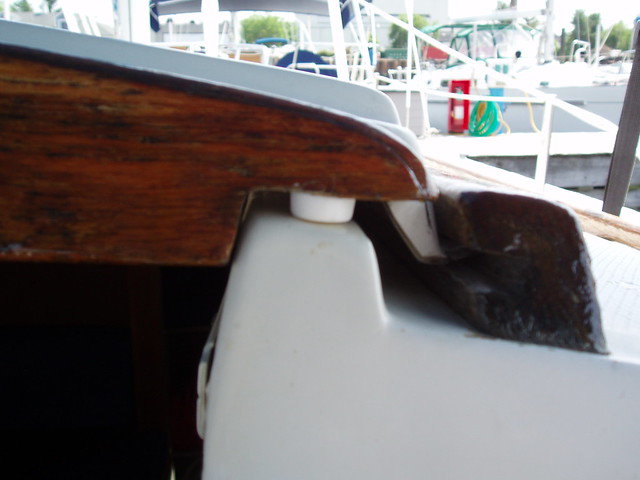
The nylon chair slides I used were about 3/16" thick (the thinner, the better) and about the diameter of a quarter. I first pulled the nail from it, then put a 1/4" wide notch (half the depth of the slide) across the nail side of the slide so it would remain captive under the forward lip of the hatch right over the raised portion of the deck that locks the hatch in. For the aft part of the hatch, instead of notching the slide, I put a little dab of caulk on the slide, lifted the hatch a bit from inside the cabin, then tucked the slide over the raised section.

This temporary $2.00 fix has lasted about ten years now and I'm still using original nylon slides.


Edited by - dlucier on 05/16/2012 06:59:53
Go to Top of Page

trptelf
Navigator

Members Avatar

USA
113 Posts

Response Posted - 05/16/2012 :  07:30:18  Show Profile
That's awesome (chair slides). I love this forum.

If you want to try to remove the rails, I have had success with "Marine Formula" by DeBond, a plastic wedge for prying, and patience.

Edited by - trptelf on 05/16/2012 11:08:53
Go to Top of Page

Sloop Smitten
Master Marine Consultant

Members Avatar

USA
1181 Posts

Response Posted - 05/16/2012 :  08:20:58  Show Profile
Tomas,
There is a lip at the front of the roof, underneath the hatch, about an inch wide that acts as a stop for the hatch to keep it from sliding back too far when open or from coming off the roof when sliding it forward. If your flanges are weak enough to allow you to pry either the back or front of the hatch over that lip you may be able to remove it that way but the risk of breakage is great trying this. Also I have no idea how you would get it back on. Try removing the cover over the hatch if you have not already done so and that may offer some needed relief. All in all, getting those wooden pieces off would be the best alternative. Maybe you could replace them if you need to damage them to remove them.

Edited by - on
Go to Top of Page

Stinkpotter
Master Marine Consultant

Members Avatar

Djibouti
9040 Posts

Response Posted - 05/16/2012 :  09:46:56  Show Profile
I did something very similar to Don's approach. My assessment was that the hatch should not be supported by the outer flanges, but by the raised fiberglass "rail" on the pop-top (or cabintop if there is no pop-top). To me, the flanges are "engineered" only to keep the top from flying off--their design is not good for bearing the load. I used chair slides that had plastic cups instead of nails, notched the cups, and fitted them to the forward edge of the hatch so they rode on the raised rails. That solved it for the remaining 3-4 years I had the boat.

Edited by - on
Go to Top of Page

OJ
Master Marine Consultant

Members Avatar

USA
4382 Posts

Response Posted - 05/16/2012 :  10:38:59  Show Profile
FWIW, the lips on our sliding hatch are worn very thin. Looks like we'll need to add fiberglass when we do this repair.

Edited by - on
Go to Top of Page

delliottg
Former Mainsheet C250 Tech Editor

Members Avatar

USA
4479 Posts

Response Posted - 05/16/2012 :  11:35:24  Show Profile  Visit delliottg's Homepage
I wonder if I can adapt the chair slides idea to our hatch? I've had to replace the UHMW strips I've been using twice, and they're ready for a third replacement.

Edited by - on
Go to Top of Page

JimGo
Admiral

Members Avatar

USA
962 Posts

Response Posted - 05/16/2012 :  12:06:18  Show Profile
I like the idea of UHMW for these purposes. The "self-wetting" property should make them slide a little better than the nylon. Are they wearing out quickly?

Edited by - on
Go to Top of Page

John Russell
Master Marine Consultant

Members Avatar

USA
3444 Posts

Response Posted - 05/16/2012 :  12:15:06  Show Profile
<blockquote id="quote"><font size="1" face="Verdana, Arial, Helvetica" id="quote">quote:<hr height="1" noshade id="quote"><i>Originally posted by delliottg</i>
<br />I wonder if I can adapt the chair slides idea to our hatch? I've had to replace the UHMW strips I've been using twice, and they're ready for a third replacement.
<hr height="1" noshade id="quote"></font id="quote"></blockquote id="quote">I already have some abrasion at the point the slide goes under the hatch cover. I'd think that putting aything to lift the slier would further complicate that.

Edited by - on
Go to Top of Page

Tomas Kruska
Admiral

Members Avatar

Czech Republic
522 Posts

Response Posted - 05/16/2012 :  12:48:17  Show Profile  Visit Tomas Kruska's Homepage
Thanks for all that ideas. My flanges are already broken in the front so I have to add something against the raised fiberglass rail on the pop-top. Some piece of nylon, teflon or some small roller.

PS: Just ordered Teflon (PTFE) tube 10x1 mm. Attempt #1: I will cut the tube across and slip over the hatch just between the fibreglass rail and the hatch edge in the front. I will inform you after weekend.

Edited by - Tomas Kruska on 05/16/2012 13:20:44
Go to Top of Page

delliottg
Former Mainsheet C250 Tech Editor

Members Avatar

USA
4479 Posts

Response Posted - 05/16/2012 :  13:07:16  Show Profile  Visit delliottg's Homepage
<blockquote id="quote"><font size="1" face="Verdana, Arial, Helvetica" id="quote">quote:<hr height="1" noshade id="quote">I like the idea of UHMW for these purposes. The "self-wetting" property should make them slide a little better than the nylon. Are they wearing out quickly?<hr height="1" noshade id="quote"></font id="quote"></blockquote id="quote">

To prevent a further C-250 hijack of a C-25 problem, I've started a [url="http://www.catalina-capri-25s.org/forum/topic.asp?TOPIC_ID=25036"]new thread on this[/url].

Edited by - on
Go to Top of Page

OJ
Master Marine Consultant

Members Avatar

USA
4382 Posts

Response Posted - 05/17/2012 :  07:14:06  Show Profile
Becareful not to make the hatch slide too easily - so it doesn't slide out from underneath your feet when standing on it.

Edited by - on
Go to Top of Page

GaryB
Master Marine Consultant

Members Avatar

USA
4291 Posts

Response Posted - 05/19/2012 :  21:09:09  Show Profile
I think there's some stuff called Japanese slide tape or something similar. It may be the same as the UHMW strips mentioned above.

Edited by - on
Go to Top of Page

Tomas Kruska
Admiral

Members Avatar

Czech Republic
522 Posts

Response Posted - 05/21/2012 :  01:45:22  Show Profile  Visit Tomas Kruska's Homepage
@dlucier: can you please make some photos please? I think its not really clear to me.

I've bought pretty rigid teflon tube and put it on fore part of the hatch
It holds on place and helped a lot as the aft part of the flanges seems to be still working.

Edited by - on
Go to Top of Page

islander
Master Marine Consultant

Members Avatar

USA
4007 Posts

Response Posted - 05/26/2012 :  14:28:45  Show Profile
So I did the chair slide thing Don had done. Works great and easy to do. I cut the nails a bit so as not to split the teak and used some channel lock pliers to drive them into the teak. Now I have to get to the back ones. Thanks Don.

Edited by - on
Go to Top of Page

dlucier
Master Marine Consultant

Members Avatar

Virgin Islands (United Kingdom)
7583 Posts

Response Posted - 05/26/2012 :  19:19:57  Show Profile
<blockquote id="quote"><font size="1" face="Verdana, Arial, Helvetica" id="quote">quote:<hr height="1" noshade id="quote"><i>Originally posted by islander</i>
<br />So I did the chair slide thing Don had done. Works great and easy to do. I cut the nails a bit so as not to split the teak and used some channel lock pliers to drive them into the teak. Now I have to get to the back ones. Thanks Don.<hr height="1" noshade id="quote"></font id="quote"></blockquote id="quote">

You're welcome, Scott.

As to the nails in the chair slide, I pulled them out completely and only used the nylon part.

One thing you may find, especially with the thicker slides, is that after placing the slides on the forward part of the hatch it may raise the hatch too much resulting in the flanges binding against the top portion of the teak channels.

Edited by - on
Go to Top of Page
  Previous Topic Topic Next Topic  
 New Topic  Topic Locked
 Printer Friendly
Jump To:
Association Forum © since 1999 Catalina Capri 25s International Association Go To Top Of Page
Powered By: Snitz Forums 2000 Version 3.4.06
Notice: The advice given on this site is based upon individual or quoted experience, yours may differ.
The Officers, Staff and members of this site only provide information based upon the concept that anyone utilizing this information does so at their own risk and holds harmless all contributors to this site.