Catalina - Capri - 25s International Assocaition Logo(2006)  
Assn Members Area · Join
Association Forum
Association Forum
Home | Profile | Register | Active Topics | Forum Users | Search | FAQ
Username:
Password:
Save Password
Forgot your Password?

 All Forums
 Catalina/Capri 25/250 Sailor's Forums
 Catalina 25 Specific Forum
 Companionway Leak
 New Topic  Topic Locked
 Printer Friendly
Author Previous Topic Topic Next Topic  

fpill
1st Mate

Member Avatar

USA
51 Posts

Initially Posted - 05/03/2009 :  08:28:10  Show Profile
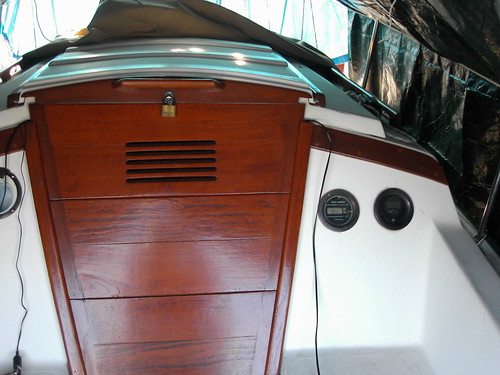
I have just installed my re-finished teak. (Thanks to everyone that suggested Cetol Natural) I am pleased with the results. I have one problem however. I now have small gaps at the top of the companionway. I just bought the boat this past fall, and don't remember it looking or leaking this way. I'm assuming (I know what happens when I assume) that somehow I did not reinstall the teak correctly. I have already taken it off once to try and move it around, but with where the screw holes are this seems to be how they fit.

Could someone post pictures of their companionway and/or tell me what I'm doing wrong.

Thanks


Frank
1978 C25 #488
SR/WK
West Islip, NY

Edited by - on

Dave Bristle
Master Marine Consultant

Members Avatar

Djibouti
10005 Posts

Response Posted - 05/03/2009 :  09:05:03  Show Profile
That looks right--there're always some little gaps at the corners, although the trim on my slider generally just about contacted the top of the upper hatch board. I wonder if your pop-top is being held up a little--is it "dogged down" tightly?

Nice job on the teak!

Edit: This is why many people have made canvas hatch covers--that and protection of the finish. I suspect you can find some pictures if you "Search" for them.

Edited by - Dave Bristle on 05/03/2009 09:07:19
Go to Top of Page

Dave Bristle
Master Marine Consultant

Members Avatar

Djibouti
10005 Posts

Response Posted - 05/03/2009 :  09:10:34  Show Profile
(Thinking, thinking.......) Here's something: Consider putting a strip of high-density, adhesive-backed foam weather-stripping along the bottom of the bottom hatch board. That could raise all three boards meet the slider, and also seal the threshold a little better. Just a thought...

Edited by - on
Go to Top of Page

JohnP
Master Marine Consultant

Members Avatar

1520 Posts

Response Posted - 05/03/2009 :  14:44:15  Show Profile
Or, alternatively, you could add a matching wooden strip under the bottom hatchboard that would form a lip on the wood of the companionway, if you don't already have one. My friend's 1982 C-25 has one, my 1978 C-25 does not, and my companionway leaked until I covered it routinely with the Sunbrella cabin cover from CD that was left on the boat but never installed by the PO.

With this additional wood strip epoxied into place, rain water would drip down to the sill but run off only on the outside into the cockpit instead of dripping inside and outside. You could experiment with heights and widths before finishing the piece and attaching it. It could raise the boards to make a better fit on top, like Dave said, too.

Edited by - on
Go to Top of Page

Deric
Captain

Members Avatar

USA
408 Posts

Response Posted - 05/03/2009 :  16:18:24  Show Profile
I had water coming in via the companionway as well. I just don't think they are supposed to be designed as a super tight fit.

Go to the link below to see my solution. I made a cover that covers the sliding rails and a cover the covers the companionway. The companionway cover tucks under the larger cabin top cover.

No more leaks.

http://www.myteacherpages.com/webpages/DTallman1/files/DSC01034.JPG

Deric

Edited by - on
Go to Top of Page

Voyager
Master Marine Consultant

Members Avatar

USA
5352 Posts

Response Posted - 05/03/2009 :  17:09:42  Show Profile
Frank -
I re-did my teak in '08 and I had a real problem with the threshold.

When I removed it, it broke into a few pieces. But because of the wear and tear the threshold receives, I decided that I would not glue it back together and re-use it.

So I checked with CD and they sell a replacement, but I wasn't sure whether that was the right one.

I had a nice chunk of teak and the pieces of the old threshold, so I made one using my table saw, my sabre-saw, my sander and lot of elbow grease.

My problem was that I made my threshold a little too thick. It pitched down into the cockpit correctly (away from the cabin), but when I put the crib boards in place in the companionway, I could not get my slider to close.

So, it again took my sander and shaved it and shaved it until everything just fit.


From the looks of your top crib board, the threshold needs a spacer underneath on the starboard side. I can't see the port side in your photo, but the starboard side looks about 1/4" - 1/2" too low.

Rather than adding a strip to the bottom crib board, you might try removing the threshold and putting a tapered shim across the bottom to level it up. For example, it might be 1/8" on the port side and 3/8" on starboard.

Before you reattach the threshold, make sure to fill the gaps underneath with polysulfide caulk, AKA 3M 101 Polysulfide Marine Sealant or equivalent. This should prevent leaks into the cabin under the threshold.

Edited by - on
Go to Top of Page

fpill
1st Mate

Members Avatar

USA
51 Posts

Response Posted - 05/04/2009 :  06:42:45  Show Profile
Thanks for all of the suggestions.

<b>Bruce:</b> I like the idea of the trim piece under the threshold, but I have a concern. The threshold piece height should have an effect on the placement of the side pieces of the companionway. Does raising the threshold have any <u>negative</u> effect on the placement of the other pieces?

I noticed in your picture that you still have wires running through the top of the companionway. Do you have problems with leaks at those spots?


<b>All:</b> I think for a first step I'll try the weather stripping. If I don't like it, I can always remove it and try shimming the threshold.

Thanks Again,

Edited by - on
Go to Top of Page

dlucier
Master Marine Consultant

Members Avatar

Virgin Islands (United Kingdom)
7583 Posts

Response Posted - 05/04/2009 :  07:55:25  Show Profile
Looking at the two top hatchboards in the pictures above, it appears your top hatchboard is narrower than Voyagers.

Edited by - on
Go to Top of Page

hillerji
1st Mate

Members Avatar

USA
37 Posts

Response Posted - 05/04/2009 :  12:56:09  Show Profile
Bruce,

Wondering what you used on your teak? The Cetol as well like Frank. I'm interested because I have mine stripped right now waiting to be coated. Also, where does Teak Oil fit in the mix?

Thanks for any advice,
Jon

Edited by - on
Go to Top of Page

jerlim
Master Marine Consultant

Members Avatar

USA
1484 Posts

Response Posted - 05/04/2009 :  13:30:59  Show Profile
We made a sunbella cover like Frank's.

Edited by - on
Go to Top of Page

Prospector
Master Marine Consultant

Members Avatar

Canada
3159 Posts

Response Posted - 05/04/2009 :  15:02:35  Show Profile  Visit Prospector's Homepage
<blockquote id="quote"><font size="1" face="Verdana, Arial, Helvetica" id="quote">quote:<hr height="1" noshade id="quote"><i>Originally posted by hillerji</i>
<br />Bruce,

Wondering what you used on your teak? The Cetol as well like Frank... Also, where does Teak Oil fit in the mix?

Thanks for any advice,
Jon
<hr height="1" noshade id="quote"></font id="quote"></blockquote id="quote">

Oh boy, here we go. Its really a personal choice, although some claim that in warmer areas the oil will blacken quickly. I just redid my grabrails and sliders with Cetol, and am very happy. Easy to apply, quite forgiving, and looks good to me.

Our boat came with a mixed bag of cetol, unfinished, and varnished wood. Personally, I wouldn't use varnish after seeing th econdition of some of the varnished areas.

As for the OP about spacing - we have a sizeable gap between the top board and the "hood," however, we don't get water comin in through there. The wood on the "hood" is thick enough that it overhangs the crib boards so the drips are over the boards by a wee bit - but its enough. When I took the board off the "hood to refinish it, I was surprised to find a thick layer of silicone behind it - that may be what was pushing it out, and we may end up with similar problems on reassembly. Thanks for posting - I will treat this as a heads-up.

Edited by - on
Go to Top of Page

Sloop Smitten
Master Marine Consultant

Members Avatar

USA
1181 Posts

Response Posted - 05/05/2009 :  08:40:06  Show Profile
When I last refinished my crib boards I placed insulation in the bottom of the side channels that the boards slide into. This snugged them up nicely and raised them just slightly. I don't think you will get anymore water inside from the gap at the top then you will see from the vents in the top board. If you have a wind driven rain you will get some water regardless if you do not have a cover of some sort.

Edited by - on
Go to Top of Page

skrenz
Captain

Members Avatar

USA
351 Posts

Response Posted - 05/06/2009 :  16:23:32  Show Profile
I have to disagree with all of the posts about putting in any kind of solid spacer on the bottom of the bottom hatch board. The opening for the hatchway is a taper. That means that if you lift up on the bottom board and hence all of the hatch boards the side to side fit is going to get way too sloppy in the taper. Much better would be to add to the top of the top board, possibly with a foam strip. The other question is, does the hatchway cover go over the top lip of the hatch boards? It should overhang a little bit. Of course that won't stop blowing spray from coming in.

Edited by - on
Go to Top of Page

fpill
1st Mate

Members Avatar

USA
51 Posts

Response Posted - 05/06/2009 :  17:29:17  Show Profile
Thanks for all the responses.

I did put a strip of flexible rubber weather stripping along the bottom two crib boards. the weather stripping has profile like the letter "D" the flat part of the "D" is where the adhesive is. It is brown and although doesn't look exactly like teak, at first glance it is not bad. It has sealed the bottom board that is in contact with the threshold. It has also pushed up the other boards to make the openings at the top and sides smaller. It does not push up enough to move the boards out of the side rails. I did have the weather stripping on all three boards, but it lifted them too high and the pop top cover did not slide over the top like Steve mentioned. I may even remove the piece from the middle crib board, as the pop top cover just makes it over the boards.

Here on Long Island the worst weather comes in from the East. That is the way the crib boards face while the boat is at my home. Once in the slip (Saturday I hope) the boards will face West. I'll see if that makes a difference.

Thanks Again,

Edited by - on
Go to Top of Page

Voyager
Master Marine Consultant

Members Avatar

USA
5352 Posts

Response Posted - 05/07/2009 :  21:13:45  Show Profile
Sorry - I've been away a while.
The wires are for the solar panels, and I have a plan to run them through the starboard cockpit scuppers. No leaks in the crib boards, only from the windows, which I cover with a sunbrella tarp.

The finish. I used 6 coats of Deks Oljes (spelling), then I covered that with six coats of Sikkens Cetol. The stain, not the clear with a less than gloss but more than matte finish. The Deks is like teak oil that soaked into the wood, and then the Sikkens covered and protected the Deks.

I just started subscribing to Practical Sailor, and the first article I read was about Teak finishes. They panned Deks (alone) because it did a bad job of protecting the finish, but since I coated it over with Cetol, it is holding up well. I will give everything a quick wash and another coat of Cetol next week, to keep it looking good.

Edit - they loved the Interlux Cetol, which is really the Sikkens stuff you can purchase for $50 a gallon at the local paint shop

Edited by - Voyager on 05/07/2009 21:15:20
Go to Top of Page
  Previous Topic Topic Next Topic  
 New Topic  Topic Locked
 Printer Friendly
Jump To:
Association Forum © since 1999 Catalina Capri 25s International Association Go To Top Of Page
Powered By: Snitz Forums 2000 Version 3.4.06
Notice: The advice given on this site is based upon individual or quoted experience, yours may differ.
The Officers, Staff and members of this site only provide information based upon the concept that anyone utilizing this information does so at their own risk and holds harmless all contributors to this site.