|
|
|
|
|
|
|
|
|
|
|
|
|
|
|
|
|
|
|
|
|
|
|
|
|
|
|
|
|
|
|
|
|
|
|
|
|
|
|
|
|
|
|
|
|
|
|
|
|

 Sunrise - "Below decks" Autopilot Installation
 This tip submitted by Christopher A. Chung
System Overview
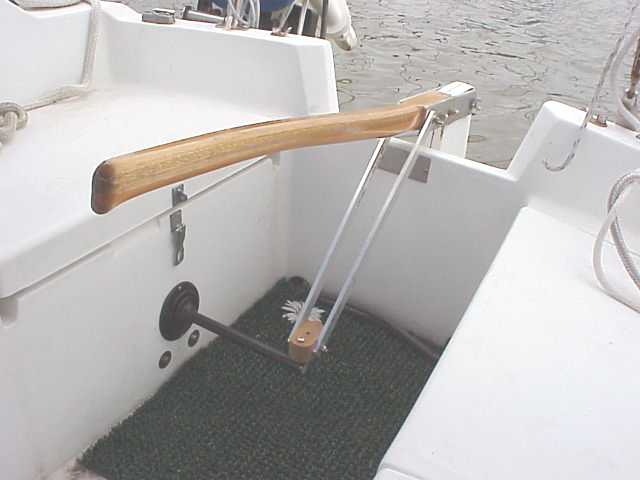
I decided to mount my Autohelm 2000 below decks in order to keep it out of the way, not have to reinstall it each time I wanted to use it, and to increase its longevity. Figure 1 illustrates the completed installation. The system that I used is fairly flexible in that it can be quickly engaged and instantaneously disengaged in an emergency. When not in use, the tiller arm only sticks out a couple and inches and the connecting bars can swing out of the way underneath the tiller when not in use. The rubber boot keeps out the water when in use and rain at the dock.
There are a lot of interactions with the positioning of the various components in this installation. For this reason, I would make sure that you understand how all the parts must fit together. If any of the parts are not positioned correctly, you may not be able to reach the control buttons or the tiller arm may not be able to extend properly or will get in the way when not in use.
To do this project you need:
One tiller autopilot, I don't think it matters what make or model as long as you can extend it with:
One extension rod
One flexible rubber boot
36 inches of 1inch wide, .25 inch thick aluminum or stainless bar stock
One small teak pad
Two 0.25 x 2.0 lag screws
Assorted length 0.25x20 machine screws, nuts, and wing nuts.
Four .25 inch nylon washers
One 2x4x24 inch piece of wood
Two small teak plugs
Assorted tools
Autopilot preparation
The arm on the Autohelm is not long enough to reach from inside the quarterberth to a point past the center of the cockpit. In order to reach this far, you must also acquire a tiller arm extension. Put the plastic end fitting away. To make the hole that the bolt on the connecting bar will fit through, you will need to drill a 0.25 inch hole through the tiller arm extension. Where exactly you drill this hole is a function of the length of the tiller extension, how far back you want mount the autopilot on the 2x4 and how far past the center of the cockpit you want the arm to extend. You can saw off the excess length of the tiller extension.
Cutting the Holes
The installation consists of cutting out ports on the inside of the shallow starboard locker and the starboard side of the cockpit well. Since the wall of the cockpit is hollow, you will need to insert the two teak plugs in the wall. Since you will already have a huge hole for the tiller arm to go through, you can slide the plugs in through there. You have to secure the 2x4 to the cockpit wall, so you can use the same bolts or lag screws to go through the center of the teak plugs. The rubber boot also needs to be secured to the wall of the cockpit with very small machine screws.
The hole on the inside of the locker should be cut as close to the wall as possible. It may be necessary to file off one segment of the mounting ring in order to get it close to the edge. If you cut the hole too far out, it will be difficult to reach the control buttons.
Interface
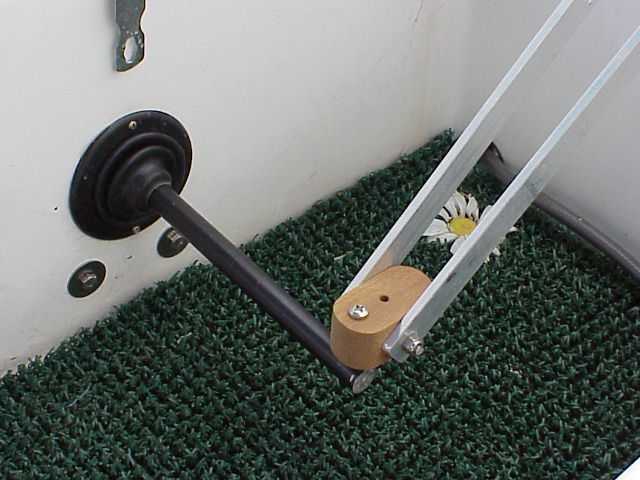
Figure 2 illustrates how to prepare the teak pad is drilled horizontally to attach to the lower end of the connecting bars. Another hole is drilled for a machine screw or quick disconnect pin that will fit through the tiller arm.
Connecting Bar
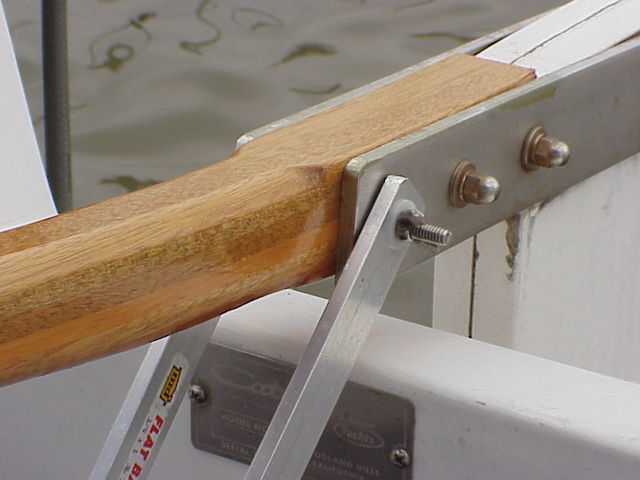
Figure 3 illustrates the mounting of the connecting bar to the tiller plates. This method is really nice since you do not have to modify your tiller in any way. Your tiller cover will also probably still fit. The connecting bar is made by cutting the original bar into two 18 inch lengths. Drill centered 0.25 inch holes between 0.50 and 0.75 inches from each end. The top end fits through the last set of bolts on the tiller plate. This bolt should have a wing nut to easily adjust the tension on the connecting bar. You are likely going to have to replace this bolt with a longer one with the additional connecting bar thickness. You can use the nylon washers to separate the aluminim connecting bar from the stainless tiller plates.

Access Port
Figure 4 illustrates the open 4 inch Beckson inspection port. When underway you can set the autopilot by accessing the controls through the open inspection port.
Mounting
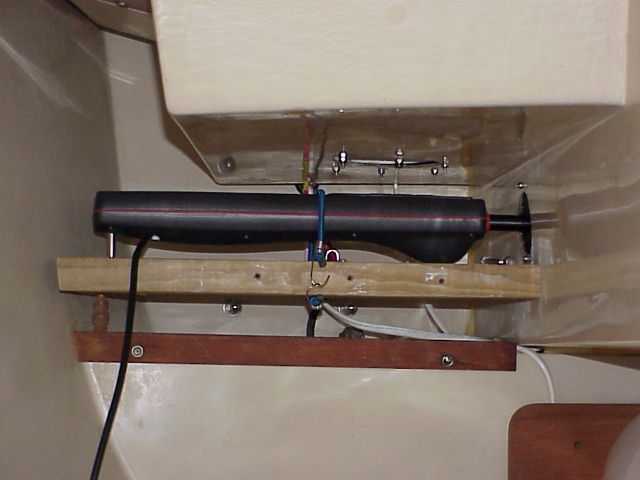
Figure 5 illustrates the interior mounting of the tiller autopilot. The wood should extend from the inside wall of the cockpit well to the starboard side of the hull. You can also secure it to the piece of teak on the back shelve.
How far back the tiller mounting pin should be drilled depends on how long your tiller arm with extension is. The best way to do this is to find the mid point of the arm throw with the extension. Position the tiller on the wood with the tiller arm hole centered in the cockpit. The point for the pivot on the bottom of the autopilot can then be marked on the piece of wood.
Final Comments
I have found that when I have to make a lot of corrections that it is inconvenient to have to open up the cockpit locker. It is a lot of trouble if you have more than a couple people in the cockpit. I am planning on buying the 600R remote unit so that I don't have to open up the locker anymore. If I get the remote unit, I will also be able to control the autopilot from anywhere on the boat.