Catalina - Capri - 25s International Assocaition Logo(2006)  
Assn Members Area · Join
Association Forum
Association Forum
Home | Profile | Register | Active Topics | Forum Users | Search | FAQ
Username:
Password:
Save Password
Forgot your Password?

 All Forums
 Catalina/Capri 25/250 Sailor's Forums
 Catalina 25 Specific Forum
 Damage in difficult area
 New Topic  Reply to Topic
 Printer Friendly
Author Previous Topic Topic Next Topic  

ctrout
Deckhand

Member Avatar

USA
10 Posts

Initially Posted - 11/07/2022 :  18:27:12  Show Profile  Reply with Quote
Here's some video Itook trying to give a pictureof the damage:
https://m.youtube.com/watch?v=TIrF_cSVxow

Unfortunately, during my pre purchase inspection of this boat I focused my inspection of the deck to the forward deck, looking for soft spots and cracking around the mast step and chainplates. I didn't notice this damage that I feel may be more challenging to address. Can't look back and beat myself up now. I can only take it as a hard lesson learned, move forward, and make the proper repairs.

Anyway, I'm looking for information, hopefully pics and/or videos of the underside of the areas that I need to address. Also, any video tutorials showing repairs specific to this part of the boat. I've already watched dozens of more generalized tutorials so I'm confident enough on theory but still wanting to see how a pro might lay the glass in this area.

Am I correct in my belief that the wood shown in my video was just a previous owner's way of performing a poor, band-aid fix and that any wood decking should have been sandwiched between two layers of glass?

Edited by - ctrout on 11/07/2022 19:41:50

hlprmnky
1st Mate

Members Avatar

USA
39 Posts

Response Posted - 11/08/2022 :  12:17:26  Show Profile  Reply with Quote
I wasn’t able to listen to your video, just watch it, but I would say that the wood under the coaming was meant to be a backing plate for the hardware that is through-bolted there, not an attempt to replace the damaged coaming deck. I cannot say much good about what I see in the bilge; I assume this is a swing-keel? I have a fin keel so I don’t have any experience with what parts of that are structural, but there is zero un-glassed wood in my fin keel bilge and that seems correct to me. Rain or even condensation as a hot, humid day cools after sundown can put a noticeable amount of water down there.

1985 C25 SR/FK/Trad. “Puffin III” - #5040
Sailing Lake Michigan out of Michigan City, IN
Go to Top of Page

ctrout
Deckhand

Members Avatar

USA
10 Posts

Response Posted - 11/08/2022 :  13:31:24  Show Profile  Reply with Quote
quote:
Originally posted by hlprmnky

I wasn’t able to listen to your video, just watch it, but I would say that the wood under the coaming was meant to be a backing plate for the hardware that is through-bolted there, not an attempt to replace the damaged coaming deck. I cannot say much good about what I see in the bilge; I assume this is a swing-keel? I have a fin keel so I don’t have any experience with what parts of that are structural, but there is zero un-glassed wood in my fin keel bilge and that seems correct to me. Rain or even condensation as a hot, humid day cools after sundown can put a noticeable amount of water down there.


The bilge is never shown in this video. I think what you are referring to is the underside of the Starboard coaming behind the teak panels above the quarter berth.

Can you confirm whether the area where the damage is should have core material between the fiberglass or if it came from Catalina with no core and just laminatedglass in that area?
Go to Top of Page

hlprmnky
1st Mate

Members Avatar

USA
39 Posts

Response Posted - 11/08/2022 :  14:43:38  Show Profile  Reply with Quote
Aha! Watched again with narration this time; I missed a critical 180-degree turn into the quarter berth (and 180-degree turn from looking down to up) and thought you were poking the camera down into the bilge, which I think would have been Not Okay.

My SR/FK boat does also have those teak covers for cutouts above the quarter berth; they are for exactly the purpose you’re using them for, inspection and maintenance of the backing plates and securing hardware for through-bolted deck hardware. I have not opened mine up yet, nor have I drilled through the coaming, but my suspicion is that the cockpit/coaming molding area is *not* cored, just because it would be so complex to get those narrow, curved shapes fitted properly. The transom itself *is* cored, which I know because I added a through-hull for an electric bilge pump output hose this season.
I don’t know the answer with certainty, but I would be unsurprised to learn that those pieces of teak are factory-original backing plates for the cleats, etc. that were not glassed in because it would be challenging and expensive to do, and that their succumbing to dry rot has left the hardware “backed” by them in the same structural-support limbo as a deck with rotted coring material. I hope others with more experience and knowledge chime in as well, but I think you will probably want to replace those boards, maybe with same-sized pieces of G10 or at least fresh marine plywood with a good dousing of epoxy to seal them up well, and then use actual thickened epoxy and fairing compound to re-do the “repair” the PO put in place.

1985 C25 SR/FK/Trad. “Puffin III” - #5040
Sailing Lake Michigan out of Michigan City, IN
Go to Top of Page

ctrout
Deckhand

Members Avatar

USA
10 Posts

Response Posted - 11/08/2022 :  15:47:28  Show Profile  Reply with Quote
quote:
Originally posted by hlprmnky

Aha! Watched again with narration this time; I missed a critical 180-degree turn into the quarter berth (and 180-degree turn from looking down to up) and thought you were poking the camera down into the bilge, which I think would have been Not Okay.

My SR/FK boat does also have those teak covers for cutouts above the quarter berth; they are for exactly the purpose you’re using them for, inspection and maintenance of the backing plates and securing hardware for through-bolted deck hardware. I have not opened mine up yet, nor have I drilled through the coaming, but my suspicion is that the cockpit/coaming molding area is *not* cored, just because it would be so complex to get those narrow, curved shapes fitted properly. The transom itself *is* cored, which I know because I added a through-hull for an electric bilge pump output hose this season.
I don’t know the answer with certainty, but I would be unsurprised to learn that those pieces of teak are factory-original backing plates for the cleats, etc. that were not glassed in because it would be challenging and expensive to do, and that their succumbing to dry rot has left the hardware “backed” by them in the same structural-support limbo as a deck with rotted coring material. I hope others with more experience and knowledge chime in as well, but I think you will probably want to replace those boards, maybe with same-sized pieces of G10 or at least fresh marine plywood with a good dousing of epoxy to seal them up well, and then use actual thickened epoxy and fairing compound to re-do the “repair” the PO put in place.


G10 sounds like an excellent idea. My plan of attack is shaping up like this... remove hardware, remove all compromised material, apply several layers of glass from underneath, apply remaining glass above and blend/gelcoat, reinstall hardware with G10(or similar) backing. I'm hoping that I can pull this repair off for less than $500 including tools and materials.
Go to Top of Page

Voyager
Master Marine Consultant

Members Avatar

USA
5308 Posts

Response Posted - 11/08/2022 :  22:43:03  Show Profile  Reply with Quote
Hey CTrout — My C-25 has several teak covers protecting the holes on the underside of my cockpit coaming. I use one to pass a 12VDC cable up to an outlet in the cubby in the starboard side of the cockpit. I can plug in a light, my handheld GPS, etc right there. Very convenient.
The pieces of board on Passage are perfectly dry and intact, but if they were dry rotting or wet and deteriorating, I’d definitely replace them. I’ve found that 1/4” teak plywood is a good substitute, especially if you impregnate it with teak oil or Tung oil. It protects the wood pretty well from water intrusion. You could also coat the pieces with wood oil, then polyurethane them with spar urethane or Danish oil.
I can’t remember whether there are two pieces on each side or just one. I think that there’s also a piece of unfinished board between the quarterberth and the fender locker, aka the Dumpster. If yours is intact, may I suggest that you treat it with a wood finish of some kind. If it’s rotten, then replace it with 1/4” marine plywood, since nobody will ever see it. You could also get some 1/4” Azek at the home center. While not cheap, it’s reasonable and relatively permanent. It resists rotting and water 100%.

Bruce Ross
Passage ~ SR-FK ~ C25 #5032

Port Captain — Milford, CT
Go to Top of Page

Leon Sisson
Master Marine Consultant

Members Avatar

USA
1889 Posts

Response Posted - 11/12/2022 :  12:47:31  Show Profile  Visit Leon Sisson's Homepage  Reply with Quote
Chris,

I have done some repairs to my 1979 Catalina 25 similar to the type you're faced with.  When I got my C25, it had similar damage to the foredeck from the pulpit bashing against something during a hurricane, followed by poor quality repairs.  I have made modifications inside both P&S coamings.  I eliminated both 'clothes drier' vents, and relocated the stern docking cleats to where the vents were.
 
All of the work described (and lots more) has subsequently withstood over 20 years of use (except for adding cockpit coaming pockets from an older Catalina C22 which was done a couple years ago).

In broad general terms, my advice includes:
  • Do as much of the work from below as practical so as to minimize the amount of cosmetic repairs needed from above.
  • Replace all damaged wood and fiberglass.  Don't try wishful shortcuts such as saturating damaged areas with thin epoxy-like snake oils.
  • Finish deck surface work with gelcoat, not paint.
  • While you're at it, add 'drill-2x-epoxy-fill-redrill' compression sleeves in all fastener deck penetrations.  Let us know if you need more info on that procedure.
  • To further reinforce heavily loaded deck hardware like winches & docking cleats, below deck I added backing plates of fiberglass and fender washers to spread the stress.
  • My personal preference is to use WEST epoxy and related products for repairs, rather than polyester resin.  No doubt other major brands of boat repair epoxy would work just as well.
The side decks and tops of the coamings were originally reinforced with plywood, maybe 3/4" thick.  If you're feeling extra fanatical, stacking thinner plywood would be even stiffer and stronger.  For example, I laminated 1/4" plywood with epoxy and fiberglass, pressed into place with a hydraulic jack, to replace rotted core under the crowned foredeck ahead of the anchor locker.
 
Re:  "Unfortunately, during my pre purchase inspection of this boat... I didn't notice this damage... I can only take it as a hard lesson learned,..."

Let this honest admission serve as a warning to others!  Hire a professional surveyor for any boat costing more than you would be willing to throw away!  (I've hauled multiple Craig's List 'bargains' to the landfill, and am currently trying to recoup my sunk costs in a power boat project I'll never find time to finish.  I can be a slow learner.)

— Leon

— Leon Sisson
Go to Top of Page

ctrout
Deckhand

Members Avatar

USA
10 Posts

Response Posted - 11/18/2022 :  09:57:11  Show Profile  Reply with Quote
quote:
Originally posted by Leon Sisson

Chris,

I have done some repairs to my 1979 Catalina 25 similar to the type you're faced with.  When I got my C25, it had similar damage to the foredeck from the pulpit bashing against something during a hurricane, followed by poor quality repairs.  I have made modifications inside both P&S coamings.  I eliminated both 'clothes drier' vents, and relocated the stern docking cleats to where the vents were.
 
All of the work described (and lots more) has subsequently withstood over 20 years of use (except for adding cockpit coaming pockets from an older Catalina C22 which was done a couple years ago).

In broad general terms, my advice includes:
  • Do as much of the work from below as practical so as to minimize the amount of cosmetic repairs needed from above.
  • Replace all damaged wood and fiberglass.  Don't try wishful shortcuts such as saturating damaged areas with thin epoxy-like snake oils.
  • Finish deck surface work with gelcoat, not paint.
  • While you're at it, add 'drill-2x-epoxy-fill-redrill' compression sleeves in all fastener deck penetrations.  Let us know if you need more info on that procedure.
  • To further reinforce heavily loaded deck hardware like winches & docking cleats, below deck I added backing plates of fiberglass and fender washers to spread the stress.
  • My personal preference is to use WEST epoxy and related products for repairs, rather than polyester resin.  No doubt other major brands of boat repair epoxy would work just as well.
The side decks and tops of the coamings were originally reinforced with plywood, maybe 3/4" thick.  If you're feeling extra fanatical, stacking thinner plywood would be even stiffer and stronger.  For example, I laminated 1/4" plywood with epoxy and fiberglass, pressed into place with a hydraulic jack, to replace rotted core under the crowned foredeck ahead of the anchor locker.
 
Re:  "Unfortunately, during my pre purchase inspection of this boat... I didn't notice this damage... I can only take it as a hard lesson learned,..."

Let this honest admission serve as a warning to others!  Hire a professional surveyor for any boat costing more than you would be willing to throw away!  (I've hauled multiple Craig's List 'bargains' to the landfill, and am currently trying to recoup my sunk costs in a power boat project I'll never find time to finish.  I can be a slow learner.)

— Leon


Thanks for the reply Leon. I am familiar with the overdrill, fill, redrill process for sealing the core at deck penetrations and I plan to so this gradually over time as I reseal all of the deck hardware.

I'd be curious to see photos of the underside of the work you've done on the back of your boat if you have access.
Go to Top of Page

Stinkpotter
Master Marine Consultant

Members Avatar

Djibouti
9044 Posts

Response Posted - 11/18/2022 :  14:28:33  Show Profile  Reply with Quote
quote:
Originally posted by Leon Sisson


Re:  "Unfortunately, during my pre purchase inspection of this boat... I didn't notice this damage... I can only take it as a hard lesson learned,..."

Let this honest admission serve as a warning to others!  Hire a professional surveyor for any boat costing more than you would be willing to throw away!...
I'll add to that (for posterity): Before purchasing (or as a contingency on the purchase), hire a surveyor for anything you can't dispose of in your local dump. That likely includes any fiberglass boat bigger than maybe 14', and all boats with lead or iron keels. You don't ever want it to come to that. A survey will either convince you to walk (or run) away, or it will provide you with a prioritized list of items to address with recommendations on how to do it. You can attend the survey and ask questions. Either is invaluable!

Dave Bristle
Association "Port Captain" for Mystic/Stonington CT
PO of 1985 C-25 SR/FK #5032 Passage, USCG "sixpack" (expired),
Now on Eastern 27 $+!nkp*+ Sarge
Go to Top of Page

Leon Sisson
Master Marine Consultant

Members Avatar

USA
1889 Posts

Response Posted - 11/18/2022 :  17:27:24  Show Profile  Visit Leon Sisson's Homepage  Reply with Quote
Chris,

Re:  "I'd be curious to see photos of the underside of the work you've done on the back of your boat if you have access."

I'll try, access being a key issue.

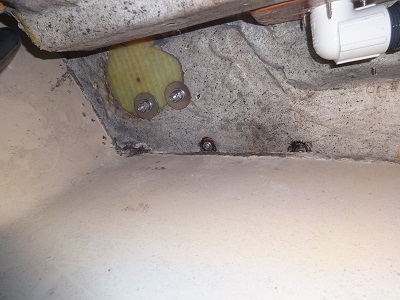
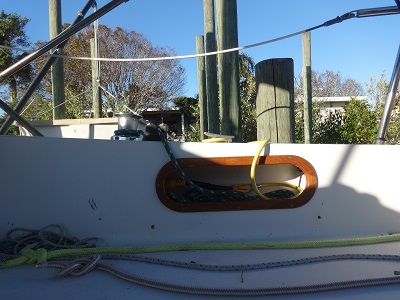
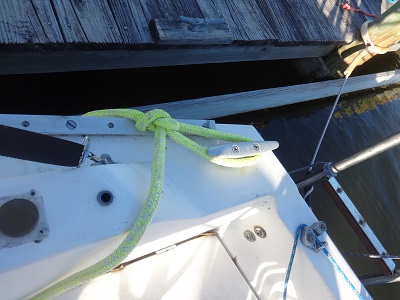
Here's where I replaced the 'dryer vent' with a docking cleat on the port side deck aft of the coaming.


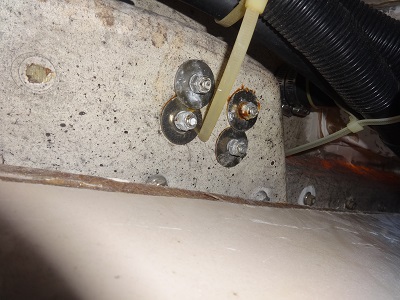
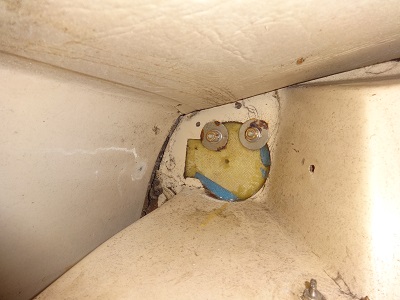
Here are the bolts of the fwd stanchion base of pushpit (aft rail), port side.


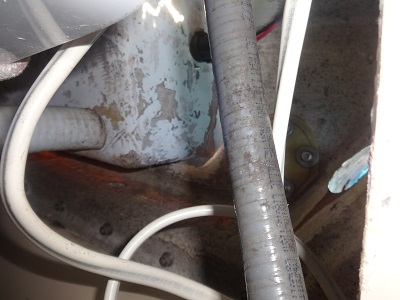
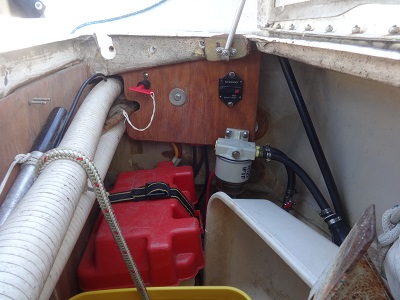
Port primary winch fiberglass backing plate obscured by cockpit coaming pocket, water tank fill hose, misc. ac & DC wiring.


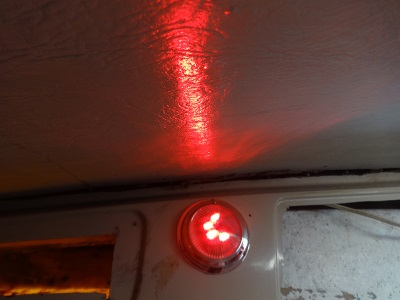
Stbd primary winch fiberglass backing plate obscured by cockpit coaming pocket, shore power input, 12V wire for autopilot of maybe quarterberth light as viewed through opening of one of those removable panels in quarterberth overhead beneath the coaming.  Note opening had to be enlarged to install C22 coaming pocket, which eliminated screw holes for plywood cover.


Aft opening didn't require enlarging for coaming pocket.


Here's where I replaced the 'dryer vent' with a docking cleat on the stbd side deck aft of the coaming.


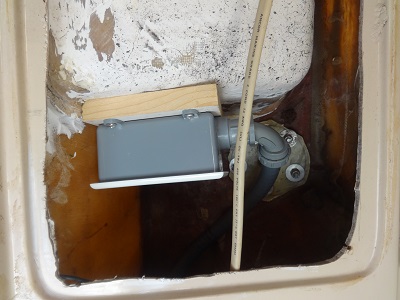
Additional modifications inside the port cockpit locker at the transom.


-Leon Sisson (this is probably going to require some editing...)

— Leon Sisson

Edited by - Leon Sisson on 11/18/2022 17:43:43
Go to Top of Page

ctrout
Deckhand

Members Avatar

USA
10 Posts

Response Posted - 11/18/2022 :  19:35:44  Show Profile  Reply with Quote
Wow, thanks for the pics. That looks like it was a lot of work. Did you bevel the glass underneath when you deleted the "dryer vents" so the new glass had some bite into the old glass?
Go to Top of Page

Leon Sisson
Master Marine Consultant

Members Avatar

USA
1889 Posts

Response Posted - 11/19/2022 :  07:55:59  Show Profile  Visit Leon Sisson's Homepage  Reply with Quote
Chris,

Re:  "Wow, thanks for the pics. That looks like it was a lot of work."

You're welcome, and it was.

Re:  "Did you bevel the glass underneath when you deleted the 'dryer vents' so the new glass had some bite into the old glass?"

I understand what you're asking, however I did that work 25 years ago, and no longer remember the exact details.  I agree providing a mechanical interlock — like countersinking the patch from both sides — would be a good idea.  As I recall, the patch is made up of 3/4" plywood core with thick epoxy fiberglass skins top and bottom, with poured glass reinforced epoxy filler tying it into the surrounding deck.  The top surface is finished with gelcoat tinted to match the original.

Whatever I did seems to be holding up OK.  I've used all four docking cleats and 1/2" line to hold the boat in the middle of a residential canal through multiple hurricanes.

— Leon Sisson
Go to Top of Page
  Previous Topic Topic Next Topic  
 New Topic  Reply to Topic
 Printer Friendly
Jump To:
Association Forum © since 1999 Catalina Capri 25s International Association Go To Top Of Page
Powered By: Snitz Forums 2000 Version 3.4.06
Notice: The advice given on this site is based upon individual or quoted experience, yours may differ.
The Officers, Staff and members of this site only provide information based upon the concept that anyone utilizing this information does so at their own risk and holds harmless all contributors to this site.