Notice:
The advice given on this site is based upon individual or quoted experience, yours may differ.
The Officers, Staff and members of this site only provide information based upon the concept that anyone utilizing this information does so at their own risk and holds harmless all contributors to this site.
Andiamo originally came with a standard length tiller. Over time it began to delaminate even though it always stayed protected with a tiller cover.
One of our forum members had a shortened tiller in great condition so I bought it. Being shorter it really worked very well for single-handing.
I later gorilla glued my old tiller but never refinished it. It's been stored at home in the garage.
Last fall during one of the tropical storms the waves apparently got big enough in the marina that it snapped the "new" tiller so I started looking for the old tiller to refinish and begin to re-use.
Only problem is the old tiller has somehow disappeared off the face of the earth, I've been looking off and on for several months in every place I can think of and it's nowhere to be found. I have the hardware for attaching it to the rudder but the tiller is gone.
Soooo.... does anyone have a suggestion on the best place to get a replacement tiller? Or does someone have a spare tiller in good condition they might want to sell?
GaryB, I remember taking 6" off my tiller because my genoa trimmer (all 250 lbs of him) sitting aft of the winch, complained he got a bruised backside every time we tacked!
Derek Crawford Chief Measurer C25-250 2008 Previous owner of "This Side UP" 1981 C-25 TR/FK #2262 Used to have an '89 C22 #9483, "Downsized" San Antonio, Texas
I'd suggest you make a tiller out of solid white oak or mahogany, but the costs of those woods are so high, I'm not sure you'd save anything, unless you can find a piece of cull lumber, typically at a 70% discount. You'd need about 2" X 8" x 4' long. It's an easy project, especially if the lumber company will cut the outline with it's band saw.
Steve Milby J/24 "Captiva Wind" previously C&C 35, Cal 25, C25 TR/FK, C22 Past Commodore
Steve Milby said: "I'd suggest you make a tiller out of solid white oak or mahogany"
Mine has also delaminated and I'll probably glue it (epoxy) but also make a new one and keep the old as a spare. It doesn't sound like the OP is interested in building a tiller, but if anyone else reading this does I suggest laminating it like the stock tillers are. As a woodworker, the reasons are 1) uses less lumber, 2) no chance of weak or short grain 3) less chance of warping or twisting. I haven't measured my tiller to see how much wood it would take to build out of solid stock, but using Steve's measurements of 2" x 8" x 48" it comes out to 4 board feet (the unit used for hardwood sales) but laminating using the dimensions I took from mine last week 2" x 2" x 48" you only need 1.34 board feet.
These tillers are usually made from mahogany and ash, so with the current price of Ash at my local supplier it would cost about $10 for the ash (I didn't price mahogany) vs $30 out of solid wood. Steve mentioned white oak, which would be an excellent choice and would cost about $12 laminated or $35 solid at MacBeath Hardwood because it's on sale right now. Of course you're trading the cost of material for the labor involved in building forms, resawing, planing, and gluing up a laminated tiller so the argument could be made to spend more $$$ and less time. With that in mind, out of solid wood you need to pay attention to grain direction since you can't literally bend it to your will.
If you choose to build from a single board, make sure you use the straightest grain possible* and orient the blank so the grain runs the direction of the long middle section. That will give you slightly diagonal grain where it approaches and attaches to the rudder, so make sure you've got clear, straight grain there (no knots or wild/strange grain patterns). Save the wild stuff for the other end because if it breaks off in your hand you'll still have enough leverage to steer the boat away from the rocks. I believe the reason Catalina and most boat builders use laminations is for the reasons I mention, and they really don't add much to their labor since they have forms and jigs to bend, glue, and shape the tiller. (we haven't talked about shaping, where predictable grain direction is much easier than changing grain direction... we'll table that)
*If you really wanted to get fancy you'd pick out a board that has grain direction that approximates the curves of the tiller. That's what traditional wooden boat builders/shipwrights would do for places like the knee of the keel where it rises from horizontal to nearly vertical at the bow. They would seek out and save the odd lumber for purposes where they needed to follow the ships curves but wanted the strength of continuous grain. https://upload.wikimedia.org/wikipedia/commons/thumb/e/ea/Krummtr%C3%A4.JPG/1920px-Krummtr%C3%A4.JPG
Paul 1981 Catalina 25 TR/FK Soon to be named either Fiddler's Dream or Fool's Errand depending on what it takes to get her into shape
If you really wanted to get fancy you'd pick out a board that has grain direction that approximates the curves of the tiller. That's what traditional wooden boat builders/shipwrights would do for places like the knee of the keel where it rises from horizontal to nearly vertical at the bow. They would seek out and save the odd lumber for purposes where they needed to follow the ships curves but wanted the strength of continuous grain.
That's what I did. If the grain of the wood follows the curve, it will be strong. If the grain runs across the curve, it will be weak at that point. The benefit of solid wood, of course, is that you'll never have to re-glue a delaminated tiller again. I found a suitable piece out of 3 possible choices. Maybe I was lucky, but the curve of the tiller isn't really extreme, and I don't think it should be too hard to find a suitable piece. I also didn't try to copy the slender, tapered dimensions of the original tiller. I kept it fatter than the original, which made it much beefier. Consequently, I didn't do much shaping. I just rounded over the sharp edges with a router along the length of the tiller and sanded it smooth.
Steve Milby J/24 "Captiva Wind" previously C&C 35, Cal 25, C25 TR/FK, C22 Past Commodore
...As a woodworker, the reasons are 1) uses less lumber, 2) no chance of weak or short grain...
That would be my concern with a solid piece of hardwood cut to that shape. At some point in the curve, you'll probably have the grain crossing from one side of the tiller to the other, creating a weak spot under stress (such as somebody losing their balance, as happened to mine.) I suspect that's the main why all the commercial wood tillers we see are laminated as they are.
Dave Bristle Association "Port Captain" for Mystic/Stonington CT PO of 1985 C-25 SR/FK #5032 Passage, USCG "sixpack" (expired), Now on Eastern 27 $+!nkp*+ Sarge
Laminated tillers are strong when you pull on them sideways, as when steering the boat, but if someone falls down on them, or pushes down too hard, that long lever exerts terrific stress on the end nearest the rudder, and it is not at all uncommon for them to split. For that reason, I drilled 3 holes down through my original laminated tiller, from top to bottom, and put bolts with flat washers through them. Those holes were in between the rudder attachment plates. Their purpose was to add a mechanical support to help the glue keep the tiller from delaminating. That worked for many years until finally the wood in the bolt holes that held the attachment plates to the tiller finally rotted.
The mahogany tiller that I made never broke, but it probably would have if a 200 pound inebriate fell on it. Nevertheless, it was easily strong enough to serve the purpose intended, it was, IMO, probably less vulnerable to damage of that sort than a laminated tiller, and it was completely invulnerable to delamination. The result depends mostly on selecting the right piece of lumber for the job. It's not for everyone, but if you have minimal woodworking skills (mine were minimal), a little time, and enjoy little projects of that sort, you might enjoy it.
Steve Milby J/24 "Captiva Wind" previously C&C 35, Cal 25, C25 TR/FK, C22 Past Commodore
GaryB, I remember taking 6" off my tiller because my genoa trimmer (all 250 lbs of him) sitting aft of the winch, complained he got a bruised backside every time we tacked!
I wasn't sure how much you took off of it but it was just the right size. Was a beautiful tiller with the whipping? you added to it.
I'm going to go with the varnished version. Looks like the one at Defender is a Ruddercraft and is the same price within a few dollars. I'll probably just order it direct from Ruddercraft. My tiller cover got torn when the tiller broke and Ruddercraft has them for $39.00 which is a lot cheaper than Defender.
Tiller, cover, delivery and tax is $232.00. Not too bad.
Now all I have to do is figure out how to drill the holes so they go straight thru from one side to the other so I can get the mounting hardware re-attached.
question about drilling the mounting holes for the hardware. Should these be drilled oversized, filled with epoxy and then redrilled to correct size? Would this add any protection, weaken the tiller, or a wash either way?
GaryB - that tiller had 6 coats of polyurethane on it. Which is why the laminations looked so beautiful. IMHO varnish on a tiller won't hold up.
Derek Crawford Chief Measurer C25-250 2008 Previous owner of "This Side UP" 1981 C-25 TR/FK #2262 Used to have an '89 C22 #9483, "Downsized" San Antonio, Texas
My 15 year old tiller from Ruddercraft was finished in epoxy. It still looks good albeit beginning to show weather on the heel. Years ago I had a Bristol Corinthian and refinished the tiller every other year -- had it stripped by a furniture refinisher then 12 coats of polyurethane varnish. It looked like new for all the years I owned the boat. I would today get a laminated tiller, have it professionally epoxied or 10-12 coats of varnish and just take care of it each season.
Peter Bigelow C-25 TR/FK #2092 Limerick Rowayton, Ct Port Captain: Rowayton/Norwalk/Darien CT
Ruddercraft has the option of getting it finished with epoxy for an additional $67.00 above the base price of the tiller and the tiller comes with a 3 year warranty.
The varnished version is $32.00 or something like that with just the standard warranty.
I will be selling my boat in the next month or two so I'm not worried about having the extra level of protection. If I was keeping the boat I'd definitely go with the epoxy.
Any suggestions on how to drill the holes so they go straight through the tiller? I don't have a drill press.
I sand and polyurethane my tiller every year. It must have 20 coats! Occasionally the poly will crack so I have to sand it back to the wood and spot coat it with 4-5 coats, then poly over the whole tiller with 3-4 more coats. The tiller has held up for the sixteen years that I’ve had it. Can’t argue with success. If I could do it all over again, however, I’d have gone with epoxy to eliminate me refinishing every year.
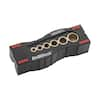
Any suggestions on how to drill the holes so they go straight through the tiller? There is a simple jig you can get from HD or other places. Google Milescraft DrillBlock drill guide jig
Scott-"IMPULSE"87'C25/SR/WK/Din.#5688 Sailing out of Glen Cove,L.I Sound
Any suggestions on how to drill the holes so they go straight through the tiller? There is a simple jig you can get from HD or other places. Google Milescraft DrillBlock drill guide jig
Perfect! I knew our vast and unpaid research department would have a solution.
Thank you Scott.
Thanks again to all of you for your help with this subject.
I would either make a simple jig or use the plates as jigs to mark the holes on both sides, then drill 5/8 of the way through from either side. (5/8 really just means more than halfway and not all the way... don't try to be precise about it! :) ) I'd do that even if I use the doweling jig suggested. That way you're sure that the holes are in the right place at the surface even if they wander a little in the middle somewhere, and you'll be sure not to blow out either side. I also find it easier to be accurate if I start with a smaller hole that's easy to place on my mark and then expand that to the size I need. Those screws are what... 1/4"? (from memory... don't hold me to that.) If that's right I'd drill 1/8" holes from both sides, then either go directly to the 1/4" or if I'm feeling particularly unsure go to a 3/16". I'm not saying that's the right way to approach it... just the approach I'd take from years of experience being disappointed in my ability to drill straight through an object without using my drill press. I would also use a wood bit or Forstner bit... or something with spur cutters like that rather than a typical twist drill. A sharp twist drill will work, but it may tear up the fiberglass fibers a little at the surface.
Paul 1981 Catalina 25 TR/FK Soon to be named either Fiddler's Dream or Fool's Errand depending on what it takes to get her into shape
Notice: The advice given on this site is based upon individual or quoted experience, yours may differ. The Officers, Staff and members of this site only provide information based upon the concept that anyone utilizing this information does so at their own risk and holds harmless all contributors to this site.