Catalina - Capri - 25s International Assocaition Logo(2006)  
Assn Members Area · Join
Association Forum
Association Forum
Home | Profile | Register | Active Topics | Forum Users | Search | FAQ
Username:
Password:
Save Password
Forgot your Password?

 All Forums
 Catalina/Capri 25/250 Sailor's Forums
 Catalina 25 Specific Forum
 What have you fixed/upgraded today?
 New Topic  Topic Locked
 Printer Friendly
Next Page
Author Previous Topic Topic Next Topic
Page: of 11

DavidBuoy
Admiral

Member Avatar

USA
707 Posts

Initially Posted - 05/07/2014 :  05:59:44  Show Profile
Hi all,

I am starting this thread for the forum with the intention of having a running topic for people to post the recent hard work they've put into their Cat 25.

I will lay down a couple rules that should help keep this relevant, helpful and interesting..

1) Please put a "Title" at the top of each post that generally covers what was done. Ex: <b>Repaired Leaky Windows</b>

2) Follow with what you've done, or however you'd like to go about it.

3) Pictures always help! Not necessary, but keep it in mind.

4) Try to keep responses and comments somewhat limited. This thread is not meant to become focused on one or two things but become a "running tab".

5) If there is interest in particular job, request that person create a topic for it so that we can all indulge.

That should cover it. Please keep in mind that I am not trying to be a forum nazi or anything like that, but have seen this work before and become a fun thing. Any suggestions are appreciated!!

Thanks,
Robert L. - David Buoy

Edited by - on

DavidBuoy
Admiral

Members Avatar

USA
707 Posts

Response Posted - 05/07/2014 :  06:09:16  Show Profile
Replaced Whisker Pole Fitting

I'll start us off here. Feel free to join.

Stopped by Annapolis Performance Sailing after work yesterday to see if I could find a new spike end for my whisker pole. Last time I used it there was duct tape involved . They did not have the specific type that fit my 6-12' Forspar pole but thankfully I brought it in to try to fit others. We measured a 1" inner diameter of the pole and finally found something that I felt would work better then the standard spike(although quite pricy). The fitting ended up being 1-1/8" and fit better then anything else after a little sanding. I table sawed off an inch where the inside of the old spike was broken and stuck. I tried everything to get it out before resorting to the saw, but it worked perfectly. JB Welded in the new fitting and lubed up the pole to slide better and now we're back in business!!


Edited by - on
Go to Top of Page

Kennyge
1st Mate

Members Avatar

USA
76 Posts

Response Posted - 05/07/2014 :  06:41:39  Show Profile
BUILT A NEW ROPE LADDER


After all the complaints last year that climbing back onboard after a swim hurt their feet, I found some old rope and wrapped up the transom ladder. Seems more comfortable and easier than drilling holes in stainless steel rungs.

Edited by - on
Go to Top of Page

RAG Sailor
Navigator

Members Avatar

USA
144 Posts

Response Posted - 05/07/2014 :  08:08:38  Show Profile
quote:
Originally posted by Kennyge

BUILT A NEW ROPE LADDER


After all the complaints last year that climbing back onboard after a swim hurt their feet, I found some old rope and wrapped up the transom ladder. Seems more comfortable and easier than drilling holes in stainless steel rungs.


Really nifty idea. I went swimming off of a friend's boat last summer and dreaded having to climb back on board using a similar ladder. This is the first summer I own my boat. I can only imagine your rope idea being a vast improvement if all it does is widen the rungs a bit. Kudos!

Edited by - on
Go to Top of Page

DavidBuoy
Admiral

Members Avatar

USA
707 Posts

Response Posted - 05/08/2014 :  19:48:33  Show Profile
Sailed him with the Pride of Baltimore today

Edited by - on
Go to Top of Page

redeye
Master Marine Consultant

Members Avatar

3475 Posts

Response Posted - 05/09/2014 :  03:41:43  Show Profile
Bokeh... Sweet..Great Shot. Thank you, My new desktop ..

Edited by - redeye on 05/09/2014 03:48:25
Go to Top of Page

Kennyge
1st Mate

Members Avatar

USA
76 Posts

Response Posted - 05/09/2014 :  15:26:39  Show Profile
Today, kinda rainy, I found a cheap way to add lifeline cushions for the cockpit. Only $4.95@ at Toys-R-Us. I had to remove the pelican clips but they went on easily and now I can lean back on the lifelines when I am healing.


Now, if I could just get her back in the water I would be set.

Edited by - on
Go to Top of Page

DavidBuoy
Admiral

Members Avatar

USA
707 Posts

Response Posted - 05/10/2014 :  08:20:10  Show Profile
Picked up some 100LL Aviation fuel for the outboard. Goin ethanol free!

Edited by - on
Go to Top of Page

dmpilc
Master Marine Consultant

Members Avatar

USA
4593 Posts

Response Posted - 05/10/2014 :  08:41:32  Show Profile
I'm adding brakes to my 35 year-old C-22 trailer. Found a never used actuator on Ebay for $50 plus s/h, a DICO Aero-6000, got it installed at a welding shop yesterday. A friend who replaced his disk brakes gave me the ones he took off his trailer, only a year old. We went to the C-22 Nationals in Ft. Walton beach, FL last year and he didn't rinse them enough. One locked up. I bought a rebuild kit for one caliper and replaced the other. I cleaned the old grease out of the hubs this morning, re-greased the bearings, and plan to install them next week and add the brake line kit.
Yesterday, I replaced the blade mandrels (spindels) and belt on my lawn tractor. Works a whole lot better now.

Edited by - on
Go to Top of Page

Rainwater
Deckhand

Members Avatar

22 Posts

Response Posted - 05/10/2014 :  17:58:48  Show Profile
Started to replace the holding tank

I ordered in and was in the process of replacing the original toilet the other day and while disconnecting the old hoses I notices a nice crack in the old holding tank. Explains why the old owner said he stopped using the toilet because it stank. Anyhow, ordered a new TODD replacement tank and refitting a new support and going to plumb most of what I can with PVC to hopefully never have stink smell. Pictures to come.

Edited by - on
Go to Top of Page

oldragbaggers
1st Mate

Members Avatar

USA
47 Posts

Response Posted - 05/11/2014 :  05:23:55  Show Profile  Visit oldragbaggers's Homepage
Cleaning/Removing Interior - Stripping Bottom Paint - Remove Rudder

We began our major refit of Serendipity yesterday. We are thinking we will be on the hard all of this year with launch in the spring so that we can take our time and do a good job. All of our vacation time and holidays this year will likely be spent in the boatyard, weather permitting. Home repairs and teardrop camping will be on hold. But we're off and running and looking forward to the process.

Yesterday we began stripping the layers of bottom paint off. We're using Franmar Soy Strip. We have used it in the past and have found it to be pretty effective and a lot better than scraping/sanding. We have some blisters. Not horrible compared to some boats we have seen. We opened all we saw. The stripping and opening of blisters will take a few days as we're doing it in manageable sections. After it's all stripped and blisters ground out we will just let the hull dry good over the summer before we start repairing it.

Our boat had been unattended, in the water, closed up and damp inside for over 3 years so there is mildew on EVERYTHING. We threw away everything that wasn't part of the boat on the day we took possession of it. Yesterday I started the process of scrubbing and removing all the wood from the interior. I am bringing it all home to clean, sand and varnish. After I get the scrub down (probably multiple scrubdowns) done on the interior I will decide if I am going to paint it or not. Those accordion doors went into the trash. I will replace them with curtains, if at all.

Our rudder is a mess and had several holes in it by the pintles. The way it was mounted was screwy too. Lance took it off and brought it home to assess the condition and see if it is worth repairing or if we should replace it. The tiller was beyond saving. We have already purchased a replacement.

Back to the boatyard today. Love seeing the progress. She is going to be so beautiful when we are done!!

Edited by - on
Go to Top of Page

OJ
Master Marine Consultant

Members Avatar

USA
4382 Posts

Response Posted - 05/11/2014 :  07:49:34  Show Profile
quote:
Originally posted by oldragbaggers

Cleaning/Removing Interior - Stripping Bottom Paint - Remove Rudder

. . . We began our major refit of Serendipity yesterday. We are thinking we will be on the hard all of this year with launch in the spring so that we can take our time and do a good job . . . Back to the boatyard today. Love seeing the progress. She is going to be so beautiful when we are done!!


Lance, Becky, sounds like a very serious endeavor! Hats off to you!
Don't forget the before and after pix!


Edited by - OJ on 05/11/2014 07:50:15
Go to Top of Page

Kennyge
1st Mate

Members Avatar

USA
76 Posts

Response Posted - 05/11/2014 :  10:37:30  Show Profile
Renamed my boat today:


I did not do all the superstitious stuff so hopefully the gods will not be angry. I got the letters made at the boat show in Norwalk and they went on easily.

Edited by - on
Go to Top of Page

redeye
Master Marine Consultant

Members Avatar

3475 Posts

Response Posted - 05/13/2014 :  14:23:03  Show Profile
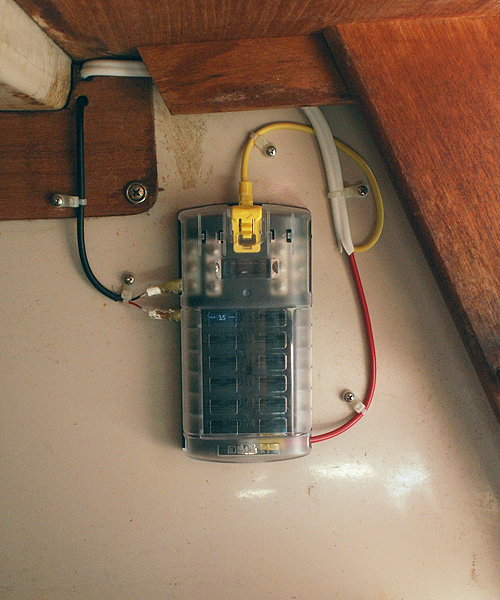
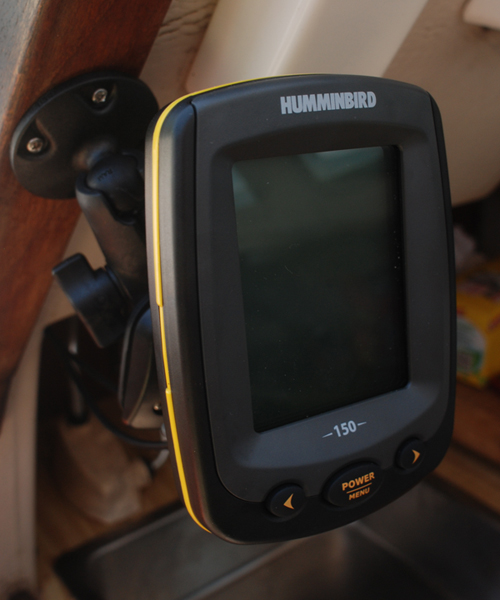
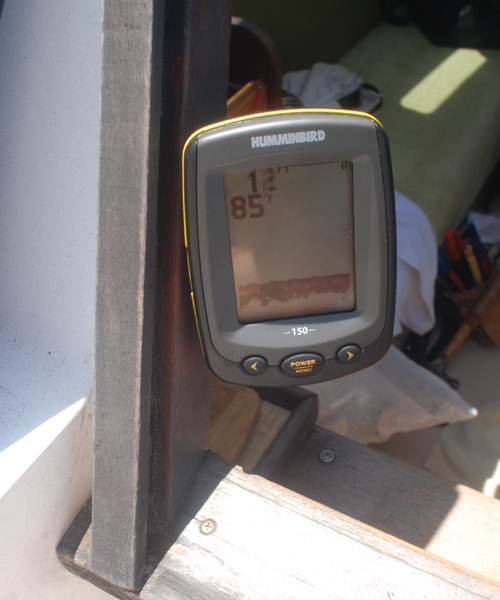
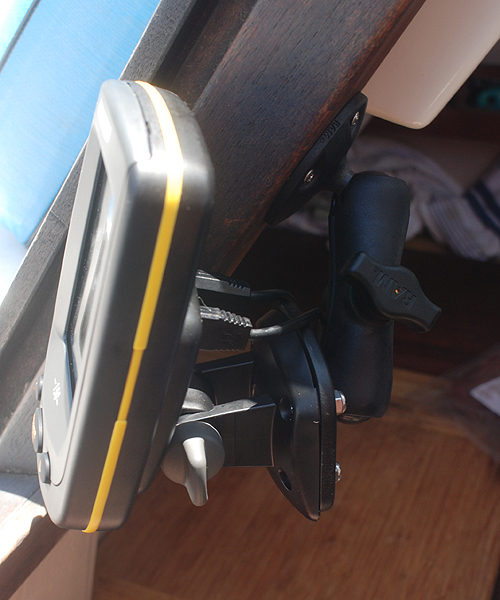
Electrical Subpanel and Depth Gauge


The sensor is under the stove and drops out some at speed with the motor. Havn't sailed with it yet. About the only time I use one is when I anchor. In wax so I may move it forward, but may not.

Edited by - on
Go to Top of Page

DavidBuoy
Admiral

Members Avatar

USA
707 Posts

Response Posted - 05/14/2014 :  06:00:45  Show Profile
Head Sail Pennant

Stopped by APS yesterday to work out a good way to raise the 110 up the forestay for some more visibility. Rather then going wire, they talked me into some high-tech line with a loop spliced on both ends. At first i was going to have it attach to the deck snap shackle then add a shackle on the other end to attach to the tack of the jib. Instead of that we decided to go double the length, go through the tack and have both ends attach to the shackle on the deck there. This would eliminate the need for another shackle. All in all, it should raise the sail 18" and give plenty of visibility. I'll throw the 150 deck sweeper on if I dont want to see anything ahead of me, which I have yet to use. Im picking it up after work today, hopefully it gets the sail in a good position!

Spin Rigging

Also, been planning and working out the rigging to get the spinnaker flying. It came with the boat and I am not sure exactly what type of spinnaker it is. It has a snuffer and looked some what symmetrical but I couldnt really tell the brief amount of time I had it out of the bag. All I know is that there is spin winches, cars, sheets, a pulley on the base of the forestay, a crane etc. etc.. but no spin pole or track on the front of the mast. I do have a whisker pole which I've been attaching to eyes on each side of the mast and works well for straight runs but not sure if that is strong enough for the spin or if it would rig correctly.

Im planning on testing it out this weekend to see the overall shape when its up to see if I can run it like an assym or if it is an assym. For ease of handling, that would be nice. Was planning on testing tomorrow but with 25+ knot winds... I can wait.

Edited by - on
Go to Top of Page

DavidBuoy
Admiral

Members Avatar

USA
707 Posts

Response Posted - 05/14/2014 :  17:06:52  Show Profile
quote:
Originally posted by DavidBuoy

Stopped by APS yesterday to work out a good way to raise the 110 up the forestay for some more visibility. Rather then going wire, they talked me into some high-tech line with a loop spliced on both ends. At first i was going to have it attach to the deck snap shackle then add a shackle on the other end to attach to the tack of the jib. Instead of that we decided to go double the length, go through the tack and have both ends attach to the shackle on the deck there. This would eliminate the need for another shackle. All in all, it should raise the sail 18" and give plenty of visibility. I'll throw the 150 deck sweeper on if I dont want to see anything ahead of me, which I have yet to use. Im picking it up after work today, hopefully it gets the sail in a


Sooo much better!

Edited by - on
Go to Top of Page

Voyager
Master Marine Consultant

Members Avatar

USA
5312 Posts

Response Posted - 05/14/2014 :  19:02:18  Show Profile
Connected masttop VHF antenna
The cable to the masttop antenna was worn and the antenna was shot. Rewired and replaced it while I worked on the mast and trimmed back and connected the radio lead to it yesterday. Got at least 30dB signal to noise improvement on the ch 24 radio check service. Woo-hoo!

Edited by - Voyager on 05/14/2014 19:03:42
Go to Top of Page

Boomeroo
Navigator

Members Avatar

Australia
129 Posts

Response Posted - 05/14/2014 :  21:44:37  Show Profile
O/B motor controls For Tohatsu
I have 3 mods to the outboard that make life easy .
1 & 2
The pull rope is below the stern so a horizontal pull is impossible so small pulley leads rope vertically
The gear lever is connected to a length of electrical conduit ,bent to suit ,that brings the control into the cock pit

3. A short length of plastic pipe fits over the throttle and brings it up to the cockpit

And

Edited by - on
Go to Top of Page

Jan Briede
Navigator

Members Avatar

USA
162 Posts

Response Posted - 05/15/2014 :  04:28:20  Show Profile
Working in repairing and rebedding all the ports on my boat, but not forgetting to sail.

Edited by - on
Go to Top of Page

justinkonecny
1st Mate

Members Avatar

USA
33 Posts

Response Posted - 05/15/2014 :  14:18:50  Show Profile  Visit justinkonecny's Homepage
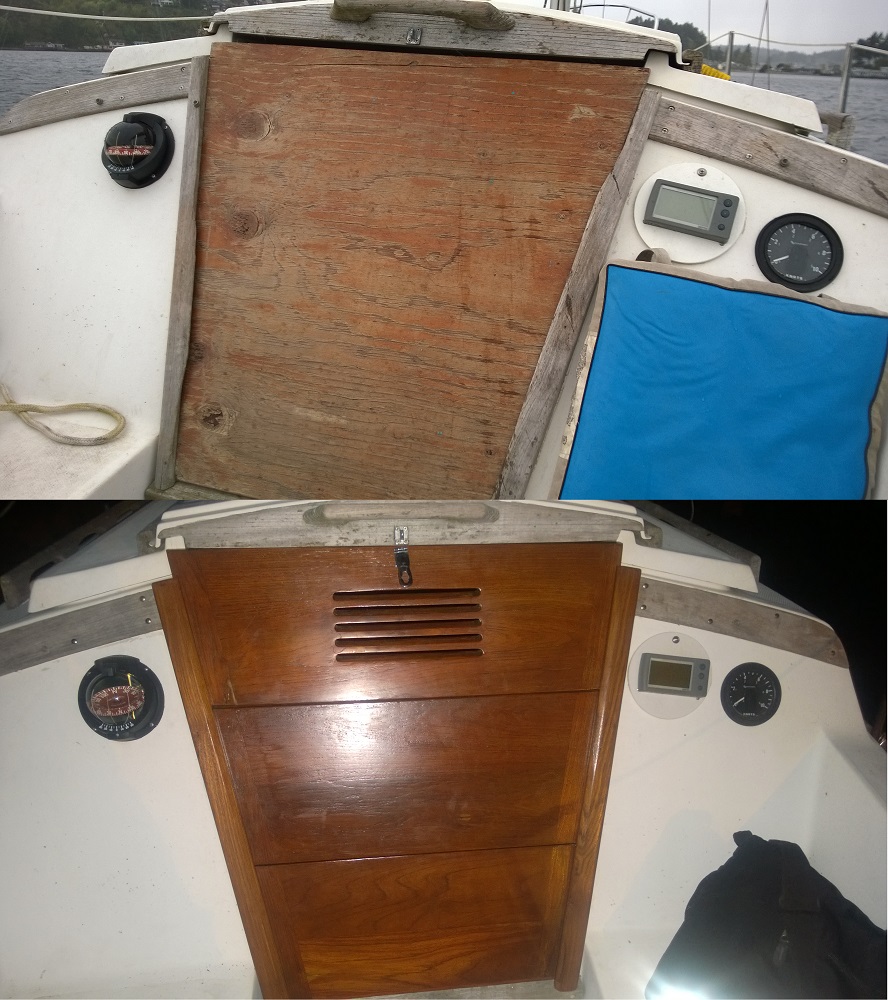
Companionway Doors

Got rid of my plywood and replaced the damaged teak guides.


Edited by - on
Go to Top of Page

Kennyge
1st Mate

Members Avatar

USA
76 Posts

Response Posted - 05/15/2014 :  14:34:22  Show Profile
Looking good but I see a lot more unfinished wood. Where did you get the replacements?

Edited by - on
Go to Top of Page

DavidBuoy
Admiral

Members Avatar

USA
707 Posts

Response Posted - 05/15/2014 :  14:52:09  Show Profile
quote:
Originally posted by Kennyge

Where did you get the replacements?


+1.

I need new tracks for the crib boards.

Edited by - on
Go to Top of Page

sweetcraft
Admiral

Members Avatar

USA
816 Posts

Response Posted - 05/15/2014 :  15:23:02  Show Profile
Caught a garbage bag around outboard in San Juans which caused Honda to shut down: horn,slow to idle and shut off. Removed and continued on but last season outboard would only run for 5 or 6 minutes and again shut down. New impeller but would only run 10 or 11 minutes. Ordered new pump and compaired. Stainless steel cup for impeller had melted pump base and allowed cup to turn just slightly. Problem solved but after talking to Honda shop they also replace thermostate. History has shown over heating could affect thermostate. Today the new thermostate is in for this season. Bottom line is the shut down feature of outboard saves the outboard but not the pump and maybe the thermostate.

Edited by - on
Go to Top of Page

DavidBuoy
Admiral

Members Avatar

USA
707 Posts

Response Posted - 05/15/2014 :  15:49:45  Show Profile
quote:
Originally posted by Kennyge

Where did you get the replacements?


+1.

I need new tracks for the crib boards.

Edited by - on
Go to Top of Page

justinkonecny
1st Mate

Members Avatar

USA
33 Posts

Response Posted - 05/15/2014 :  16:25:35  Show Profile  Visit justinkonecny's Homepage
quote:
Originally posted by Kennyge

Looking good but I see a lot more unfinished wood. Where did you get the replacements?


Yeah, I hope to pull that all off this weekend to replace it if the weather holds.

I got the 'new' crib boards from craigslist. The latch is not even close to where it needs to be, but for a hundred bucks they look pretty nice. www.catalinadirect.com has them as well (unfinished) but they don't have vents on the top piece like mine.

Edited by - on
Go to Top of Page

Kennyge
1st Mate

Members Avatar

USA
76 Posts

Response Posted - 05/16/2014 :  10:58:41  Show Profile
BUILT ME A WHISKER POLE

After checking prices for whisker poles I decided to build one myself. I got a seemingly sturdy fiberglass / aluminum 8' to 16' painters extension pole at Home Depot for @ $33:


I had an old 5' whisker pole someone had given us years ago just sitting in the garage that I cut off the end was luckily able to attach it securely to then end of the painters pole:


The other end is more of a challenge. I bought the best 4" paint roller frame at HD ($6.00), took off the roller part and hope it will hold up when I run it through the pad eye which I got on E-Bay ($16.20) which I will run on a track from WM on the front of the mast.


Less that $100 total. Now, all I have to do is get her in the water. They are moving very slow at the College Point Marina getting the boats in the water.

Edited by - on
Go to Top of Page
Page: of 11 Previous Topic Topic Next Topic  
Next Page
 New Topic  Topic Locked
 Printer Friendly
Jump To:
Association Forum © since 1999 Catalina Capri 25s International Association Go To Top Of Page
Powered By: Snitz Forums 2000 Version 3.4.06
Notice: The advice given on this site is based upon individual or quoted experience, yours may differ.
The Officers, Staff and members of this site only provide information based upon the concept that anyone utilizing this information does so at their own risk and holds harmless all contributors to this site.