Notice:
The advice given on this site is based upon individual or quoted experience, yours may differ.
The Officers, Staff and members of this site only provide information based upon the concept that anyone utilizing this information does so at their own risk and holds harmless all contributors to this site.
Couple of ideas after reading your blog. First thing I'd do is spray them on both ends with [url="http://www.homedepot.com/buy/pb-blaster-11-oz-penetrating-catalyst-lubricant-267840.html"]PB Blaster[/url] or some other similar formula to start the breaking loose action. WD-40 might work, but it's not designed to break stuff loose. PB Blaster benefits from time, the longer you can leave it on before you try to get the offending piece off, the better.
Can you get two nuts on the end of the bolt so you can lock them together, then turn the outer nut against the inner and so turn the entire bolt? That'd probably be the next thing I'd try. It looks like you've got nylocks on there now, so there may be enough room to get two regular nuts on. If not, you can find half height nuts, don't remember what they're called, but they're much thinner than a regular nut, but you can still use them as a stopper. I do this when repairing a pen using 10-32 bolts and nuts.
Can you tap on them from the inside? I think you said you'd tried that.
The last resort might be heating the bolt to loosen up the corrosion.
When you do get it sorted out, apply some Lanacote or anhydrous lanolin to the bolts before you put them back in to help prevent the dissimilar metal galling again.
Thanks Dave, never heard of PB Blaster. the local AutoZone store carried it, 3rd spray is on now, nothing happening yet.
Buzz, yes, I saw that article, these are about 1/4" SS machine screws, heating them is not an option in that confined space, there is a metal plate on the inside and outside of the transom.
I'm going to squeeze back in the trunk and see if I can put a pair of locked nuts and get enough leverage to make some progress. Holding off on the grinder option for now, but that's my last option.
Buzz, yes, I saw that article, these are about 1/4" SS machine screws, heating them is not an option in that confined space, there is a metal plate on the inside and outside of the transom.
Paul <hr height="1" noshade id="quote"></font id="quote"></blockquote id="quote">
Why is heating not an option? Can you get a soldering Iron in there?
Heating, to be most effective, needs a lot of calories and temp applied quickly to create a large temperature and expansion differential between the metals. The heat from a low energy source will be conducted to the surrounding metal.
I put 4 coats of PB Blaster, added a few sound sharp blows to the heads of the two reluctant bolts.
Then climbed all the way into the trunk and put a pair of locked nuts on each bolt. Then with a stubby socket and long wrench handle, and some blows with the side of a hammer and they began to turn. A few more minutes of effort with the Admiral watching on the outside and I was able to get them to turn pretty freely.
Removed the locked nuts, then with a wrench torqued flat blade driver, was able to get them out!
Now I'm off to WM to get new bolts, the heads on these two are shot!
<blockquote id="quote"><font size="1" face="Verdana, Arial, Helvetica" id="quote">quote:<hr height="1" noshade id="quote"><i>Originally posted by Buzz Maring</i> <br />If you have an impact driver with a chuck that accepts a flat-head screw driver, that might work, too.<hr height="1" noshade id="quote"></font id="quote"></blockquote id="quote">
Although I don't currently have one, I used to use my Dad's hand impact driver, a rather simple tool, to break loose stubborn bolts/screws.
<blockquote id="quote"><font size="1" face="Verdana, Arial, Helvetica" id="quote">quote:<hr height="1" noshade id="quote"><i>Originally posted by dlucier</i> <br /><blockquote id="quote"><font size="1" face="Verdana, Arial, Helvetica" id="quote">quote:<hr height="1" noshade id="quote"><i>Originally posted by Buzz Maring</i> <br />If you have an impact driver with a chuck that accepts a flat-head screw driver, that might work, too.<hr height="1" noshade id="quote"></font id="quote"></blockquote id="quote">
Although I don't currently have one, I used to use my Dad's hand impact driver, a rather simple tool, to break loose stubborn bolts/screws. <hr height="1" noshade id="quote"></font id="quote"></blockquote id="quote">
I tried to describe an impact driver to a young employee of mine about six months ago and received the blank stare look. So now, every time I go to a Lowes, HD, Ace, etc, I look for one to buy for the marina. Can't find one, does anyone still sell them?
Paul, glad it worked out without resorting to the grinder.
Buy cheap ones every now and then and replace bits or buy a $20 one once. I've replaced two bits in 30 years and add a couple of drops of oil every now and then. A cheap, disposable tool is OK for some applications, but you get what you pay for.
Finished the Boot replacement all but the cleanup on the outside and the rudder.
I replaced all 6 of the dome head slotted machine screws with new SS 316 Hex head bolts, nuts and spring washers.
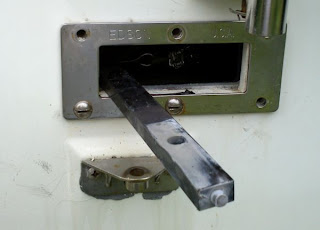
The original boot did not have anything to seal the joint between the Rudder control arm and the boot, it was just a good fit, the new boot was not such a good fit; the hole in the outer end of the boot is just slightly larger than the arm that passes through it. Two Tie-wraps does a great job of closing up the small gap.
Most difficult part was removing the reluctant bolts due to the corrosion between them and the plates.
The new bolts have butyl around the heads, and lithium grease around the nut/spring washers.
So now I have a can of PB Blaster in my garage tool arsenal, as well as a spray can of white lithium grease.
Took the time to inspect the pivot pin on the inside end of the steering arm. The coat of heavy grease I used over a year ago is still doing it's magic.
Turned out a good weekend for getting stuff done. Looks like we'll be on target for our May 11th mini cruise.
<blockquote id="quote"><font size="1" face="Verdana, Arial, Helvetica" id="quote">quote:<hr height="1" noshade id="quote"><i>Originally posted by Dave5041</i> <br />Sears. It looks just like my 30 year old Craftsman model <hr height="1" noshade id="quote"></font id="quote"></blockquote id="quote"> Thanks...forgot to have them look at Sears. Looked at our local Harbor Freight but didn't see one.
Good job, Paul. FYI, my steering mechanism is installed with hex bolts, and I'd suggest that you do the same. It seems it would make a huge difference if you need to remove it again. [EDIT: thanks to my sloppy reading I hadn't noticed that you said you already did this]
Just a quick comment for others who replace their boot: It is possible to do it without removing the rudder.
I suspect you removed your rudder anyway for other reasons, such as for trailering. In fact, it's interesting that you have a wheel on a trailer boat, since rudder removal/installation is significantly more tedious with the steering mechanism.
I haven't greased my pivot pin - I'll have to look into that.
One upgrade that I did this year was to insert a 1x3 between the ends of the aluminum steering bracket to prevent the chain from jumping under load. (This had been suggested by Arlyn in [url="http://www.catalina-capri-25s.org/forum/topic.asp?TOPIC_ID=23812"]this thread[/url].) This improvement is only beneficial for the Edson pull-pull cable system, not for Arlyn's open cable pulley system. I'm not sure which one you have. I did find that it's generally better to insert the wood after connecting the steering bar to the rudder, since the wood reinforcement tensions the pin and causes the bar to rotate, making it harder to align in its seat. (Hence my interest in lubricating the pin.) It's important to locate the wood block in a way that does not interfere with the motion of the pin. I've tested this on the hard, but not on the water yet.
On the topic of impact drivers, I LOVE my Klien driver kit. Its kind of pricey (link below) but its real stout. Though to be honest I don't even use the handle part of it anymore... I put the socket part of it on my cordless impact gun and use that. Was a lifesaver when I had to replace my bilge pump - it was absolutely not going anywhere without it.
I agree, no need to remove the rudder to do this, but it sure makes accessing the middle bolt easier. Still have to disconnect the arm from the rudder to get the new boot on (I cut the old one off).
FYI, this is the first time I have ever removed the rudder. We have trailed JD at least 50 times from 5 miles to over 600 miles each way. Never had any issues with the rudder. I would be more concerned that it get damaged during transit/removal/reinstall.
Notice: The advice given on this site is based upon individual or quoted experience, yours may differ. The Officers, Staff and members of this site only provide information based upon the concept that anyone utilizing this information does so at their own risk and holds harmless all contributors to this site.