Notice:
The advice given on this site is based upon individual or quoted experience, yours may differ.
The Officers, Staff and members of this site only provide information based upon the concept that anyone utilizing this information does so at their own risk and holds harmless all contributors to this site.
Note: You must be registered in order to post a reply. To register, click here. Registration is FREE!
T O P I C R E V I E W
LuckyDuck
Posted - 01/31/2022 : 23:40:33 My old Standard Horizon depth sounder has given up the ghost and I’ve purchased a Hawkeye to replace it. I’m planning to leave the old gauge and just install the Hawkeye next to it. Drilling the 2-inch hole in the bulkhead is simple enough but what, if anything, should I bed the gauge with? The instructions say to seal any exposed wood with marine sealant. But shouldn’t I bed the bezel with something also? Would butyl tape make sense? Thanks!
25 L A T E S T R E P L I E S (Newest First)
OLarryR
Posted - 02/18/2022 : 22:00:55 Glad it all worked out ! Enjoy!
LuckyDuck
Posted - 02/18/2022 : 21:27:34 Finished the sounder project today! The black 1/4” starboard worked perfectly as did the butyl tape for bedding. Worst part was kneading and sticking the blob of wax up in the tight area under the V-berth and mashing the transducer into it, getting it level etc. Even with nitrile gloves it was a messy job. Everything is now reading perfectly! Thanks to all for the tips and guidance! — Greg
LuckyDuck
Posted - 02/13/2022 : 18:37:38
quote:Originally posted by OLarryR
I was on my boat today and checked out the wiring access for port and starboard sides. I have an '89, so your access may be same or slightly different.You can do it on either side. You mentioned that you will likely do it on the starboard side.On the starboard side, as you indicated, you can just follow the water lines - The VBerth bulkhead has wiring access since the sink drain line goes forward to the seacock. Similarly, the main cabin bulkhead has wiring access for the water tank line going to the sink. The only issue is depending on the transducer and/or Hawkeye sounder cable connector at the end of the wire, if it is more than say 3/8" - 1/2" then you may have to widen the hole a bit. On the port side there is also access via a space between the bulkhead and the hull. The only issue on the port side is passing the wire thru the Head area. Behind my Port Potti, there is an enclosed shelf. An electrical snake/fish tape can be passed from the main cabin area, then behind the head/shelf area into the VBerth area - Then pull the wire through. Another option is to just unscrew the shelf panel (behind the port potti )to gain access to that area, then pass the wire thru by hand.
Thanks Larry. I ended up running it down the starboard side, following water/drain lines as you mentioned. The rca plug on the Hawkeye cable is about 1/2” so I had to drill a separate 5/8” hole through the v-berth bulkhead and fish tape the line though. It was easy after that through the water tank area, under the quarterberth and back up and over to the gauge. I “plugged” the 4” hole left by the old gauge with high-density foam board. Now I’m waiting for the starboard to arrive so I can cap it front and back and insert the new sounder. Then plop the ducer into the wax. Can’t wait!
OLarryR
Posted - 02/12/2022 : 15:49:55 I was on my boat today and checked out the wiring access for port and starboard sides. I have an '89, so your access may be same or slightly different.You can do it on either side. You mentioned that you will likely do it on the starboard side.On the starboard side, as you indicated, you can just follow the water lines - The VBerth bulkhead has wiring access since the sink drain line goes forward to the seacock. Similarly, the main cabin bulkhead has wiring access for the water tank line going to the sink. The only issue is depending on the transducer and/or Hawkeye sounder cable connector at the end of the wire, if it is more than say 3/8" - 1/2" then you may have to widen the hole a bit. On the port side there is also access via a space between the bulkhead and the hull. The only issue on the port side is passing the wire thru the Head area. Behind my Port Potti, there is an enclosed shelf. An electrical snake/fish tape can be passed from the main cabin area, then behind the head/shelf area into the VBerth area - Then pull the wire through. Another option is to just unscrew the shelf panel (behind the port potti )to gain access to that area, then pass the wire thru by hand.
LuckyDuck
Posted - 02/09/2022 : 15:13:56
quote:Originally posted by OLarryR
I routed it on the port side. The plexiglas sides have wide slots on their bottom adjacent to the hull, so the wiring passes under the plexiglas port side then passes along the port side thru the head compartment. Then the wiring passes through under the port main cabin seats. I do not recall exactly how I did that. There may have been an opening at the bottom of the main cabin bulkhead and I just pulled the wire through. You can probably do the same via the starboard side. If there is no small opening, you may have to drill a small hole to pass through the VBerth bulkhead and/or the main cabin bulkhead. I do not think I had to drill any holes - If I remember, I'll check my wiring and the pass-throughs when I next go down to the marina. I was just there yesterday but I'll probably be back there within next several days. We are right now in a brief warm spell and temps are in 50s...may hit 60F. I would be out sailing but we have to watch my grandkids the next few days since my son and daughter-in-law are going out of town starting this afternoon.
By the way, one of the VBerth shelf pictures shows the wiring passing thru to the head compartment. Probably same can e done on the starboard side. Not sure about the pass through to the main cabin - I'll have to check that out.
Thanks! I have some other wire and water tubing going through the starboard side so probably will just follow that. Just got in from sailing — it’s 83* today with brisk winds so hard to spend the day crouched in a cabin!
OLarryR
Posted - 02/09/2022 : 12:44:53 I routed it on the port side. The plexiglas sides have wide slots on their bottom adjacent to the hull, so the wiring passes under the plexiglas port side then passes along the port side thru the head compartment. Then the wiring passes through under the port main cabin seats. I do not recall exactly how I did that. There may have been an opening at the bottom of the main cabin bulkhead and I just pulled the wire through. You can probably do the same via the starboard side. If there is no small opening, you may have to drill a small hole to pass through the VBerth bulkhead and/or the main cabin bulkhead. I do not think I had to drill any holes - If I remember, I'll check my wiring and the pass-throughs when I next go down to the marina. I was just there yesterday but I'll probably be back there within next several days. We are right now in a brief warm spell and temps are in 50s...may hit 60F. I would be out sailing but we have to watch my grandkids the next few days since my son and daughter-in-law are going out of town starting this afternoon.
By the way, one of the VBerth shelf pictures shows the wiring passing thru to the head compartment. Probably same can e done on the starboard side. Not sure about the pass through to the main cabin - I'll have to check that out.
LuckyDuck
Posted - 02/08/2022 : 22:05:11
quote:Originally posted by OLarryR
Thanks for your comments on my shelf! The plexiglas sides basically enclose the thru-hulls & wiring. The plexiglas shelf extends over and past the sides - full length from hull’s port side to Starboard side. I have screw fasteners that attach the plexiglas sides w/wood supports to the plexiglas shelf. But the entire assembly is not screwed or fastened to the hull or bulkhead except for 2 Velcro strips on the V Berth wall that Velcro to the plexiglass sides. The entire assembly fits extremely snug because I used a cardboard template to get the contour of the shelf and the forward plexiglas side accurate. Padding was then used to cushion the hull from the assembly and firms/wedges the assembly against any shifting. I used plexiglas for the assembly to provide good visibility and sort of a more modern look.
Yes, it looked great and it’s nice to have the extra “flat” storage under there. I’m curious how you routed your transducer cable? I’m looking to go to the starboard side under the head sink and through the compartment under the starboard settee.
OLarryR
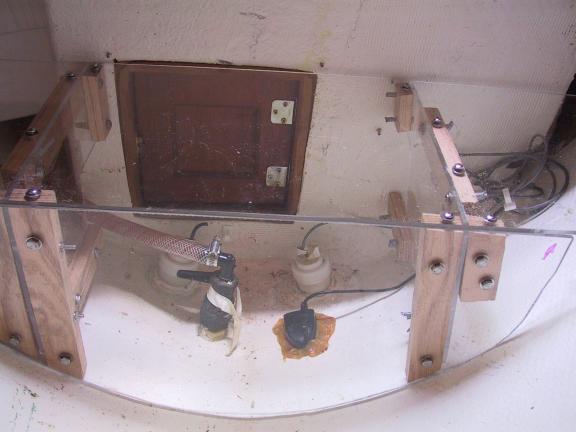
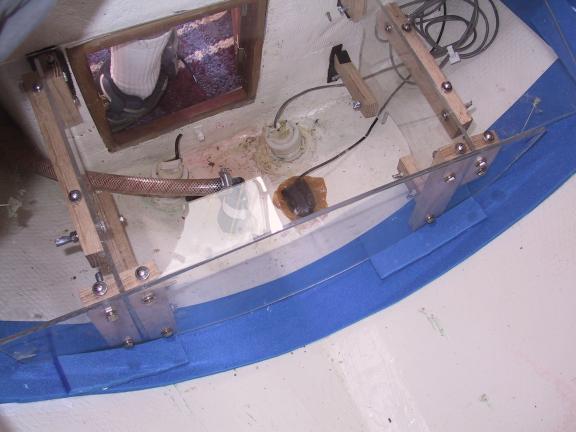
Posted - 02/08/2022 : 21:32:16 Thanks for your comments on my shelf! The plexiglas sides basically enclose the thru-hulls & wiring. The plexiglas shelf extends over and past the sides - full length from hull’s port side to Starboard side. I have screw fasteners that attach the plexiglas sides w/wood supports to the plexiglas shelf. But the entire assembly is not screwed or fastened to the hull or bulkhead except for 2 Velcro strips on the V Berth wall that Velcro to the plexiglass sides. The entire assembly fits extremely snug because I used a cardboard template to get the contour of the shelf and the forward plexiglas side accurate. Padding was then used to cushion the hull from the assembly and firms/wedges the assembly against any shifting. I used plexiglas for the assembly to provide good visibility and sort of a more modern look.
LuckyDuck
Posted - 02/07/2022 : 21:37:57
quote:Originally posted by OLarryR
Looks like you have a plan!
Yes, the Robin’s Nest site was very inspiring, too. Funny, the previous owner of My C25 built a shelf above the through-hull also. It’s plywood screwed into cross members and a bear to work under but too much work to dismantle. I wish it was at least clear plexiglass like yours.
OLarryR
Posted - 02/07/2022 : 20:55:36 Looks like you have a plan!
LuckyDuck
Posted - 02/07/2022 : 19:26:39 Just an update on my new sounder quest… I’ve ordered a piece of black 1/4” Starboard from Defender based on the suggestions here. My plan is to remove the old Standard gauge and plug the 4” diameter hole with a disc of wood or high-density styrofoam. Then, I’ll “sandwich” it with two 5” discs of the starboard (inside and out) and drill a 2” hole through all to mount the new Hawkeye, tightening it all with the thumbscrew from behind. Oh yeah, and bed it with butyl. It should look almost identical to the S-H speed log and wind speed gauges next to it.
I did test the Hawkeye transducer in a bag of water in the area under the V-berth today. Sanded the inside sole a bit and laid it right in front of the through-hull drain. Worked like a charm, even out on the lake at full throttle. Next: mount it in a patty of toilet wax. I’ll let you know the final results.Thanks for all the great advice and tips!
OLarryR
Posted - 02/06/2022 : 22:24:51 If you are using a PVC pipe, etc as a container for a liquid to be used preventing an air gap between the hull and transducer, you could probably be able to utilize vaseline and even if the container did not provide a complete leak-tight environment, the vaseline probably will not flow under the container. (Vaseline, by itself, is probably not firm enough to hold the transducer without a container, etc providing some support for the transducer.)
The only time my fishfinder indicated an error was right after I had a hull blister(s) repair job, 7 coats of Interlux Interprotect applied followed by anti-fouling paint. When the boat was lowered into the water, I was preparing it for the next day return to my marina. Checking my fishfinder, it was not reading depths but I also noticed that since the boat was just lowered into the water, the hull was covered with micro-bubbles. The next morning, as I left the dock at the repair facility to return back to Marina, the fishfinder was back to normal. So, it was just the initial launch and all the bubbles that were initially on the hull temporarily interfered with the fishfinder depth readings.
Voyager
Posted - 02/06/2022 : 20:49:20 Hey Larry, that’s an excellent account, I appreciate it. Sealants like silicone are a good possibility, and epoxy works provided you don’t need to make adjustments afterwards. My transducer works well most of the time, but occasionally when I’m passing over soft mud or sand, I get the “- - -“ signal, and when in shallows, it gives me some agita. Perhaps I should start over and re-bed my transducer in another hunk of wax, but I’m liking Leon’s pipe solution, except the part about keeping the water reservoir full sounds a little problematic. Perhaps a better approach is to insert a chunk of toilet bowl wax or some thick axle grease as a better medium.
OLarryR
Posted - 02/05/2022 : 18:41:47 Bruce, On industrial applications, epoxy is used for permanent transducer mountings to pipe. Pipe/hose clamps are also used on pipe for permanent or temporary mounting of the transducers. I forget what the type/name of the lubricant/conductant other than calling it transducer lubricant is used between the pipe and the transducer to eliminate bubbles under the transducers. The transducers are not used for depth or speed readings but for determining fluid pipe system flow rates by utilizing two transducers in line - The signal transmits from one transducer thru the pipe to the other transducer and the flow rate can very accurately be determined. Ideally, the use of hose clamps would be preferable over epoxy for us but unfortunately we can’t utilize hose clamps for mounting inside the hull.
To affix a container/open-ended pipe to hold liquid against the hull so a transducer inside the container can make contact with the hull without an air gap, perhaps a sealant such as what you suggested, would provide a water tight seal for a PVC pipe to hull contact area. Sealants may deteriorate with time but if you initially get a good seal, probably would be fine for many years and then could be replaced without too much trouble.
However, I would still consider a glob from a wax ring since it is so easy to install a transducer and very low cost. You just place a wax ring glob on the hull, smoosh the transducer into it and up around the transducer base and it holds it firm. I installed my transducer back in the 2005-2006 timeframe and have never touched it since then. When I later installed a plexiglass shelf (with sides) under the VBerth area, it was not necessarily to protect the transducer with the wax ring from being disturbed by stowage, it was more to protect the existing thru hulls and all the loose wiring from being disturbed by stuff being dumped in that area. As it turns out, I rarely store anything under the VBerth area......but the shelf looks nice!
bigelowp
Posted - 02/05/2022 : 15:17:00 I installed mine with clear GE silicone. Had to be careful so not to have air bubbles, but it has worked for over a decade with no issues and, if I need to remove the transducer I can do so without destroying it. Will require laborious cleaning, etc., but unlike epoxy, will not require hammer to release.
Voyager
Posted - 02/05/2022 : 11:44:06 Instead of a wax ring and instead of epoxy, are there any other materials which could be used to secure the transducer to the hull which avoids the “air gap” problem. Has anybody ever tried polysulfide caulk, acrylic caulk or (horrors) silicone caulk might work. Also, my son does a trick with masking tape - he uses cyanoacrolate glue (crazy-glue) to glue two pieces of tape together back-to-back to create double-sided tape to hold wood in a jig. The physics problems to solve here are related to the index of refraction between dissimilar materials and maximum power transfer.
LuckyDuck
Posted - 02/04/2022 : 10:22:41
quote:Originally posted by Leon Sisson
Transducer Shoot-Thru-Hull Mounting Options
Let me start by saying I have nothing against the wax ring method of mounting a shoot-thru-hull transducer, other than the risk of it getting knocked loose.
When I phoned a manufacturer's tech support about an adhesive stronger than wax, he recommended epoxy. I asked how to remove the transducer if it didn't work well in the selected mounting spot (air voids, too thick, etc.) He said whack it sideways with a big hammer, and buy another transducer. Hmm. Not the approach I was looking for.
I installed the same model depth finder (Lowrance Hook7) on both my Catalina boats. I mounted each transducer in a liquid filled reservoir inside the hull.
In the Catalina 25, I use the default transducer intended for external transom mount (about the size of a small candybar, pivoting attachment point sticking up from one end, thin sheet SS hinge to screw to transom).
For a container to mount the transom transducer under the V-berth, I started with a large PVC sewer pipe cleanout, like a coupling, with female threads on one end, female slip fit at other end. I trimmed the unthreaded end to match the shape of the hull under the V-berth. To create a flat surface inside the PVC for the mounting bracket I used thickened epoxy mush with tapped screw holes.
I bedded the shaped end of the cleanout to the hull up against the aft locker wall under the V-berth using more thickened epoxy. In a threaded PVC cover plate I drilled a hole large enough to pass the transducer cable connector. I top up the water once or twice a year. (Distilled, if you're a purist about such things.)
When ordering the depth finder for the Catalina 22, I had the vendor substitute the manufacturer's shoot-thru-hull transducer kit in place of the transom mount one. This is a better thought out, more compact, commercial version of what I made for the other boat. Having a smaller volume, it needs refilling more often.
Both installations have been working well for years.
Great info, thank you! The more I poke around, the more great examples I’m seeing. The vendor’s “hammer option” doesn’t surprise me but made me chuckle. I wonder if these folks ever really use their product.
Let me start by saying I have nothing against the wax ring method of mounting a shoot-thru-hull transducer, other than the risk of it getting knocked loose.
When I phoned a manufacturer's tech support about an adhesive stronger than wax, he recommended epoxy. I asked how to remove the transducer if it didn't work well in the selected mounting spot (air voids, too thick, etc.) He said whack it sideways with a big hammer, and buy another transducer. Hmm. Not the approach I was looking for.
I installed the same model depth finder (Lowrance Hook7) on both my Catalina boats. I mounted each transducer in a liquid filled reservoir inside the hull.
In the Catalina 25, I use the default transducer intended for external transom mount (about the size of a small candybar, pivoting attachment point sticking up from one end, thin sheet SS hinge to screw to transom).
For a container to mount the transom transducer under the V-berth, I started with a large PVC sewer pipe cleanout, like a coupling, with female threads on one end, female slip fit at other end. I trimmed the unthreaded end to match the shape of the hull under the V-berth. To create a flat surface inside the PVC for the mounting bracket I used thickened epoxy mush with tapped screw holes.
I bedded the shaped end of the cleanout to the hull up against the aft locker wall under the V-berth using more thickened epoxy. In a threaded PVC cover plate I drilled a hole large enough to pass the transducer cable connector. I top up the water once or twice a year. (Distilled, if you're a purist about such things.)
When ordering the depth finder for the Catalina 22, I had the vendor substitute the manufacturer's shoot-thru-hull transducer kit in place of the transom mount one. This is a better thought out, more compact, commercial version of what I made for the other boat. Having a smaller volume, it needs refilling more often.
Both installations have been working well for years.
OLarryR
Posted - 02/03/2022 : 22:04:33 I installed my transducer below the VBerth area utilizing the wax ring method. Then as a separate project some time later, I protected the transducers by installing a plexiglas shelf above them so that the area below the VBerth could also be used for storage without disturbing the transducers. More details on my website - See Sections titled: "Fishfinder Installation" and "Cabin VBerth Hull Fittings Enclosure and Storage Shelf".
LuckyDuck
Posted - 02/03/2022 : 20:13:47
quote:Originally posted by bigelowp
I was in a similar situation but had two instruments: depth and speed. I wanted to install depth and sail/wind instruments (Raymarine 40 (now 50) series) I opted to remove old, have starboard fabricated to cover both but locate new over the old holes. I am lousy at posting pics, but it looks good and now I have depth via internal mounted transducer and wind speed. E-mail for pics and more description.
Just PM’d you! I’m leaning toward the starboard “cover” — just need to figure how best to affix it to the bulkhead surface.
bigelowp
Posted - 02/03/2022 : 19:53:12 I was in a similar situation but had two instruments: depth and speed. I wanted to install depth and sail/wind instruments (Raymarine 40 (now 50) series) I opted to remove old, have starboard fabricated to cover both but locate new over the old holes. I am lousy at posting pics, but it looks good and now I have depth via internal mounted transducer and wind speed. E-mail for pics and more description.
LuckyDuck
Posted - 02/03/2022 : 17:02:05
quote:Originally posted by Voyager
If you search for “wax ring” or “transducer” you’ll find a great number of discussions on the topic. Bottom line, don’t knead the wax or you’ll introduce air bubbles which will cause intermittency in the display. The wax gets pretty soft during the heat of summer. That’s why it’s best to place the transducer in a location that will not be disturbed by access to storage of equipment or by shifting items during heavy seas. I use my Vee berth storage for jackets, sleeping bags and soft goods as well as lines and tackle, so I wouldn’t use that area for the transducer. There’s a hatch under my companionway ladder that I don’t use for storage, so it’s ideal in my case.
Thanks. I have been seeing various info out there on the wax method. Seems to make sense. I could use either spot as both are free of anything that might disturb it.
Voyager
Posted - 02/03/2022 : 15:58:55 If you search for “wax ring” or “transducer” you’ll find a great number of discussions on the topic. Bottom line, don’t knead the wax or you’ll introduce air bubbles which will cause intermittency in the display. The wax gets pretty soft during the heat of summer. That’s why it’s best to place the transducer in a location that will not be disturbed by access to storage of equipment or by shifting items during heavy seas. I use my Vee berth storage for jackets, sleeping bags and soft goods as well as lines and tackle, so I wouldn’t use that area for the transducer. There’s a hatch under my companionway ladder that I don’t use for storage, so it’s ideal in my case.
LuckyDuck
Posted - 02/03/2022 : 10:30:37
quote:Originally posted by Voyager
That’s a good question, different models from different years could have been designed uniquely. If there’s not a single piece of 4” round glass on the face, but instead some plastic or aluminum with a small window for the display, then you’re right. I did not remove the original depth transducer from the through-hull fitting behind the keel in the bilge, but I do not use the old one. I disconnected the cable and tied it off down below. Instead I used the new Hawkeye transducer that came with the gauge and mounted it inside the hull near the old one. I followed the old wire harnesses with the cable. It shoots through the hull to get a depth reading. I used the toilet bowl wax gasket method to Mount and seal the new transducer to the inside of the hull.
I have the old thru-hull transducer in exactly the same place but also am thinking I’ll use the new one, either next to the old, or in the area below the V-berth next to the thru-hull drain. I like the wax ring idea — are there any specific directions out there on the web or this site? This may sound nutty, but is there any problem with heat and the wax? We get summer temps of over 110* but I’m thinking it wouldn’t affect the wax inside against the hull in water?
Voyager
Posted - 02/03/2022 : 07:36:40 That’s a good question, different models from different years could have been designed uniquely. If there’s not a single piece of 4” round glass on the face, but instead some plastic or aluminum with a small window for the display, then you’re right. I did not remove the original depth transducer from the through-hull fitting behind the keel in the bilge, but I do not use the old one. I disconnected the cable and tied it off down below. Instead I used the new Hawkeye transducer that came with the gauge and mounted it inside the hull near the old one. I followed the old wire harnesses with the cable. It shoots through the hull to get a depth reading. I used the toilet bowl wax gasket method to Mount and seal the new transducer to the inside of the hull.
Notice: The advice given on this site is based upon individual or quoted experience, yours may differ. The Officers, Staff and members of this site only provide information based upon the concept that anyone utilizing this information does so at their own risk and holds harmless all contributors to this site.