Notice:
The advice given on this site is based upon individual or quoted experience, yours may differ.
The Officers, Staff and members of this site only provide information based upon the concept that anyone utilizing this information does so at their own risk and holds harmless all contributors to this site.
Caution: The mast and other
metal parts conduct electricity.
Coming in contact with or near
an electrical power line or lightning
can cause severe injury or
death. Stay away from overhead electrical
power lines when sailing and/or
launching the boat.
When trailering your boat
always try to undo as little rigging
as possible. Before lowering
the mast, it is only necessary to
undo the two forward lower
shrouds and the forestay.
1. Before
raising the mast, make sure halyards are neatly
tied down and that they are on proper sides of the spreaders.
You should never attempt to raise the mast unless the upper
shrouds (those that pass over the spreaders) and the aft
lower shrouds, are attached to the deck fittings and the
turnbuckles are well "started� into their barrels by at
least 3/4 of an inch. The turnbuckles must not be completely
tightened however, because slack is needed in the shrouds
to enable the mast to be fully raised. The backstay should
be attached to the transom chainplate.
The upper shrouds, aft lower shrouds, and backstay will
keep the mast from falling over when it is raised. therefore,
all of these must be attached to the chainplates before
the mast is raised.
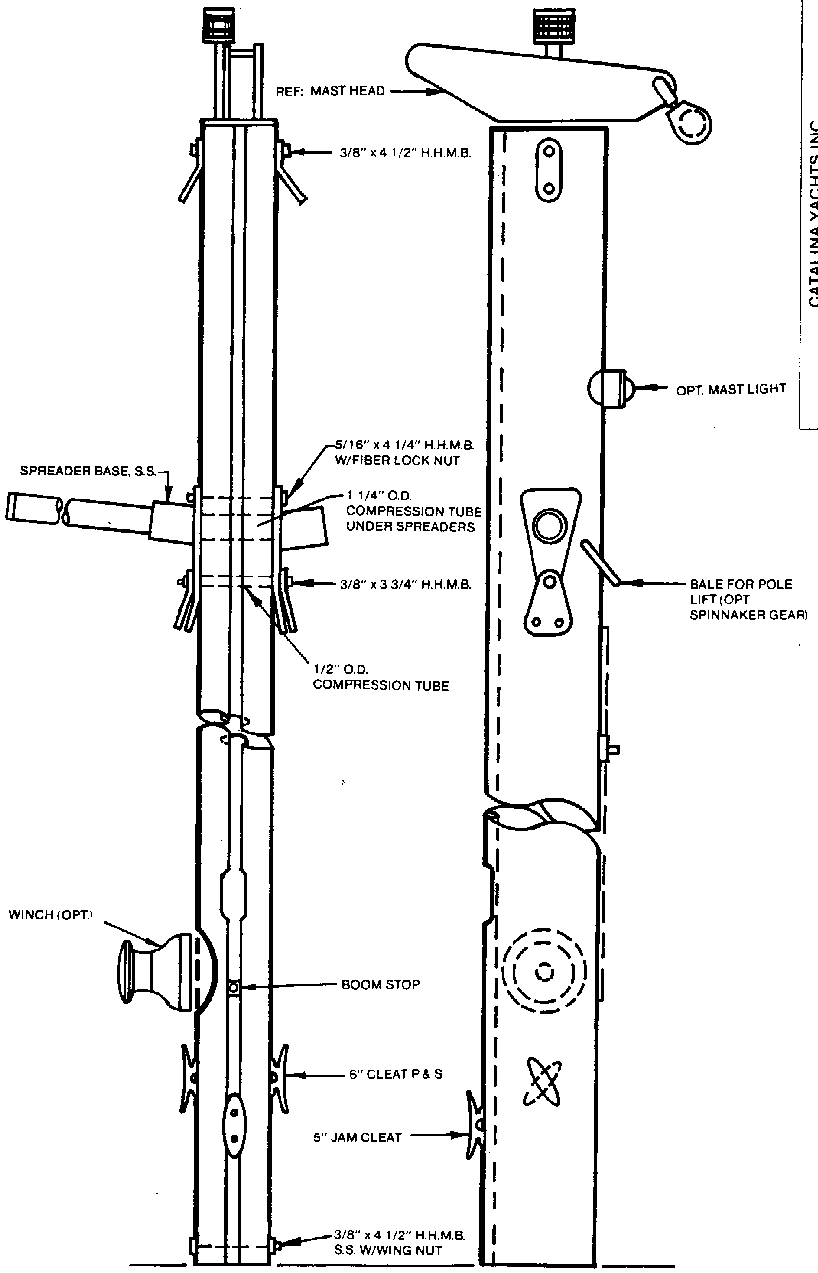
Check that the spreaders are secure and that spreader boots
or tops are secure.
2. Make sure
that the shrouds and stays are not fouled. Backstay
should lie clear of the transom. You may step the mast
on land or while the boat is in the water. It seems to
be easier on land because the boat is stable. Also, it
keeps other sailors from getting impatient while they wait
for you to move out of the launch area.
3. Walk the
mast aft and drop the mast foot into the tabernacle
located on top of the deck, keeping the mast in center
line of boat, insert the pivot bolt and locking nut.
At this time. you should check that all the mast lights
are functioning properly.
4. One crew
member should pull on a line tied securely to
the forestay while another pushes up on the mast and walks
from the cockpit forward. With the mast erect, attach
the forestay and forward lower shrouds.
IMPORTANT: Be careful not to twist the mast or allow
it to move to one side of centerline while
raising the mast, as this may cause the mast
step to break.
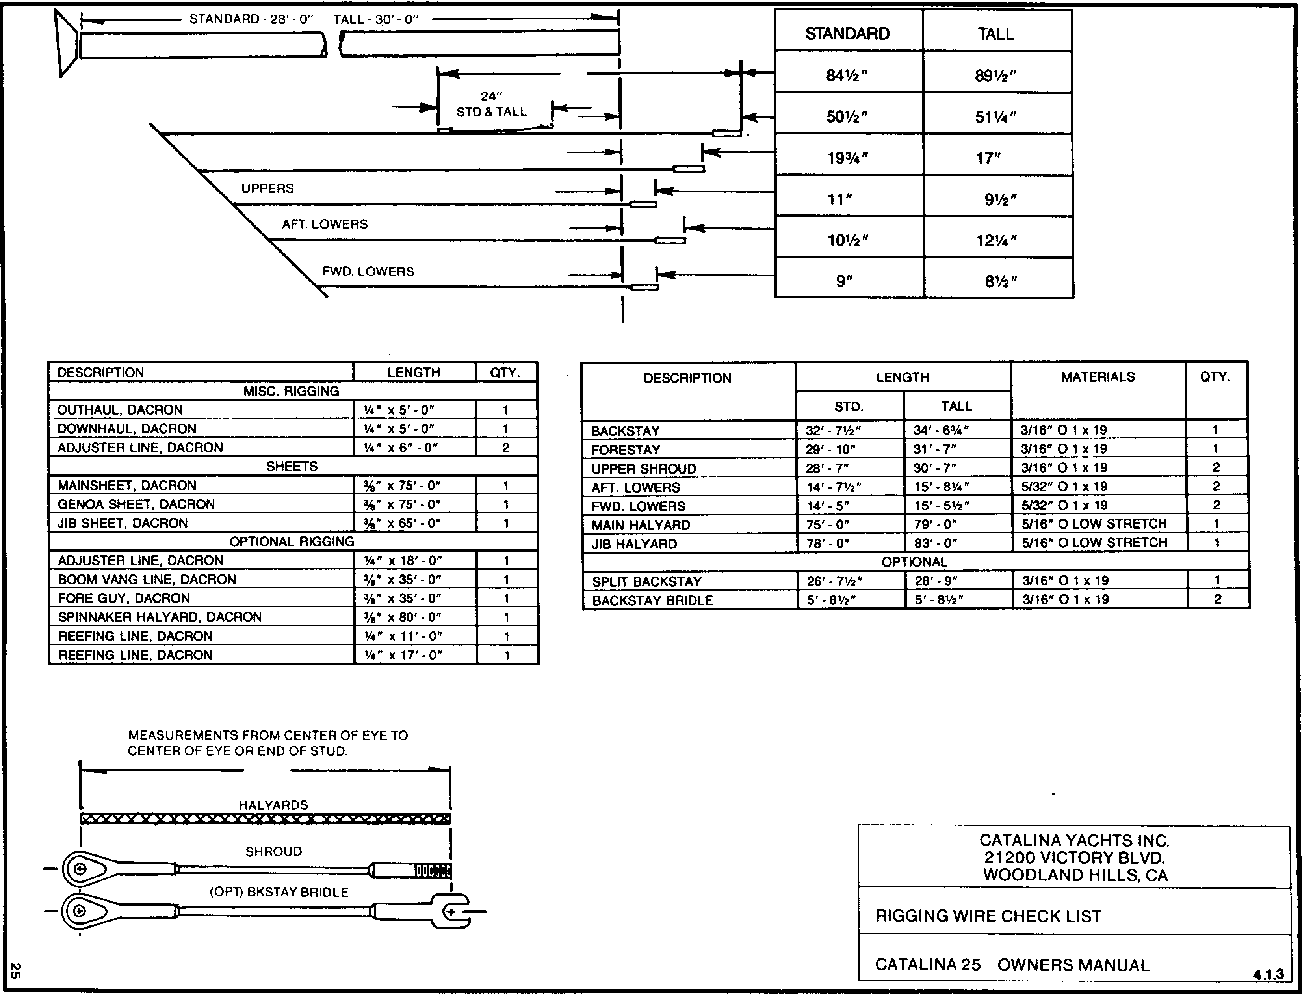
4.1.2 TUNING THE MAST:
Your mast is help aloft by the
standing rigging (forestay, backstay,
upper shrouds, fore and aft,
lower shrouds). The term "tuning"
refers to adjustment of the
standing rigging so that the mast remains
'in column" (not bent)
when under load. This is accomplished by
following the procedure
outlined below:
AT THE DOCK:
1. Adjust
forestay and backstay so that the mast is straight
up and down. Tie a holt to a 6 to 7 foot long piece of
light line to make a quick plumb bob, and tape the free
end of the line to the front of the mast as high up as
you can reach. This device will help you to determine
whether the mast is perpendicular or not. Otherwise, sight
your mast with a corner of a building.
2. Adjust
upper shrouds so that the mast is straight up and
down athwartships. That is, from side to side as opposed
to bow to stern.
3. The upper
shrouds should be firm but not far apart. A
50 pound push should deflect the upper shroud about 1"
at shoulder height.
4. The lower
shrouds (4 of them) should be adjusted so that
they are looser than the upper shrouds. While at dock.
they should have no slack. but no tension either. No lower
shrouds. when pushed. should deflect the mast more than
any other shroud when pushed equally hard. If this cannot
be achieved, the upper shrouds are too tight. Back off
one half turn at a time on the upper shroud turnbuckles
until the tension of the lower shrouds is brought into
balance.
IMPORTANT: Final tuning of the mast depends on local con-
ditions and the cut and set of your sails.
Consult your dealer or sail maker for advise.
More detailed information on this subject can
be found in Wallace Ross' �Sail Powero, published
by Alfred A. Knopf in New York.
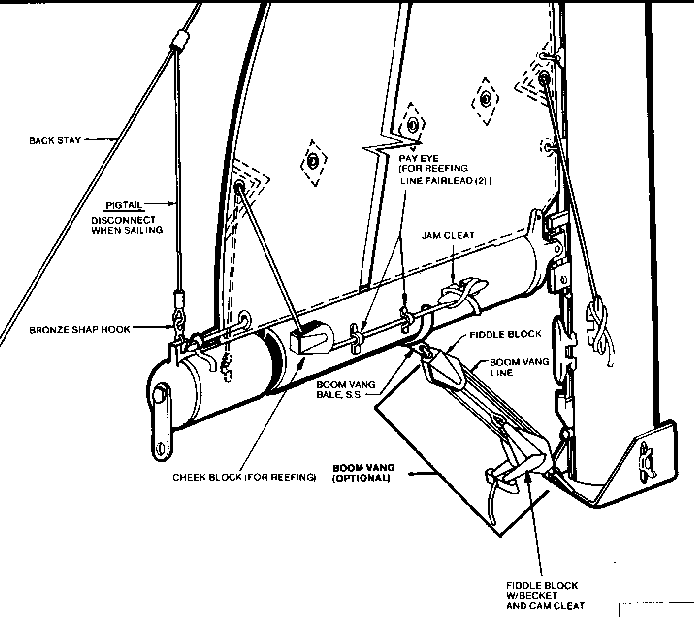
Reefing should always be done
before it becomes necessary. Some
sailors use the rule of thumb,
if the thought of reefing occurs
to you, it is time to reef.
Sailing at extreme angles of heel
- 25 degrees or more, is not
efficient. fast or comfortable.
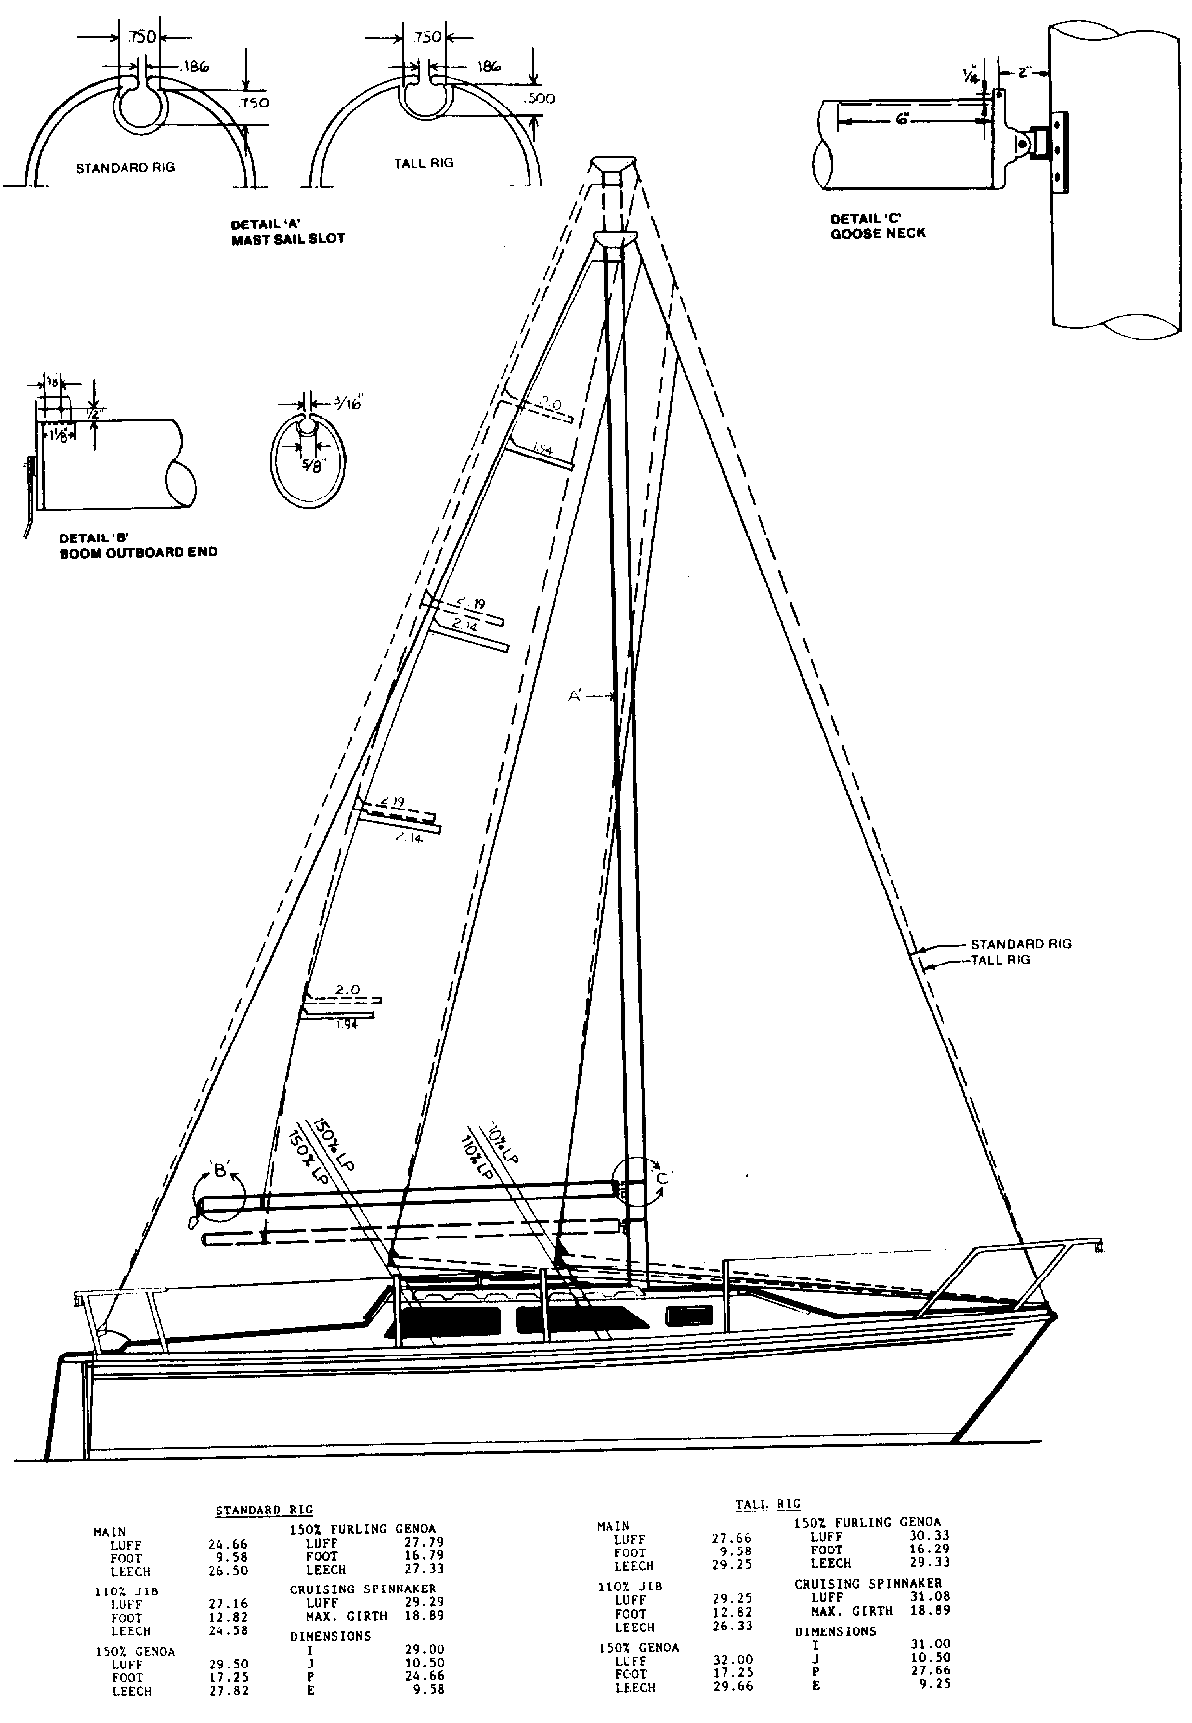
The Catalina 25 is equipped
with jiffy reefing (also called slab
reefing) for reefing the main
sail. The system consists of a cheek
block mounted on the starboard,
outboard end of the boom. A cleat
is located on the mast below
the gooseneck. for reefing the luff
of the main.
Run the reefing line through
the cringle (grommets) in the luff
and leech of the main sail in
preparation for reefing. Per illustration,
one crew stationed in the
cockpit and one crew at the mast are
recommended for fast, safe
reefing.
REEFING PROCEDURE:
1. Take up slack in main boom topping lift,
cleated to port
side of boom.
2. Release the main halyards to a predetermined
point. Marking
the halyard with ink or a colored thread woven into the
line is helpful. Re-cleat the halyard after lowering.
3. pull the luff cringle down to the gooseneck by
pulling
the luff reefing line through the cleat on either side
of the mast. By pulling the line up through the cleat.
a 2:1 purchase is created on the luff. Tie off the luff
reefing line when the cringle meets the gooseneck.
4. Ease the mainsheet and boom vang.
5. Pull the leech cringle down to the boom by
pulling the
leech reefing line on the starboard side of the boom, and
make the line fast
6. Trim in the mainsheet and boom vang.
7. Snug up the main halyard, as required, to
flatten out the
main sail.
Your electrical system is
powered by a marine grade 12 volt, deep
cycle. 90 amp hour battery.
Attention should be given to maintaining
the proper level of distilled
water. Do not overfill. The batteries
are located behind the
companionway stairs.
The batteries are provided with
a tie down to prevent tipping over
at extreme angles of heel. Be
sure these tie downs are fastened
securely.
with proper care. the battery
installed in your Catalina 25 will
provide long and satisfactory
service. Proper care is not difficult.
if a few basic points are kept
in mind:
Your battery should be examined
periodically for any cracks or
breaks in the case or cover,
and any cracks in the sealing compound.
If there is any damage, the
battery should be repaired at once.
WARNING
The electrolyte in a battery is a solution of sulphuric
acid. If any should enter the eyes, rinse immediately
with large amounts of fresh water and seek medical
attention. Electrolyte spilled on skin should be rinsed
well with fresh water also. Even a small amount of
electrolyte spilled on clothing will destroy the clothing.
ELECTROLYTE LEVEL:
The electrolyte level in a
battery should never be allowed to fall
low enough to expose the
plates. This not only results in a loss
of battery capacity while the
battery is low, but will cause hardening
of the active material on the
battery plates. This will result
in a permanent loss of battery
capacity.
CAUTION! Use
only pure distilled water to replenish electrolyte
levels. The water from many city water supply systems
is unsatisfactory for battery use.
CHARGING THE BATTERY:
Before adding water. a
hydrometer reading of the battery should
be taken. If the reading shows
the battery to be above 1.225 specific
gravity, the battery has a
sufficient charge. If the reading is
below 1.225, the battery should
be removed for bench charge.
IMPORTANT: Do not leave
your batteries on charge for more than
forty-eight (48) hours. If there is no rise in voltage
or specific gravity in a period of two hours, further
charging is useless and may damage the battery beyond
repair.
Once charged. the battery
should have a specific gravity of at
least 1.260. If this cannot be
reached, the battery should be
inspected by a battery
supplier.
The batteries should be checked
often to ensure that they do not
run down. Check that all
battery cells keep an even fluid level
and that the fluid is about
3/8" above the top of the separators.
If one or two cells have lower
fluid levels, it is a good indicator
that something is wrong with
the battery, and it should be checked.
DISCHARGED STATE:
Leaving a battery in a
discharged state for any length of time
can also result in a permanent
loss of capacity for the battery.
Since it will freeze at
relatively low temperatures, leaving it
in the cold can destroy the
battery.
CLEAN CONNECTIONS:
Keep the battery connections
clean and tight. A cupful of strong
baking soda solution and a
toothbrush will clean corrosion from
the terminals and neutralize
any spilled acid. (Do not allow any
of the solution to enter the
battery cells). A coating of petroleum
jelly on the battery terminals
will inhibit corrosion.
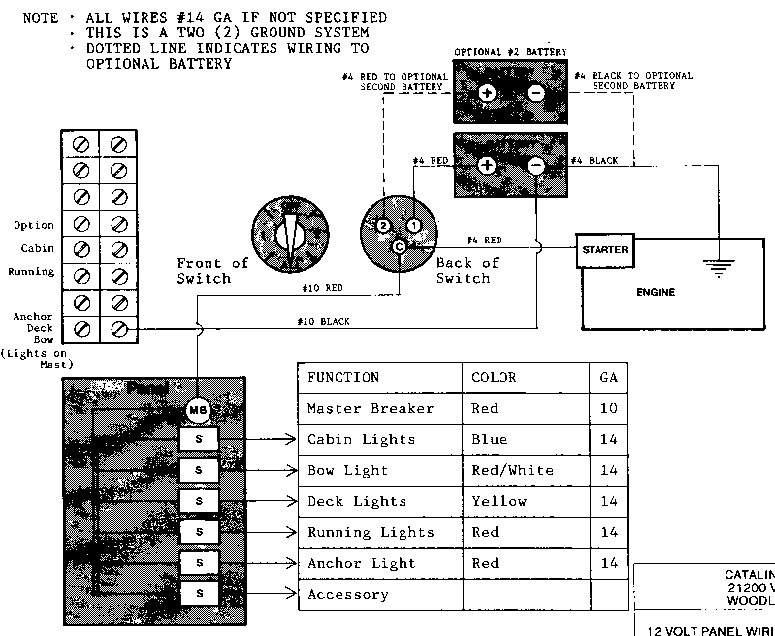
4.2.2 ELECTRICAL SYSTEM:
The Catalina 25 is equipped with a standard 12 volt DC system
and
an optional 110-115 volt AC system. The wiring is run to
prevent
chaffing or contact with water, where possible. and is
supported
as needed. we recommend that you check all the connections at
least once a year for corrosion. loose fittings. etc.
DC - 12 VOLT SYSTEM:
The DC system is powered by one deep cycle battery located
under
the forward part of the aft quarter berth. The optional
battery,
when ordered, is located next to it. The DC electrical system
is controlled by a main breaker panel with switches for
running
lights, interior lights and accessories. The interior lights
are
also controlled by individual switches on the lights
themselves.
The Catalina 25 with outboard engine has no method for
recharging
the battery. Always ensure that your battery is fully charged
before setting out on a trip. See section 4.2.1 for more
informa-
tion on care of your battery.
MAIN DC CIRCUIT BREAKER:
Operating switches for lights and accessories are located on
the
main switch panel. The main circuit breaker will
automatically
trip to the OFF position in the event of an overload to the
circuit.
If the breaker trips to OFF, the cause should be determined
and
any necessary repairs should be made before repositioning the
circuit
breaker switch to ON.
Before purchasing any electrical accessories for your boat.
ensure
that they are compatible to a negative ground system.
The electrical panel is located at floor level, adjacent to
the
galley. It is attached with screws which can be easily
removed
for maintenance access.
IMPORTANT: Be sure to disconnect the batteries before opening
the panel, or
severe injuries may result.
All wires, terminals and connections should be checked
periodically
for loose connections or corrosion which could cause high
resistance.
electrical sparks or fires. The engine accessory wiring
should
also be checked at this time.
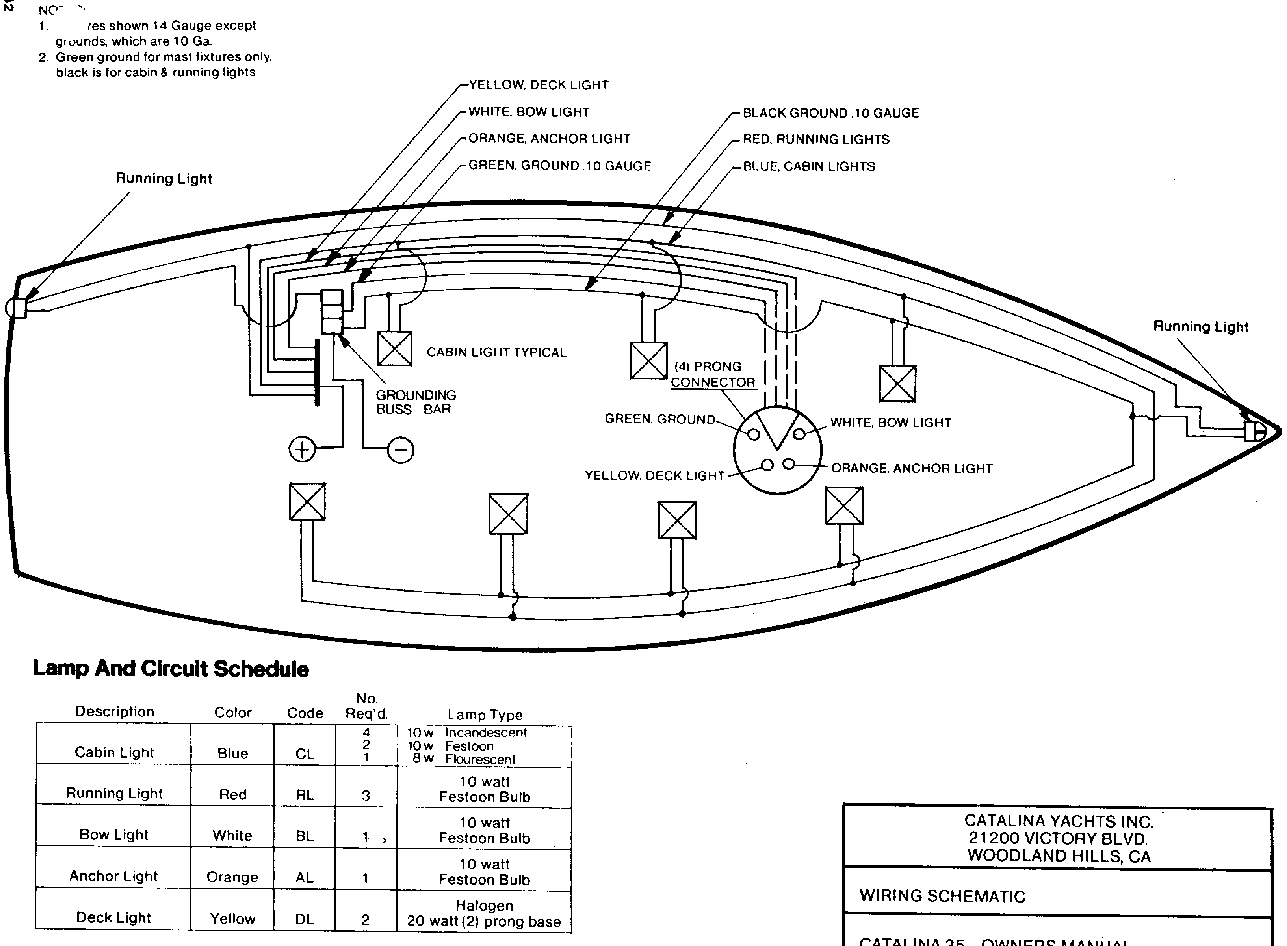
NAVIGATION LIGHTS:
Navigation lights should be used in accordance with the rules
and
regulations of the waters in which you intend to sail.
Generally, navigation lights should be used from dusk to dawn
in
all weather conditions. It is advisable to use the navigation
lights any time visibility is poor.
Your Catalina 25 is equipped with the following navigation lights:
(a) Red and Green
112.50 combination lights mounted on the
bow pulpit.
(b) White 1350
stern light mounted on the stern pulpit.
(c) White 225"
steaming light mounted on the mast.
(d) White 360"
anchor light mounted on the masthead.
(a) and (b) are wired to the
bow light switch on the panel. (c)
is wired to the steaming light
switch, and (d) is wired to the
anchor light switch.
When underway by sail. the bow
light and stern light must be used.
When underway by power, the
steaming light, bow light and stern
light must be on. At anchor.
the anchor light should be on.
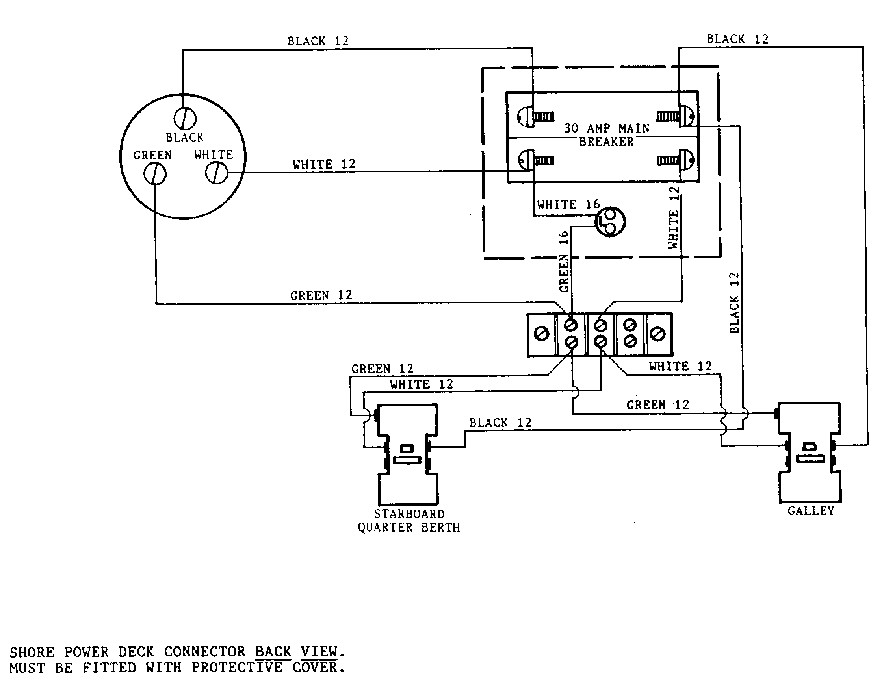
AC - 110-115 VOLT SYSTEM:
The llOV AC power system
depends upon the boat being connected
to a 110V-30 amp shore power
connector. The factory option offers
a 25' shore power cable which
should be plugged into the 110v inlet
on the boat (located in the
cockpit) and into the shore power connector
on the dock.
IMPORTANT: TO MINIMIZE SHOCK
AND FIRE HAZARDS
1. Turn off the boat's shore connection switch
before connection or disconnecting the shore
power cable.
2. Connect the shore power cable at the boat first.
3. If the polarity warning indicator is activated,
disconnect the cable immediately.
4. Disconnect the shore power cable at the shore
outlet first.
5. Close the shore power inlet cover tightly.
6. DO NOT ALTER THE SHORE POWER CABLE CONNECTORS
IN ANY WAY. SEVERE INJURY MA'I OCCUR.
Care should be taken to support
the shore power cable at both ends
to allow sufficient slack to
avoid pulling. Remember to allow
for the tide.
The AC panel is located next to
the DC switch panel. This panel
controls the llOV switch
outlets. The master circuit breaker controls
AC flow in the boat. When no
llOV AC is in use, or when connecting
and disconnecting the shore
power cable, this circuit breaker must
be turned OFF.
The master breaker switch is 30 amp, two pole. There are two (2)
llOv outlets, one located by the quarter berth and the second located
in the galley. Be certain that all 110 volt appliances, other
than lamps, have an adequate grounding connector. Wet feet or
moist atmosphere increases the potential shock hazard.
There is a reverse polarity indicator on the panel. With all switches
off, attach the power cable to the inlet. Next, attach the power
cable to the dock outlet. If the reverse polarity light comes
on, DISCONNECT THE CORD IMMEDIATELY! This indicates a reverse polarity
situation which is very dangerous.
WARNING: Do not open the electrical panel for any purpose with
the shore power cable connected to the dock. 210
volt
wiring is exposed when the panel is open. Contact
with
110 volt wiring can cause electrocution.
Electricity
is dangerous. Even when safety devices are
present,
handle with care and use reasonable caution.
GROUND FAULT INTERRUPTER:
G.F.I. receptacles are designed to provide protection against electrical
shock hazards due to line-to-ground faults. Although the G.F.I.
receptacle does not limit the magnitude of the fault current. and
therefore cannot prevent electrical shock, it does limit the duration
of the shock to a period considered safe for normal healthy persons.
G.F.I. receptacles will provide protection against ground faults
only. They will not protect against overloads or short circuits.
There is no known device that will guard against the electric shock
hazard resulting from contact with both the 'hot' and neutral wires
of the electrical circuit.
The llOv AC outlets in the Catalina 25 are protected by the G.F.I.
receptacle. If there is a power failure which does not affect
the fuse or breaker serving these outlets, unplug all cord-connected
appliances from the protected outlets and restore power by pressing
the red RESET button on the receptacle. Push the RESET back in
and reconnect the appliances one at a time. Any defective appliance
will trip the button and should be repaired at once.
If the appliances are all disconnected, and the RESET button will
not stay in. call a qualified electrician. If the RESET button
does not pop out when the blue TEST button is pressed, PROTECTION
IS LOST. Do not use any of the outlets and call a qualified elec-
trician immediately.
IMPORTANT: Your Ground Fault Interrupter Circuit should be tested
regularly. Use the following steps:
1. Push the blue TEST button. The red
RESET button
should pop out. Power is now
out at that outlet
indicating that the circuit is
operating properly.
2. If the button does not pop out when testing,
do not use that outlet. Protection is- lost and
a qualified electrician should be called.
3. TO restore power, push the RESET button.
PREVENTIVE MAINTENANCE:
This consists of periodic
inspection and protection against any
damage created by the elements.
Electrical systems are adversely
affected by moisture and a
salt-air environment.
The system can be protected by
the application of aerosol sprays
such as WD-40 or CRC. All wire
harnesses and connections should
be checked periodically to
ensure that fastenings are secured and
that everything is clean with
no sign of damage or corrosion.
It is extremely important that
all connections be kept clean.
WARNING: Do not perform
any maintenance or repair on a live circuit.
Do not turn the main DC switch off while the engine
is running. This could cause damage to the alternator.
The manual bilge pump is located in the
port cockpit locker. Insert
the handle through the water-tight fitting
in the cockpit to operate
the pump.
The pump intake hose (1" inside
diameter) is in the bilge under
the main cabin sole.
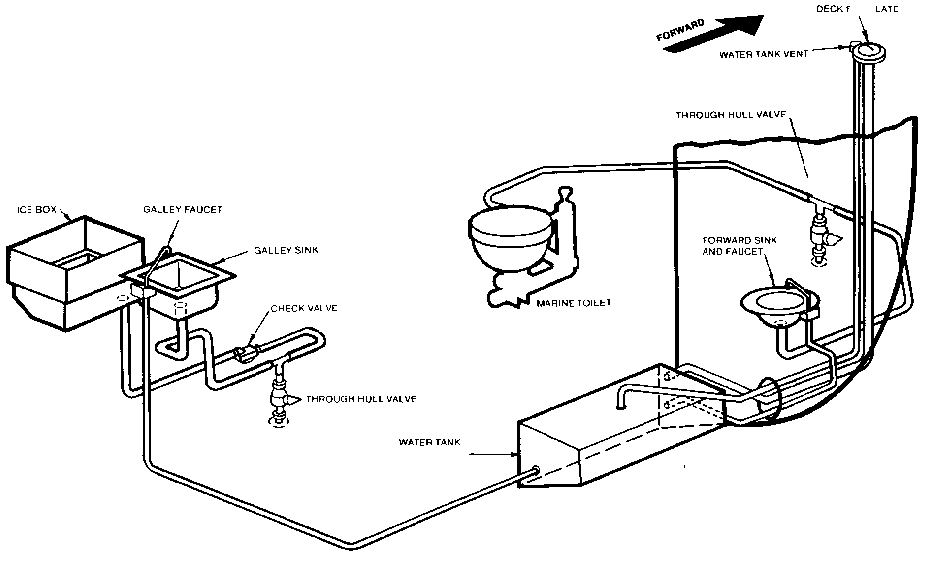
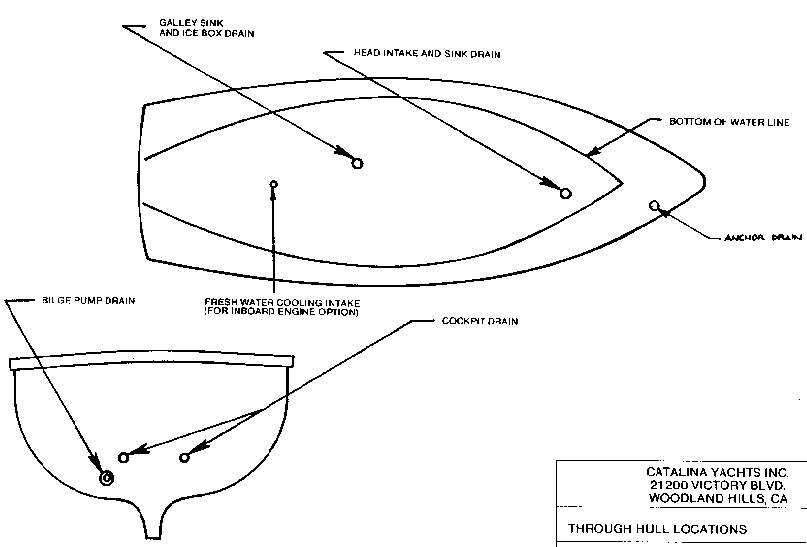
4.3.3 SEACOCKS:
All underwater through hull fittings are
equipped with seacock
1/4 turn valves. It is good practice to
close all seacock valves
when leaving the boat. especially for long
periods of time.
To close seacocks. turn clockwise 1/4 turn.
To open, turn counter-
clockwise 1/4 turn.
It is good practice to operate the seacock
valves at least once
a month to keep the seals lubricated.
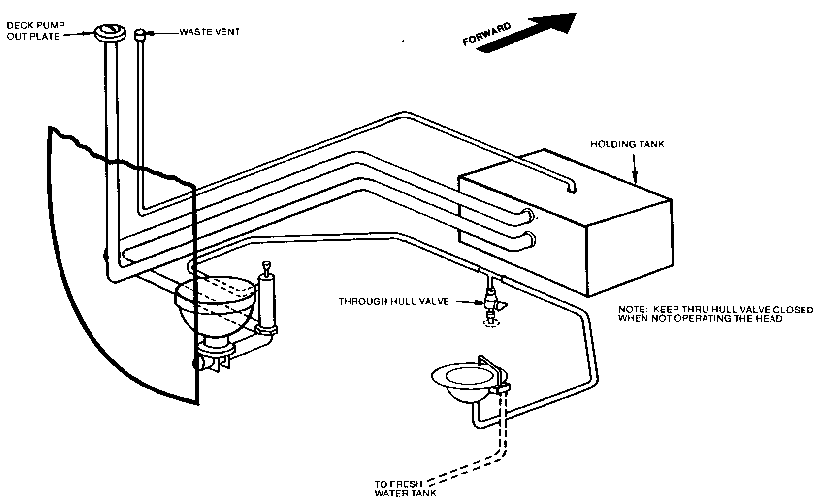
4.3.4 MARINE TOILET OPERATION:
USING THE HEAD:
1. Read the instructions
supplied by the toilet manufacturer
for
operating your marine toilet.
These
instructions are also printed on the toilet pump
housing. Be sure everyone who will be using the head is
familiar with these instructions.
2. Immediately before
using the head, the inlet valve "A"
must be
opened. This provides flushing water to the toilet.
The
valve should be kept closed when the head is not in
use.
This will prevent water from flooding the boat if
the
valve in the toilet pump should fail.
3. waste will be pumped
directly into the holding tank when
the
bowl is emptied. A minimum amount of water for every
flush
should be used in order to take best advantage of
the
tank's capacity between pump-outs.
4. The condition of the
holding tank should be checked from
time to
time. Overfilling can cause the tank to burst.
5. To clean the head, use
hot water and soap. High strength
cleaners may cause damage to the valves and seals in your
pump
system. If there is any problem with the head, it
should
be corrected immediately.
EMPTYING THE TANK THROUGH THE DECK DISCHARGE PLATE:
1. The
holding tank should be emptied via the deck discharge
plate only at approved shore-based pump-out stations.
2. Remove the
cap from the deck discharge plate. The threads
on the plate cap should be periodically coated with silicone
spray or petroleum jelly to ensure a good seal.
3. The
pump-out station suction hose should form a seal at
the deck plate.
4. Be sure
inlet valve "AO is closed when the tank is being
emptied.
5. After the
tank is empty, you may wish to open valve "A"
and pump some water through the toilet and into the tank
to dilute residual sludge and rinse the tank and lines.
6. Close all
valves after the tank is emptied, and recap the
deck plate.
An outboard engine of 7.5 to 15 horsepower
should be adequate to
propel the Catalina 25 at hull speed under
usual conditions.
n larger engine will not increase hull
speed and may add additional
unnecessary weight in the stern.
Long shaft engines are preferable, however,
standard length shaft
engines should be adequate for most
conditions.
4.4.2 OUTBOARD BRACKET:
The factory installed outboard bracket is
spring loaded to assist
lifting and lowering the engine. It locks
in both the up and down
position. To release the lock in either
position, a downward pressure
is applied to the handle while lifting or
lowering the engine.
The motor should not be lifted clear of the
water while it is running.
While under sail, the motor should he kept
in the raised position
and tilted forward so that the propeller is
clear of the water
to eliminate unnecessary drag.
The motor bracket manufacturer recommends
that an 18 H.P. maximum
engine should not be exceeded.
Danger - the spring assisted bracket must
not be raised or lowered
without an engine in place. Should the
bracket be released without
an engine the upward force of the bracket
could cause serious injury.
4.4.3 GENERAL ENGINE INFORMATION:
For a complete
description of your engine, please consult the guide
supplied by the
engine manufacturer. This can he found in your
owner's packet.
Two points are
worth special attention. Firstly, marine engines
work under
conditions tougher than those of automotive engines.
Your marine engine
faces constant torquing not encountered on the
highway. For this
reason, you must change your engine's crank
oil as recommended
in the engine manufacturer's guide. Secondly,
before using your
engine. the shaft coupling must be adjusted within
a tolerance of .003
(thousandths of an inch) T.I.R. after launching.
This is done during
commissioning of the yacht. se sure that your
dealer has made
this adjustment before using your engine.
Change the oil
regularly. Keep spare parts and alternator belts
on hand and use
only 2/3 to 3/4 throttle on long passages. Keep
your fuel tank full
whenever possible to prevent water condensation
in your fuel tank.
To retard
electrolysis. we recommend installing a zinc collar immediately
on the propeller
shaft when the boat is to be used in salt water.
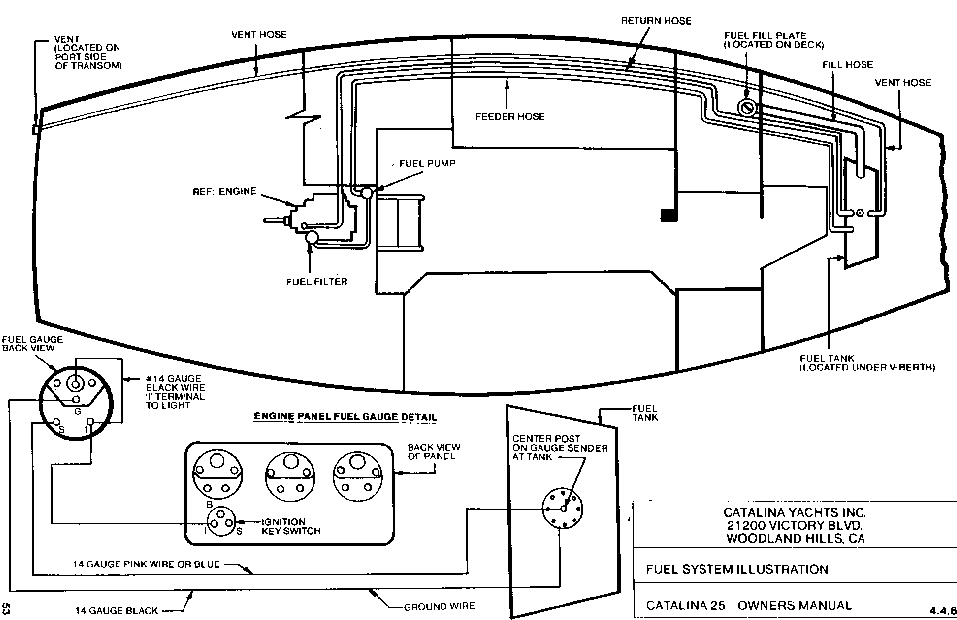
4.4.4 FUELING:
The fuel system of
the Catalina 25 is illustrated. and consists
of fuel tank, fuel
suction and return lines. a fuel filter on the
engine, and an
electric fuel pump controlled by the engine key
switch, a deck fill
plate, and an overboard vent through the transom.
Refer to the
Universal Engine manual provided for recommended fuel
type. A diesel
engine does not require an ignition system and
is superior to a
gasoline engine in dependability.
This depends on the
clean fuel being supplied to the engine since
the close
tolerances required by the engine's fuel delivery system
make it intolerant
of dirt or water contamination. The engine
is supplied with
primary and secondary filters that prevent contaminants
from reaching the
engine where they could cause damage. However,
a clogged filter,
although providing this protection, can also
stop an engine.
Keeping the filters free of dirt and water is
critical.
BEFORE FUELING:
1. Extinguish all smoking materials and check
around the fueling
area for other sources of spark or
flame. Remove if found.
2. Shut off the engine and any electrical
accessories or devices.
3. De-energize all electrical equipment by turning
the selector
switch to the off position.
4. Close all hatches and ports.
5. Ensure that a fire extinguisher is readily
available.
6. Ensure that the proper (diesel, not gasoline)
hose is about
to be used.
WARNING: Do not fuel during an electrical storm. Besides the
obvious hazards of lightning, the possibility of static
discharge is greatly increased at this time.
FUELING PROCEDURE:
1. Remove fill pipe cover using a proper teal.
2. Place nozzle of fuel hose in the fill pipe.
Keep the nozzle
in contact with the deck plate rim
during fueling to avoid
the possibility of a static spark.
3. Fill slowly. Do not overfill. If it is not
possible to
see the meter on the fuel pump. the
attendant or a crew
member should call out the gallonage
from the fuel dock.
Filling the tank to only 95% of
capacity will avoid overflow
problems on a hot day.
4. Replace cover, clean up any spilled fuel. If
any rags.
etc.. were used for this purpose,
dispose of them ashore.
5. Check below decks for presence of fumes or fuel
leakage.
Check bilge, engine space, and main
cabin. If fumes or
evidence of leakage are found,
determine the cause. correct
it and clean up any spillage before
proceeding.
6. Open all hatches and ports to ventilate the
boat.
7. Switch on battery.
8. The engine should be started only when it is
certain that
no potentially hazardous conditions
exist.
4.4.5 FUEL SANITATION:
BACTERIAL CONTAMINATION:
Bacterial contamination of the
diesel fuel can cause problems.
The bacteria needs both water
and fuel to exist, and thrive at
the fuel/water interface in a
fuel tank. As they multiply, they
form more water and a tilter
choking brown slime. Their presence
will not be known until tough
weather churns up the fuel tank causing
clogged filters at the worst
possible time.
Keeping water out of the fuel
will prevent the problem entirely.
However, a certain amount of
water, due to normal condensation
in the tank, is to he expected.
FUEL ADDITIVES:
Fuel additives or fungicides
provide another means of combating
contamination. Additives break
the water down to a molecular level.
dispersing it throughout the
fuel and allowing it to pass harmlessly
through the fuel system.
Several brands of this product are available
at marine stores.

