|
|
|
|
|
|
|
|
|
|
|
|
|
|
|
|
|
|
|
|
|
|
|
|
|
|
|
|
|
|
|
|
|
|
|
|
|
|
|
|
|
|
|
|
|
|
|
|
|

CAUTION
The aluminum mast and other metal parts conduct electricity coming in contact with or near an electrical power line or lightning can cause severe injury or death. Stay away from overhead electrical power lines when sailing and/or launching the boat.
When tailoring your boat always try to undo as little rigging as Possible. It is necessary only to undo the two forward lower shrouds and the forestay before lowering the mast.
1. Before raising mast, make sure halyards are neatly tied down and that they are on proper sides of the spreaders. You should never attempt to raise the mast unless the upper shrouds (those that pass over the spreaders) and the aft lower shrouds are attached to the deck fittings and the turn buckles well "started" into their barrels. The turnbuckles must not be completely tightened however, because slack is needed in the shrouds to enable the mast to be fully raised. The backstay should be attached to the transom chainplate. The upper shrouds, after lower shrouds, and backstay will keep the mast from falling over when it is raised, therefore, all of these must be attached to the chainplates before the mast is raised.
2. Make sure that the shrouds and stays are not fouled. Backstay should lie clear of the transom. You may step the mast on land or while the boat is in the water. It seems to be easier on land because the boat is still. Also, it keeps other sailors from getting impatient while they wait for you to move out of the launch area.
3. Walk the mast aft and drop the mast foot into the tabernacle located on top of the deck, keeping the mast in center line of boat insert the pivot bolt and locking nut.
4. One crew member should pull on a line tied securely to the forestay while another pushes up on the mast and walks from the cockpit forward. With the mast erect, attach the forestay and forward lower shrouds.
RIGGING FOR HOIST LAUNCHING
The fixed-keel model Catalina 25 should be launched with the aid of a hoist and slings. The local dealer and boat yard using hoists can advise you about this and will handle the operation for you. Retractable-keel models are also often launched using a hoist and slings.
Either model boat can be hoist launched with the mast stepped and in place in the vertical
position by releasing the backstay at the turn buckle where it attaches to the transom. However,
the remainder of the mast's shrouds and forward stay must be properly connected to their
chainplates. Most importantly, check that the aft lower shrouds are secure since they will keep
the mast from falling forward when the backstay Is disconnected from the transom. Be sure to re-
connect the backstay before raising sails or getting under way.
TUNING THE MAST
The mast is held aloft by the Standing Rigging (forestay, backstay, upper shrouds, double lower shrouds). The term "tuning" refers to adjustment of the standing rigging so that the mast remains "in column" (not bent) when under load. This is accomplished by following the procedure outlined below:
At the dock:
1. Adjust forestay and backstay so that the mast is straight up and down (perpendicular). Tie a bolt to a 6 to 7 foot long piece of light line to make a quick plumb bob, and tape the free end of the line to the front of the mast as high up as you can reach. This device will help you determine whether the mast is perpendicular or not.
2. Adjust upper shrouds so that the mast is straight up and down athwarthships, that is from side to side as opposed to from bow to stern.
3. The upper shrouds should be firm but not tight. A 50 pound push should deflect the upper shroud about 1M" at shoulder height.
4. The lower shrouds (4 of them) should be adjusted so that they are looser than the upper shrouds. While at the dock they should have no slack but also have no tension on them. No lower shroud when pushed should deflect the mast more than any other shroud when pushed equally hard. If this can't be achieved, the upper shrouds are too tight. Back off one-half turn at a time on the upper shroud turnbuckles until the tension on the lower shrouds is brought into balance.
FINE TUNING WHILE SAILING
The object of Fine Tuning is to have the mast "in column" (not bent fore or aft or athwartships) when sailing in conditions typical for your area. This is accomplished through adjustments to the lower shroud turnbuckles. Here are some points to look for:
1. When sailing on port tack, sight up the mast from the base. If the middle (where the spreaders are) is sagging to leeward, take up equally on both port lower shrouds until the mast is in column. Repeat this procedure on starboard tack.
2. If, when sighting up the mast while on port tack, the middle is bent forward (but not to leeward) take up a turn on the port aft lower shroud and let out a turn on the port forward lower shroud turn buckle. Reverse these adjustments if the middle of the mast is aft of the "in column position.
3. If a perfectly straight mast is not obtained, the mast head (top) may be curved aft and to leeward. The mast head should never be "hooked" forward to weather.
All rigging wire used on yachts has a tendency to stretch, especially on a new yacht, or after you have sailed in heavier wind than you normally experience. Therefore, you should periodically check the tension on the shrouds and stays, tightening them up if it is required.
Our masts are built to withstand any normal usage but improper tuning or handling can cause problems. Therefore, it is impossible to guarantee the mast under our current warranty program. Rigging, as well as tuning becomes ail important when setting up the mast. A knowledgeable person should oversee the rigging and tuning so as to eliminate the possibility of an eccentric loading which might occur with an improperly tensioned shroud. Special attention should be given to the initial stretch of the shrouds and a further gradual stretch of the wire over the first few hard outings.
When making the tuning adjustments while underway, it is advisable to keep the upper and lower nuts on each turnbuckle snug to keep from having the turnbuckle loosen. Upon completion of the tuning, tighten the nuts securely.
ALWAYS, before leaving the dock for a day's sail, check all your turnbuckle nuts for tightness.
Also, visually inspect the fittings aloft. MOST MAST FAILURES HAVE BEEN TRACED BACK
TO LOOSENED TURNBUCKLES AND IMPROPER TUNING.
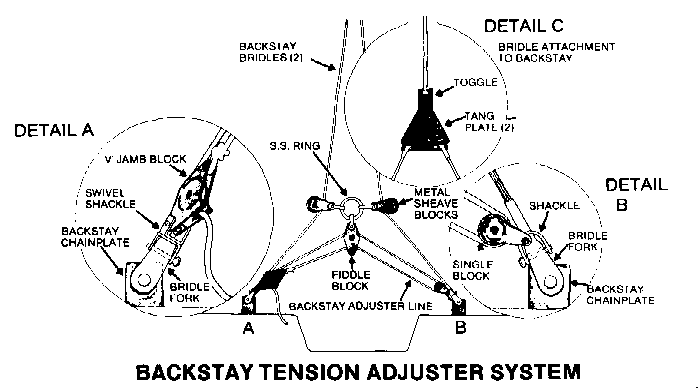
RIGGING SPECIFICATION SCHEDULE C-25
STANDARD
NOTE - MAST EXTRUSION = 28' - 0" ------- BOOM EXTRUSION = 10' - 4"
Description ------ S.S. Wire Size ------ L = Length ------ No. Reqd
Main Halyard ------ 1/8" 7x19 ------ 27' - 8" ------ 1
Jib Halyard ------ 1/8" 7x19 ------ 29' - 2" ------ 1
Forestay ------ 3/16" 1x19 ------ 29' -10" ------ 1
Single Backstay ------ 3/16" 1x19 ------ 32' - 3" ------ 1
Split Backstay ------ 3/16" 1x19 ------ 26' - 4" ------ 1
Backstay Bridle ------ 3/16" 1x19 ------ 5' - 8 1/2" ------ 2
Forward Lowers ------ 5/32" 1x19 ------ 14' - 5" ------ 2
Aft Lowers ------ 5/32" 1x19 ------ 14' - 7 1/4" ------ 2
Upper Shrouds ------ 3/16" 1x19 ------ 28' - 5 3/4" ------ 2
L = Eye to Eye for halyards
L = Eye to end of the threads for shrouds and stays
TALL RIG
NOTE - MAST EXTRUSION = 30' - 0" ------ BOOM EXTRUSION = 10' - 4"
Description ------ S.S. Wire Size ------ L = Length ------ No. Reqd
Main Halyard ------ 1/8" 7x19 ------ 27' - 8" ------ 1
Jib Halyard ------ 1/8" 7x19 ------ 29' - 2" ------ 1
Forestay ------ 3/16" 1x19 ------ 31' -10" ------ 1
Single Backstay ------ 3/16" 1x19 ------ 33' - 11 1/4" ------ 1
Split Backstay ------ 3/16" 1x19 ------ 28' - 2" ------ 1
Backstay Bridle ------ 3/16" 1x19 ------ 5' - 8 1/2" ----- 2
Forward Lowers ------ 5/32" 1x19 ------ 15' - 5" ------ 2
Aft Lowers ------ 5/32" 1x19 ------ 15' - 6 1/4" ------ 2
Upper Shrouds ------ 3/16" 1x19 ------ 30' - 6 1/2" ------ 2
All dimensions are approximate and subject to change
SPAR AND RIGGING MAINTENANCE
Mill finish aluminum on the standard spar surfaces are protected against corrosion by a thin naturally formed film of aluminum oxide. Dust, dirt, smoke, salt and traffic fumes will adhere to this film, making the surface dull and unsightly. Coating the new surfaces with a good paste wax like Vista or Simonize, will help protect the aluminum oxide from foreign matter. If the surface has become tarnished, a good high grade cleaner, wax, or polish will help restore the original sheen. Heavier pitting can be removed by wetsanding with #600 paper prior to polishing and waxing.
Anodized spars need only to be washed with soap and fresh water and waxed each season to maintain the original finish for many years.
Fill finish aluminum spars may also be painted. Epoxy and polyurethane paint systems have been specially formulated for use on aluminum spars. The coating manufacturers' instructions should be followed.
Salt water will gradually stiffen dacron line. Hosing with fresh water or soaking in warm soapywater will make the line soft and flexible again. Be sure to rinse line thoroughly. Keep line coiled and stowed in a dry spot below.
Clean rigging means clean sails. A quick trip aloft with damp rags takes care of this problem. While aloft, check the entire rig for loose screws, nuts, bolts, cotter pins and chafe which may have resulted from hard sailing. Periodic inspection of the rig is one of your best insurance against rigging and spar failure. Keeping halyards tied away from the mast stops the annoying dockside clanking and save the mast finish.
Test the mast light before the mast is raised, this is especially important after the boat has been trailered. Spreader tips, turnbuckle barrels and clevis pins should be taped or covered with plastic caps to reduce chafing on the sails. Tape any part of the rigging which is sharp or jagged which may tear the sails when sailing and coming about.
BATTERIES
The 12 volt electrical system is powered by, 12 volt DC, 70 amp hour wet cell marine grade battery
Battery #1 is located under the starboard Seat-berth aft of the water tank; the battery is housed in a plastic container and is secured with a tie down to prevent movement at extreme angles of heel.
The optional second battery is located on the port side under the settee or dinette seat, the second battery is also housed in a plastic container and secured to prevent movement.
When the optional second battery is installed a battery selector switch is provided.
Battery box covers should be kept on at all times to prevent accidental arcing at the terminals.
BATTERY SELECTOR SWITCH
The circular sparkproof switch has the marking 1,2, and "ALL" as well as "OFF".
If your outboard motor is equipped with an alternator and electric starter NEVER pass through the OFF position to change from one battery to the other with the engine running or the alternator diodes will be burned out. Switching from one battery to another should only be done with the engine stopped. If both batteries are of equal charge, keep the selector switch on ALL position, and use ALL to start the engine if both batteries are low.
110 VOLT SHORE POWER SYSTEM
The optional 110 volt AC system is connected to shore power by a grounded, twist-lock- connector mounted on the outside of the port cockpit coaming. Always connect the power cord to the boat and then to the Shore power source. When removing the cord unplug at the shore connection first.
A twenty-five Amp circuit breaker is located the aft bulkhead of the galley. Duplex outlets for the 1 10 Volt system are located on both sides Of the main cabin. Be certain that all 110 V. appliances, other than lamps, have an adequate grounding connector. Wet feet or moist atmosphere increase the potential shock hazard.
Always use a marine type three (3) prong connector w/locking ground for all shore power
connections.
Next