Catalina - Capri - 25s International Assocaition Logo(2006)  
Assn Members Area · Join
Association Forum
Association Forum
Home | Profile | Register | Active Topics | Forum Users | Search | FAQ
Username:
Password:
Save Password
Forgot your Password?

 All Forums
 Catalina/Capri 25/250 Sailor's Forums
 General Sailing Forum
 Skerry 15' Sailboat Completed !
 New Topic  Reply to Topic
 Printer Friendly
Author Previous Topic Topic Next Topic  

OLarryR
Master Marine Consultant

Member Avatar

USA
3367 Posts

Initially Posted - 03/06/2020 :  13:32:19  Show Profile  Visit OLarryR's Homepage  Reply with Quote
Completed 50% (the basic hull) during end of September 2019 5 1/2 day, build class at Chesapeake Light Craft (CLC) in Annapolis, Md. Then completed construction end of February 2020 (~ 5 months).

Worked on it approximately 4-5 days a week, most weeks. The first 1-2 months while I was sanding, scarfing/joining the rail for the inwales w/spacers (inner top rail) and then epoxying and applying finish coats to the hull (bow to stern), I worked about 3 hours a day. After that, I then worked about 1 1/2 hrs/day. 4-5 days most weeks on specific tasks: scarfing/epoxy joining the wood to build the mast, boom and yard; daggerboard, kick-up rudder & rudder box. etc. I was still able to go out sailing on my Cat 25, once a week, most weeks since we had a relatively warm winter days (45-60F).

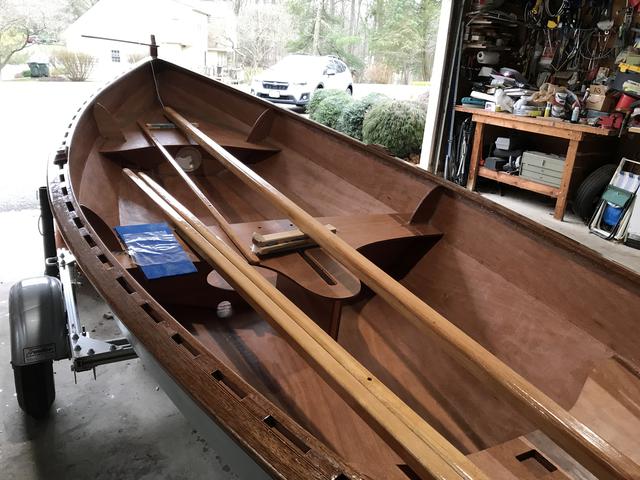
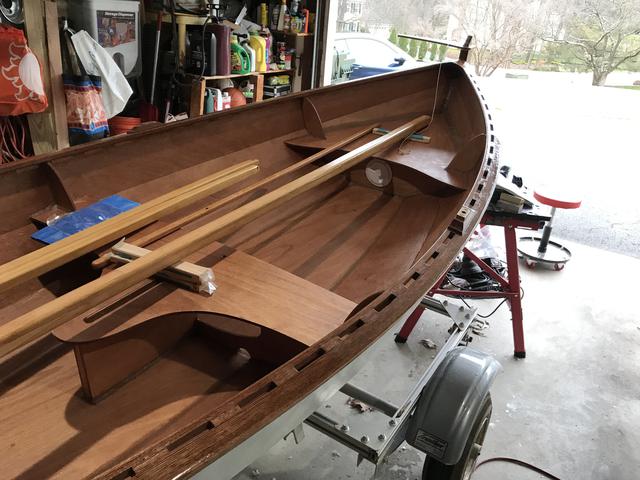
Here are a few photos of the Skerry 15'. More are on my website - See Section on top right of opening page for the "Skerry". I also added orange raft netting to the bow and stern rails to keep gear/clothing bag(s) from potentially going overboard. I'll add a photo with the netting to my website after I add reefing fittings/lines to the boom - probably in a couple of weeks.

Not much to do on my Cat 25 this Spring...except some normal maintenance - a teak oil exterior wood refresh, Polyglow to topsides, non-skid cleaner wax to the deck/cabin top non-skid areas, then maybe a light sand/varnish refinish to some areas of my tiller, The other day, I attended to the cockpit with some cleaner wax and then pure wax finish. Non-skid cleaner wax to the cockpit non-skid surrounding areas.


Larry
'89 Robin's Nest#5820, Potomac River/Quantico, Va
http://catalina25.homestead.com/olarryr.html

bjoye
Navigator

Members Avatar

USA
105 Posts

Response Posted - 03/06/2020 :  14:21:13  Show Profile  Reply with Quote
Truly Awesome!

"Frayed Knot" 1989 C-25 WK/SR #5878
Go to Top of Page

Buzz Maring
Master Marine Consultant

Members Avatar

USA
1762 Posts

Response Posted - 03/06/2020 :  15:40:37  Show Profile  Reply with Quote
Beautiful work!

Buzz Maring

~~Freya~~
C-25 SK/SR #68
Lake Dallas, TX
Go to Top of Page

OLarryR
Master Marine Consultant

Members Avatar

USA
3367 Posts

Response Posted - 03/06/2020 :  21:15:50  Show Profile  Visit OLarryR's Homepage  Reply with Quote
Thanks guys!

Larry
'89 Robin's Nest#5820, Potomac River/Quantico, Va
http://catalina25.homestead.com/olarryr.html
Go to Top of Page

islander
Master Marine Consultant

Members Avatar

USA
3992 Posts

Response Posted - 03/07/2020 :  13:31:25  Show Profile  Reply with Quote
Very nice Larry, Now you can sell it to Dave. He's looking for a small boat

Scott-"IMPULSE"87'C25/SR/WK/Din.#5688
Sailing out of Glen Cove,L.I Sound


Go to Top of Page

Stinkpotter
Master Marine Consultant

Members Avatar

Djibouti
9013 Posts

Response Posted - 03/07/2020 :  14:06:17  Show Profile  Reply with Quote
quote:
Originally posted by islander

Now you can sell it to Dave. He's looking for a small boat


I doubt I can afford it... Beautiful work!

Dave Bristle
Association "Port Captain" for Mystic/Stonington CT
PO of 1985 C-25 SR/FK #5032 Passage, USCG "sixpack" (expired),
Now on Eastern 27 $+!nkp*+ Sarge
Go to Top of Page

zeil
Master Marine Consultant

Members Avatar

Canada
1297 Posts

Response Posted - 03/07/2020 :  15:59:24  Show Profile  Reply with Quote

What a beauty


Henk & Johanna
"Floating", a few off your "barnacles".
"Someday Lady" '95 C250WB #151 ('03 - 2016)
"Sea ya" 30ft Bayliner (04-2018 - 09-2018)
"Mariah" '96 C250WB #191 (05-2019 - 15-05-2023)
"Lady J" '00 C250WK #499 (05-2021 - 09-2022)
Go to Top of Page

glivs
Admiral

Members Avatar

USA
822 Posts

Response Posted - 03/07/2020 :  21:03:43  Show Profile  Reply with Quote
Well done Larry. Beautiful.
Curious...is the mast hollow at the base and solid at the top? Square in cross-section at the base and circular at the top?

Gerry & Leslie; Malletts Bay, VT
"Great Escape" 1989 C-25 SR/WK #5972
Go to Top of Page

OLarryR
Master Marine Consultant

Members Avatar

USA
3367 Posts

Response Posted - 03/08/2020 :  17:39:36  Show Profile  Visit OLarryR's Homepage  Reply with Quote
The mast starts off as two pieces of square hardwood. The sections are joined using epoxy mixed with some Silica an applied to an angled/scarfed joint, clamped together with a few adjustable bar clamps. After this solid hardwood mast and joint are sanded smooth, it is given a pleasing shape by rounding off the sides along the entire length by putting a 1/2” radius curve on each side along the entire mast length using a router.

Same work also accomplished on the thinner boom and yard but they have added step -get tapered down from 1 1/2” to 1” along the last 2-2 1/2 ft of each end...and that was a bear!

(The hull, bow to stern, interior and exterior, had fiberglass mat epoxied to it during the class. No fillers, just the epoxy resin and hardener. Then at home, after trimming the fiberglass and sanding the hull, 3 coats of epoxy resin were applied to the interior and exterior. The fillet welds throughout the boat were accomplished using epoxy mixed with wood flour. The scarf joints for the mast, boom and yard were accomplished with epoxy resin mixed with Silica. Pretty much everything that was epoxied, I then applied 4 varnish coats except the exterior - The exterior, applied 2 coats of Interlux Pre-Kote paint after sanding the 3rd epoxy coat w/220 sandpaper, then applied 2 coats of Interlux Brightside paint after sanding the Pre-Kote.)

Larry
'89 Robin's Nest#5820, Potomac River/Quantico, Va
http://catalina25.homestead.com/olarryr.html

Edited by - OLarryR on 03/09/2020 14:42:52
Go to Top of Page

OLarryR
Master Marine Consultant

Members Avatar

USA
3367 Posts

Response Posted - 03/08/2020 :  18:21:33  Show Profile  Visit OLarryR's Homepage  Reply with Quote
Dave,

I know I would never be able to sell it for what it has cost - The basic kit, mast kit, inwales kit and I also bought oars. Then there is the cost of the build class. But it’s a hobby. You get to work on something you like to do and then joy of completing it.


Larry
'89 Robin's Nest#5820, Potomac River/Quantico, Va
http://catalina25.homestead.com/olarryr.html
Go to Top of Page

dmpilc
Master Marine Consultant

Members Avatar

USA
4593 Posts

Response Posted - 03/09/2020 :  07:23:44  Show Profile  Reply with Quote
Beautiful boat! Looks like a lot of love and joy went into building it.

DavidP
1975 C-22 SK #5459 "Shadowfax" Fleet 52
PO of 1984 C-25 SK/TR #4142 "Recess"
Percy Priest Yacht Club, Hamilton Creek Marina, Nashville, TN
Go to Top of Page

OLarryR
Master Marine Consultant

Members Avatar

USA
3367 Posts

Response Posted - 03/09/2020 :  14:26:58  Show Profile  Visit OLarryR's Homepage  Reply with Quote
Scott, Henk, DavidP - Thanks!

Larry
'89 Robin's Nest#5820, Potomac River/Quantico, Va
http://catalina25.homestead.com/olarryr.html
Go to Top of Page

Voyager
Master Marine Consultant

Members Avatar

USA
5231 Posts

Response Posted - 03/09/2020 :  19:36:56  Show Profile  Reply with Quote
Larry, what a beautiful hobby! Wish I had the time to do it.
I was reading about your mast and spars and I see the square hole in the third thwart seat just in view in your first photo. Since the mast cannot rotate, I assume the boom and the yard do instead. How are the components held together? Lashing? Or some kind of shackles?

Bruce Ross
Passage ~ SR-FK ~ C25 #5032

Port Captain — Milford, CT
Go to Top of Page

OLarryR
Master Marine Consultant

Members Avatar

USA
3367 Posts

Response Posted - 03/09/2020 :  21:28:48  Show Profile  Visit OLarryR's Homepage  Reply with Quote
Bruce,

Yes, the mast fits thru a squared hole in the forward deck and then the squared hole in support box that was fillet welded to the hull and the forward deck support/bulkhead. I attached a fitting to the support box to attach a line and then attach it to a mast cleat to ensure the mast does not out....in case of a capsize.

The sail is permanently lashed to. the boom and yard. The main halyard passes thru a hole at the top of the mast and is attached to a hole in the Yard. So. the Yard is hoisted up and raises the sail and the attached boom. A downhaul is attached to a hole in the boom and cleated to the mast. So, the sail/Yard/Boom rotate around the mast to tack...the mast is stationary.

I have been thinking/envisioning sailing and the issues that perhaps would or should be addressed...thinking back to the days I had small sailboats. I then searched the Chesapeake Light Craft Builders Forum and the Wooden Boat Association Forums to see if they addressed some of the things I thought of and how: The attaching a line from the mast to hull structure...that seemed like a good idea...and I did come across someone that did indeed had his mast come out. Another the I am going to add, at east to the Yard near the halyard attachment point is a line loop around the mast. Some use beads and I am going to try that as well. This is so after the sail is raised but reefed, it keeps the Yard close to the mast and does not allow the sail and Yard to billow out from the mast. The line loop just rides up the mast when the sail s raised and down the mast when the sail s lowered. Then the kick up rudder was designed with a line to hold it from pivoting it up but no line to pull and secure to hold it pivoted up. So I added a line and can used a wedge cam to hold it up. Some individuals have added a metal spring tab above the top rudder pintle to keep the rudder from popping off it's hinges. The simple solution would be to just install pintles that allow a cotter pin to hold the pints in place but the kit was furnished with pintles without a cotter pin hole and so only a few drilled holes or replaced the pintle(s). Two on the forum reported the rudder popping off their boats....may have been a Skerry or a different model. Some individuals came up with other locking mechanisms. What I am going to do is just zip tie the pintle to the hinge. I tried it out with the boat on the trailer and the zip tie does not interfere with rudder movement. Then the zip tie can always cut off and another one used if rudder is pulled off the boat. I te=hen added netting to keep belongings on the deck and not going overboard.. Snaps can be used on the netting as well. I will add additional photos with the netting in couple of weeks or so.

Larry
'89 Robin's Nest#5820, Potomac River/Quantico, Va
http://catalina25.homestead.com/olarryr.html
Go to Top of Page

glivs
Admiral

Members Avatar

USA
822 Posts

Response Posted - 03/10/2020 :  19:11:48  Show Profile  Reply with Quote
Thanks for the update Larry. Would like to see pics of key details if you have the time someday and of course one with the sail up when the weather allows. You alluded to your costs but not the benefits gained....you must have extended your understanding/skills in many areas and likely accumulated a few new toys/tools along the way...oh and got a sail boat out of your experience. Again, well done.


Gerry & Leslie; Malletts Bay, VT
"Great Escape" 1989 C-25 SR/WK #5972
Go to Top of Page

OLarryR
Master Marine Consultant

Members Avatar

USA
3367 Posts

Response Posted - 03/11/2020 :  07:04:17  Show Profile  Visit OLarryR's Homepage  Reply with Quote
Gerry, what you say is true. Yeah, there are the costs but the takeaways are well worth it.
Actually, this all started many years taking interest in boatbuilding and subscribed to Wooden Boat Magazine. Then took the Introduction to Boatbuilding Class at the Wooden Boat Association School in Brooklin, Maine. Highly recommend that to all. It’s like being in Adult summer camp, get your mind off everything and just focus on accomplishing a single boatbuilding task before moving onto another. Then building your own boat (in Annapolis, Md) with others was sort of another adult summer camp and worth the experience even if not producing your own boat.

Along these journeys and continuing building in my garage, there are many skills learned abilities improved thru experience. Then there are the additional toys/tools acquired....and if a material person, so much the better....and if not, well then you may stress over the garage clutter.

A snapshot of what comes to mind and in no particular order but represents, skills, abilities, experience and acquisitions:

Clamps, Shinto rasp, compact router and then what I should have bought...a std size router, Stop Loss Bags for varnish/paint, dense foam brushes, epoxy resin with or without fillers depending on use, scarf joints, varnish techniques, how hull planks are joined, wiping down after sanding, sanding and more sanding, filter masks and gas canister masks, working temperatures for epoxy, varnish, etc. , lots of foam brushes, mixing cups and loads of plastic throw-away gloves.

Larry
'89 Robin's Nest#5820, Potomac River/Quantico, Va
http://catalina25.homestead.com/olarryr.html
Go to Top of Page
  Previous Topic Topic Next Topic  
 New Topic  Reply to Topic
 Printer Friendly
Jump To:
Association Forum © since 1999 Catalina Capri 25s International Association Go To Top Of Page
Powered By: Snitz Forums 2000 Version 3.4.06
Notice: The advice given on this site is based upon individual or quoted experience, yours may differ.
The Officers, Staff and members of this site only provide information based upon the concept that anyone utilizing this information does so at their own risk and holds harmless all contributors to this site.