Catalina - Capri - 25s International Assocaition Logo(2006)  
Assn Members Area · Join
Association Forum
Association Forum
Home | Profile | Register | Active Topics | Forum Users | Search | FAQ
Username:
Password:
Save Password
Forgot your Password?

 All Forums
 Catalina/Capri 25/250 Sailor's Forums
 Catalina 25 Specific Forum
 Sinking mast step or normal? Repair plan...
 New Topic  Topic Locked
 Printer Friendly
Author Previous Topic Topic Next Topic  

sethp001
Mainsheet C-25 Tech Editor

Member Avatar

814 Posts

Initially Posted - 08/24/2017 :  19:31:43  Show Profile
I had thought that my mast step was sinking into the deck due to cracks in the deck by the step resulting in a rotting deck core there. However, after removing the mast, the deck under the step seems solid. There is a consistent sharp report from tapping; and I cannot remove any rotten wood with a pick from the step's through-deck bolt holes.

Where the mast step sits on the deck, the deck is depressed by 1/8" (not sure if you can tell from the photos). Do other boats have a mast step contour in the deck like mine? As in, is a 1/8" depression at this location in the deck normal?

I had originally planned to cut out the area in the deck under the mast step, insert new core, and fill with West Systems Six10 Thickened Epoxy. However, in the absence of rotting deck core symptoms, I intend to fill in the depression superficially with West Systems Six10 Thickened Epoxy (recommended by West Systems tech support), then install a stainless steel plate to cover the entire raised area in the deck on which the mast step sits, which I hope will distribute the weight and loads of the mast better to prevent additional cracking.

Does this sound like a good plan?


Seth
"Outlier" 1987 Catalina 25 SR/SK/Traditional Interior #5541
"Zoo" 1977 Morgan Out Island 30
"Nomad" 1980 Prindle 16
"Lost" 1988 Catalina Capri 14.2 (sold - yay!)
"Marine Tex 1" Unknown Origin POS 8' Fiberglass Dinghy
https://whichsailboat.com/2014/07/27/catalina-25-review/

Edited by - sethp001 on 08/24/2017 19:39:24

DavidBuoy
Admiral

Members Avatar

USA
707 Posts

Response Posted - 08/25/2017 :  04:48:06  Show Profile
I don't think you can rule out any rotting from simply the knock test. You could cut out the damaged fiberglass to re-do it and when it's open you should know if the core is bad as well.


Captain Rob & Admiral Alyson
"David Buoy"-1985 C25 SK/SR #5053
Go to Top of Page

hewebb
Admiral

Members Avatar

USA
761 Posts

Response Posted - 08/25/2017 :  05:07:15  Show Profile
Mine sunk a little, however, did not crack. I did cut out a piece of fiberglass about the size of the base. and found some bad wood a short distance from the step and dug it out. I cut a piece if teak for the space between the compression post and the deck surface and filled the void with resin and glass fibers. Replaced the glass deck and gel coat.

1988 WK/SR w/inboard diesel Joe Pool Lake
Hobie 18 Lake Worth


Life is not a dress rehearsal. You will not get another chance.
Go to Top of Page

islander
Master Marine Consultant

Members Avatar

USA
3992 Posts

Response Posted - 08/25/2017 :  05:22:08  Show Profile
Seth, I have the same indentation although not as severe cracking of the gel coat. When I had my mast down I checked for moisture but like you found the core to be dry and solid. I also checked the post and that was ok. I wrote it off to 30+ years of the core drying, The wood shrinking and the weight, movement and downward pull of the shrouds. These boats aren't young anymore. My fix is to do exactly what you are thinking. My thought is that it throws the shrouds adjustments out if it gets worse. You could end up tightening the shrouds then they become loose as the mast sinks a little so you tighten them again ect. untill you run out of adjustments on the turnbuckles. I didn't have time to do the fix but will be done the next time my mast is down.

Scott-"IMPULSE"87'C25/SR/WK/Din.#5688
Sailing out of Glen Cove,L.I Sound


Go to Top of Page

Voyager
Master Marine Consultant

Members Avatar

USA
5231 Posts

Response Posted - 08/25/2017 :  05:30:34  Show Profile
Wow Seth, I can see what you're talking about. (I opened the pictures on my iPad). Passage appears to have a similar indentation but of course no major separations as shown in your photo. I have no idea how the cracks may have gotten there. Were they there when you bought your boat, but you just did not notice them until recently, or has the problem steadily been getting worse? And while the core directly beneath the top skin may be fine, could your compression post in the head be soft on top? To test this, eyeball the cabintop and then have a weighty friend step on the spot to see whether it sags or compresses.
Also, prior to purchasing your boat, could it have had a run-in with a bridge, overpass or low hanging tree limb? You might be able to see some telltale scrapes and gouging on the mast above the bow light/ steaming light. The force of such a lateral strike could drive the mast downward due to the tension in the shrouds and stays.
Just a thought.
If there's no "give" in the cabin top tabernacle base area, then I'd agree, fill the holes, glass it over, drill out new holes and start "fresh"

Bruce Ross
Passage ~ SR-FK ~ C25 #5032

Port Captain — Milford, CT
Go to Top of Page

oldengineer1949
1st Mate

Members Avatar

USA
75 Posts

Response Posted - 08/25/2017 :  10:45:19  Show Profile
Seth,

if yours is like mine, I would also check the coring around the mast power cabling through-deck just to the port of the mast step. Mine is loose, and I am afraid of what I will find, but so far, I don't have the cracking around Pualani's step like you do. Here's hoping ...

regards,

Al and Bernadette, "Pualani Nui", '82 C25 SR/SK, homeport MCB Quantico
Go to Top of Page

Akenumber
Navigator

Members Avatar

USA
247 Posts

Response Posted - 08/30/2017 :  17:57:19  Show Profile
I can honestly say, and I'm sorry. I have seen none of that. Thanks for the heads up I will keep a close look out in the future. Maybe it's only certain years. I do have some crazing, but no sinking. And mostly unfortunate, Here in so cal we don't get a lot of rain.

Ken
San Diego
84 C25 SR/FK 4116
The KRAKEN

Go to Top of Page

Stinkpotter
Master Marine Consultant

Members Avatar

Djibouti
9013 Posts

Response Posted - 08/30/2017 :  20:39:39  Show Profile
The mast tabernacle is sitting on the exterior deck/cabin fiberglass molding, which is separated from the one-piece interior head-liner molding, and the compression post under it, by a piece of plywood. It seems likely that the plywood won't perfectly fill the void between the two moldings, in which case the rig tension and other forces are going to crack something. So most of the similar cases here were solved essentially by filling the void left by the plywood. As long as the plywood, compression post, and lower post (from the cabin sole to the keel area) are sound, that's the sensible solution. I removed the tabernacle to install a mast base plate for turning blocks, and didn't see this problem--apparently it developed since for Voyager Bruce to deal with.

Dave Bristle
Association "Port Captain" for Mystic/Stonington CT
PO of 1985 C-25 SR/FK #5032 Passage, USCG "sixpack" (expired),
Now on Eastern 27 $+!nkp*+ Sarge

Edited by - Stinkpotter on 08/30/2017 20:44:17
Go to Top of Page

Lee Panza
Captain

Members Avatar

USA
465 Posts

Response Posted - 08/31/2017 :  07:34:38  Show Profile  Visit Lee Panza's Homepage
If I'm reading the photos correctly, these cracks are at the forward side of the tabernacle area. An engineer would tell you that cracks in a surface layer of a multi-layer structure occur on the convex side of a deformation. This would be consistent with Bruce's suggestion that it happened from the mast being forced aftward, but it also might have occurred from the mast being lowered aftward: if the base of the mast doesn't rise in the tabernacle as it begins to tip back (note that the pivot holes in the sides of the tabernacle are vertical slots) and this wasn't noticed in time, it's not inconceivable that the deck was deformed before the sound of the cracking deck alerted someone to the problem. If this is what happened I'd be less concerned about the damage than if if had been caused by internal collapse of seriously rotted wood.

Nevertheless, it would be wise to look for possible subsequent damage from leakage through those cracks. Tapping doesn't always identify very localized areas of rot if the fiberglass layer is relatively thick. But you should also examine the top of the compression post, and the bottom as well (the compression post is a hollow 4-sided assembly, and water leaking down the interior could pool at the bottom). On the other hand, the sag might simply be from compression of the wood (plywood deck core and compression post below) over the years. Except, as I said, I wouldn't expect to see that cause cracks like this on the surface.

I'm wondering about the 1/8" depression you mention; I can't see it in the photos. If you're saying the tabernacle well is lower than the surrounding deck I'd think it had to have been molded that way and it's not something to be concerned about.

Bottom line is that these cracks need to be properly repaired; they will lead to damage beneath even if they haven't already.

Oh, boy... yet another project to do! (sorry, I actually do sympathize).

The trouble with a destination - any destination, really - is that it interrupts The Journey.

Lee Panza
SR/SK #2134
San Francisco Bay
(Brisbane, CA)
Go to Top of Page

Leon Sisson
Master Marine Consultant

Members Avatar

USA
1889 Posts

Response Posted - 08/31/2017 :  20:13:52  Show Profile  Visit Leon Sisson's Homepage
Seth,

From your photos and description, it seems to me that the plywood core under the mast step between the deck and deck liner is collapsing, likely from rot.

I have repaired this problem myself, although not on a Catalina 25. The repair plan you describe sounds like a good one.

Here are some ideas, many of which you may decide are overkill.

Cut through the top fiberglass layer, (maybe 1/8" to 3/16" thick) until you reach the wooden core. I would try to keep this cutout within the boundaries of the tabernacle (mast hinge). That way, your repair would be invisible, and the surface of the epoxy repair would be protected from solar UV degradation without additional messing with gel-coat. (Unless of course you like working with gel-coat.) Just for the extra challenge, you might try keeping the kerf thin, and lifting the rectangle of fiberglass all in one reusable piece.

Once you have a mast-size window into the deck core, I think the cause of your problem will become much clearer.

I would then use a router or similar tool to remove the core down to the fiberglass headliner.

Depending upon what you find, it might be a good idea to cut further out into the core under the deck. Exactly how to make the undercut depends on core condition and thickness, and what tools you have on hand. A 1" circular saw chucked in a router would be ideal. (No, I don't know where to get one.) Dremel sells a 3/8" circular saw bit, but after you subtract the 1/8" shank, and divide by two, that's only going to undercut 1/8". You could look for a wide router bit no taller than the deck core. If the core is badly rotted, you might be able to chew it out with a sharpened bent nail spun with a drill motor.

To restore the core, you could try making plywood puzzle pieces to extend out into the undercut. Or you could lay in many laminations of fiberglass roving extending out into the undercut, built up to the original core thickness. Laying up fiberglass that thick over a large area would get tedious (and expensive). But stacking small precut rectangles of heavy roving should be relatively quick and painless.

Or you could say screw it, and replace some, or all, of the removed core with epoxy thickened with milled fiber. I don't suggest viscosity increasers, such as colloidal silica. I prefer the resin be able to flow easily to penetrate as deeply as possible into the surrounding core and any voids. If you're feeling fanatical, preheat the deck (this also helps drive out moisture), then let it cool as you're applying the resin, so the contracting air in the core sucks the resin deeper.

Conventional wisdom says to chamfer the original fiberglass 12:1 beyond the outer extent of the damage. Doing so would encompass that factory molded plateau, and would expose the outer inch and a half of your repair to sunlight and judgemental glares (yours, mostly). Back to messing with gel-coat.

If the purpose of the taper is to prevent stress cracking, then I'd suggest solid, fiber filled, epoxy extending a bit under the original deck would be unlikely to crack easily.

I would have the metal plate cut to size from 1/8" to 1/4" stainless steel. Round, chamfer, sand, and polish all corners and edges. Try to size the plate to blend well with the top of the factory mast step. (Or hold off on cutting the plate, see oversize plateau, below.)

On the boat I repaired, I used two 3/16" or 1/4" aluminum plates treated with alodine, one above deck, and one on top of the compression post. I used a hydraulic jack to support the deck while installing the lower plate.

You might also consider making that metal plate large enough to span, and hide, a new larger plateau area. That way, you'd only need to keep sunlight off of a small fillet. You could shape epoxy mush to the edge of the plate with a tongue depressor, popsicle stick, marble, or similar. Smooth the gel-coat over epoxy fillet with sandpaper wrapped around an appropriate diameter dowel or stiff hose. Use masking tape on the deck to limit unwanted epoxy smears.

Be sure your repair prevents water from getting into the core in the future!

I suppose this would be a good time to remind everyone about the importance of sealing the plywood core at all deck penetrations. I highly recommend the drill2x-fill-redrill method, so deck core integrity isn't dependent upon bedding compound condition under deck fittings.

Sorry if this is more than anyone wanted to know about the subject.

Good luck with whatever repair method you end up using.

-- Leon Sisson

— Leon Sisson
Go to Top of Page

sethp001
Mainsheet C-25 Tech Editor

Members Avatar

814 Posts

Response Posted - 09/06/2017 :  22:11:34  Show Profile
An update...

The deck seems solid. A 200lb buddy jumping on the mast step resulted in no deflection of the deck above or below (but I cringed with each jump).

I realized that if the mast step was in fact sinking, the through-bolted fasteners would have been loose, but they were tight. This seems to be crucial evidence against suspected sinking.

With additional research, I learned that at least some Catalina 25s had a keel step well. I suppose the depression in the keel step area of the deck is this well.

Considering the cracking around the mast step, I filled the well and covered the step with West Systems Six10. I'm having a stainless steel plate cut, to go under the mast step, which will cover the entire mast step area, 7.5" x 5.25". This should distribute loads better.

As far as explaining the cracking goes, it seems that if the mast hit an obstruction above while moving forward, the cracking would be behind the mast rather than before it. Perhaps the cracking was caused by the PO tying lines to the base of the mast to secure the boat during haul outs on our rail lift, rather than using the winches and cleats. Or maybe my boat was built on the Friday before Christmas.


Seth
"Outlier" 1987 Catalina 25 SR/SK/Traditional Interior #5541
"Zoo" 1977 Morgan Out Island 30
"Nomad" 1980 Prindle 16
"Lost" 1988 Catalina Capri 14.2 (sold - yay!)
"Marine Tex 1" Unknown Origin POS 8' Fiberglass Dinghy
https://whichsailboat.com/2014/07/27/catalina-25-review/
Go to Top of Page

Voyager
Master Marine Consultant

Members Avatar

USA
5231 Posts

Response Posted - 09/07/2017 :  21:10:00  Show Profile
A correction to my previous report. While there were some markings around the base of the mast tabernacle, there was actually no indentation in the cabin top by the base of the mast. What I saw was some water markings caused by lines. The top of my cabin is actually quite flush and solid.

Bruce Ross
Passage ~ SR-FK ~ C25 #5032

Port Captain — Milford, CT
Go to Top of Page

DavidBuoy
Admiral

Members Avatar

USA
707 Posts

Response Posted - 09/08/2017 :  04:45:28  Show Profile
quote:
Originally posted by sethp001

I'm having a stainless steel plate cut, to go under the mast step, which will cover the entire mast step area, 7.5" x 5.25". This should distribute loads better.


I'm no Engineer but it could be possible that by spreading the load out it may extend beyond the step and into even more damaged and unsupported core. I always try to overbuild when possible but who knows, they built thousands of these boats with mast steps that are still going strong.

Thinking about it more...Why don't you just install one of the mast step plates from CD that many of us have. That gives you the advantage of being able to run lines to the cockpit or whatever other crazy idea you may have.

http://www.catalinadirect.com/index.cfm/product/1406_149/mast-step-halyard-plate-c-25-tallstd-rig.cfm


Captain Rob & Admiral Alyson
"David Buoy"-1985 C25 SK/SR #5053
Go to Top of Page

slim
Navigator

Members Avatar

USA
113 Posts

Response Posted - 09/08/2017 :  13:39:52  Show Profile
All good thoughts above however i am thinking of what i have experienced on a Peterson 25 that i owned. the cabin top was collapsing and starting to crack like yours, from what i think was years of racing and tightening the rigging down to the extreme. This in turn gradually compressed the base of the compression post allowing the cabin top to depress over time. All the wood was solid however the boat was never intended to withstand that type of pressure. What i am saying is before you repair everything else look at the last element in the line of pressure coming down your mast - (the mast step is only halfway there). Check for compression at the base of the compression post that is why it is called a compression post.

1978 - C25 - standard rig - Fixed keel #1040

Edited by - slim on 09/08/2017 14:15:35
Go to Top of Page

sethp001
Mainsheet C-25 Tech Editor

Members Avatar

814 Posts

Response Posted - 09/08/2017 :  16:27:12  Show Profile
Thanks, Rob.

The core does not have any symptoms of being rotten. No flex, no actual sinking/collapsing, tight nuts on the through-bolts for the mast step.

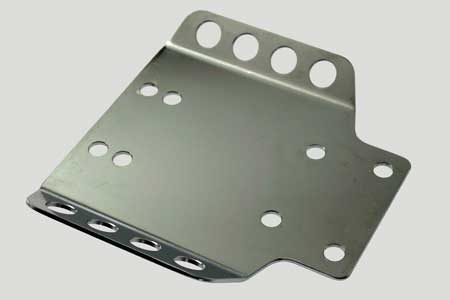
The mast step is a great idea, but like half of the items I've purchased from Catalina Direct, it doesn't quite fit my boat. In this case, the hole pattern is wrong (yes, I could widen or elongate the holes, but I'd rather have a better fitting hole pattern). Also, the plate did not cover the entire raised step area in the deck - see below.


I might go with this larger plate for a C30 from Catalina Direct if my custom plate fab turns out badly.


Seth
"Outlier" 1987 Catalina 25 SR/SK/Traditional Interior #5541
"Zoo" 1977 Morgan Out Island 30
"Nomad" 1980 Prindle 16
"Lost" 1988 Catalina Capri 14.2 (sold - yay!)
"Marine Tex 1" Unknown Origin POS 8' Fiberglass Dinghy
https://whichsailboat.com/2014/07/27/catalina-25-review/

Edited by - sethp001 on 09/08/2017 16:39:10
Go to Top of Page

sethp001
Mainsheet C-25 Tech Editor

Members Avatar

814 Posts

Response Posted - 09/08/2017 :  16:34:58  Show Profile
quote:
Originally posted by slim

All good thoughts above however i am thinking of what i have experienced on a Peterson 25 that i owned. the cabin top was collapsing and starting to crack like yours, from what i think was years of racing and tightening the rigging down to the extreme. This in turn gradually compressed the base of the compression post allowing the cabin top to depress over time. All the wood was solid however the boat was never intended to withstand that type of pressure. What i am saying is before you repair everything else look at the last element in the line of pressure coming down your mast - (the mast step is only halfway there). Check for compression at the base of the compression post that is why it is called a compression post.


Thanks, Slim.

The cabin top is not collapsing. I realized, after my initial post, that the nuts on the through-bolts were tight. They would have been loose if the cabin top was collapsing.

The core is not rotten. The deck does not flex with a 200 lb man jumping on it.

The compression post is solid also.

Using my Loos gauge, rig tension on the uppers was 12 lbs and lowers was 6 lbs. When I put the mast back up, I'm going to try 30 lbs for the uppers and 15 lbs for the lowers, which I saw recommended on this forum elsewhere.

As far as explaining the cracks go, perhaps the PO tying lines around the base of the mast during rail-lift haul out induced stress there.


Seth
"Outlier" 1987 Catalina 25 SR/SK/Traditional Interior #5541
"Zoo" 1977 Morgan Out Island 30
"Nomad" 1980 Prindle 16
"Lost" 1988 Catalina Capri 14.2 (sold - yay!)
"Marine Tex 1" Unknown Origin POS 8' Fiberglass Dinghy
https://whichsailboat.com/2014/07/27/catalina-25-review/
Go to Top of Page

Lee Panza
Captain

Members Avatar

USA
465 Posts

Response Posted - 09/09/2017 :  04:08:11  Show Profile  Visit Lee Panza's Homepage
"...As far as explaining the cracking goes, it seems that if the mast hit an obstruction above while moving forward, the cracking would be behind the mast rather than before it."


As I tried to explain above, cracking like you show is more likely to happen on the surface that stretches when the structure is deflected: when the mast tilts aft the forward end of the tabernacle comes up (if the pivot bolt is tight and the hold-down screws are into competent material or, as in your case apparently, they are through-bolts) and the top layer is stretched.

Small, tight crazing can form on the upper surface of a multi-layer composite structure if the structure is bent downward enough to crack the relatively brittle gelcoat layer, but to get cracks as substantial as yours from downward deflection there would be much more substantial damage on the underside or on the inside.

As Dave Bristle pointed out, the deck structure is plywood laminated to fiberglass, with an inner liner of fiberglass added before the whole assembly was inverted and fastened-down to the hull. With the compression post underneath the mast there won't be much downward deflection unless some wood gets crushed: this area was specifically designed to resist downward pressure, not upward tension.

The large cracks with substantial separation like your photos show are more suggestive of upward deflection. The tight bolts, indicating no crushing of the plywood substrate, seems to confirm this.

The first time I lowered my mast (aftward) the wood screws (not through-bolts) holding the forward edge of the tabernacle pulled right out, even though I had loosened the wing-nut on the pivot bolt; the bolt itself had not slipped even though the nut was loose (apparently the base of the mast had moved forward to clamp the bolt tight against the sides of the slots in the tabernacle and the head was still tight against the outside of the tabernacle). The screws just pulled out because the wood had softened from leakage, but if the wood had been solid the deck around the forward side of the tabernacle might have lifted, causing the kind of cracks shown in your photos. If my tabernacle had been bolted down instead of just using screws, I'm pretty sure I would have gotten the kind of damage your photos show. If the forestay snaps and the mast collapses aftward I'm certain that a through-bolted tabernacle - with a tight pivot bolt - would product this result. Does your mast appear to be younger than the rest of the boat?

As I said, the depression you noted (I see it now that I looked more closely at your photos) is apparently a tabernacle well, and you seem to have confirmed this (I presume you meant "mast step well"). The apparent concept would seem to be to provide more resistance to lateral shifting of the mast base, especially if the tabernacle hold-down screws lose their integrity. Ironically, a well would accelerate the loss of sheer resistance at the screws by pooling water there and encouraging it to infiltrate into the screw holes. If you fill the well with resin and fasten a plate over the new surface, the plug of hardened resin sitting in that well (with your longer tabernacle screws passing through it) will help hold the base of the mast in place. Just don't forget that the mast will be sitting slightly higher, and the standing rigging needs to be adjusted for that.

Seal those cracks thoroughly, and worry no more (but be careful when lowering the mast aftward or when approaching a low bridge).

The trouble with a destination - any destination, really - is that it interrupts The Journey.

Lee Panza
SR/SK #2134
San Francisco Bay
(Brisbane, CA)

Edited by - Lee Panza on 09/09/2017 05:20:46
Go to Top of Page

sethp001
Mainsheet C-25 Tech Editor

Members Avatar

814 Posts

Response Posted - 09/11/2017 :  19:42:56  Show Profile
Lee, I missed the convex deflection concept in your first post, but now I understand it. Thank you for taking the extra time to educate me!


Seth
"Outlier" 1987 Catalina 25 SR/SK/Traditional Interior #5541
"Zoo" 1977 Morgan Out Island 30
"Nomad" 1980 Prindle 16
"Lost" 1988 Catalina Capri 14.2 (sold - yay!)
"Marine Tex 1" Unknown Origin POS 8' Fiberglass Dinghy
https://whichsailboat.com/2014/07/27/catalina-25-review/

Edited by - sethp001 on 09/11/2017 22:27:04
Go to Top of Page

Voyager
Master Marine Consultant

Members Avatar

USA
5231 Posts

Response Posted - 09/11/2017 :  20:40:31  Show Profile
Lee, when you say seal the cracks, are you talking about using something like polysulfide to caulk them, or thickened epoxy? The former will seal them fine, but are hardly a permanent solution. Epoxy will work well, but cosmetically, how would you suggest the surface be blended with the 30+ year old gelcoat?

Regarding the through bolt holes and screw holes, in your view, is it better to drill out all the holes oversized, refill with thickened epoxy, then drill out the holes again to prevent water seepage into the core?

It's critical to prevent any water intrusion into this area since water tends to stand on this surface and the materials are all very solid at the moment. However, the cracks and bolt holes are such that they can lend themselves to seepage and eventual rotting in a short time ...

Am I following your train of thought?

Bruce Ross
Passage ~ SR-FK ~ C25 #5032

Port Captain — Milford, CT

Edited by - Voyager on 09/11/2017 20:47:45
Go to Top of Page

Lee Panza
Captain

Members Avatar

USA
465 Posts

Response Posted - 09/15/2017 :  06:44:30  Show Profile  Visit Lee Panza's Homepage
Woke up early and can't get back to sleep, so I'll throw out a little more for whatever it might be worth (free advice being worth the price).

As Bruce points out - very correctly - just caulking the cracks is not a permanent fix. From the pictures of the damage, it looks like someone had attempted to fill the ones visible outside of the tabernacle. Clearly it wasn't done very well, and the cracks inside the well (the most important ones, where water will sit) weren't done at all.

I wouldn't expect there to be any significant flexing here in the future (unless a future owner doesn't like to wait until drawbridges are fully open), so a resin should be used rather than a flexible caulk. Epoxy resins generally adhere to wood and existing resins better than vinylester- or polyester-based compounds. The West System website has good reference materials, and there's a ton of 3rd party info on crack repairs available on the web, including YouTube videos (some of this info is actually good). In this particular location color matching probably isn't critical, but there's lots of info out there about that, too.

In this case, floating a resin into the well to fill it flush with the surrounding raised rim will take care of the cracks within the well, but it would still be wise to gouge them open a bit to get out the dirt and expose clean fiberglass for the resin to bond to. This will also fill the screw holes. I would suggest attacking the entire inner surface of the well with a light grinding tool to roughen it up so the resin filler can lock into it. You don't want water to seep through between the new resin and the existing gelcoat.

In other situations, when filling old screw holes through a shell into a wood substrate (especially on upward-facing surfaces) it's a good idea to remove some of the substrate and replace it with resin. Drilling oversize is easy enough, and it's probably good enough here where the area will be flooded with resin, but there's a better way (if it can be done) when the wood underneath is soft and rotting. Take an old allen wrench and cut/grind the short leg down to a short chisel point and then chuck the long end into a drill and insert the chisel end through the hole in the shell. Spin the right-angle chisel around to hog-out the soft, damaged wood underneath, and then vacume or blow out the loose material. I've found this challenging to do even in soft, rotten core, so it may be too difficult to get it to work in firm, undamaged wood; you might likely wind up chewing-up the shell as much as the wood beneath. I used two allen wrenches and I made the arms different lengths, so I started with the shorter one and widened the void with the longer one. One advantage of this method over just over-drilling the holes is that the intact shell around the hole also helps prevent your resin plug from pulling out. The other advantage is that you minimize the visible patch at the surface if it might show beyond whatever fitting is being re-mounted, or, in situations where this is not getting drilled-out for a replacement fitting, this leaves a smaller dot that doesn't match the surrounding surface (for a visible repair the epoxy fill should be left low or drilled-out at the surface to do the final patch with gelcoat that doesn't degrade as readily in UV).

When filling the void thus created, or when filling the tabernacle well in this case, use a thin resin mix that can mechanically key into the wood surrounding the screw holes (don't forget to tape-over or otherwise plug the underside if the holes go all the way through into the cabin). A really thin resin mix might not work if there's a void between the deck and interior liner. I once tried this on a cabin top and kept mixing and pouring more resin as it disappeared into such a void, until I noticed it starting to run out around the edges of the windows. What a mess that was to clean up!

One suggestion I'd offer to you, Seth, speaking now as a boat-owner rather than as an engineer, is to embed a coin with some significance - like the same year as the boat - in the resin used to fill the well. Coins under mast steps is apparently a historical tradition among shipwrights.


The trouble with a destination - any destination, really - is that it interrupts The Journey.

Lee Panza
SR/SK #2134
San Francisco Bay
(Brisbane, CA)

Edited by - Lee Panza on 09/15/2017 06:55:05
Go to Top of Page

sethp001
Mainsheet C-25 Tech Editor

Members Avatar

814 Posts

Response Posted - 09/15/2017 :  21:44:01  Show Profile
quote:
Originally posted by Lee Panza

Woke up early and can't get back to sleep, so I'll throw out a little more for whatever it might be worth (free advice being worth the price).


Thank you, Lee. Although I've already filled the well, this will undoubtedly help someone who reads this later, or me if I my initial repairs fail.

I used West Systems Six10, recommended by West Systems. (For anyone else reading later, those folks are easy to get on the phone and are very helpful.)

I am familiar with the procedure to surround through-bolt holes with epoxy, having a friend who did this with all of the through-bolt holes on his S2. (He used a bent nail instead of an allen wrench because his deck core was not rotted.) After I could not remove any wood from the through-bolt holes, I did not make any deliberate effort to fill the through-holes with epoxy.

The coin idea is excellent! I wish I had thought of it before applying the epoxy.

Here's a photo of the epoxy filling the mast step well and covering some cracks there. I filled (or at least covered) some of the extraneous cracks with epoxy, but did not enlarge them first. I plan to slather the surface with LifeSeal before attaching the plate. Hopefully the metal plate will keep most of the water out. I guess time will tell... If the repair does not hold up well, using epoxy I'll build the step up farther next time, and do more with the cracks.

Also, you can see my boat was built on the Friday before Christmas - the first through-bolt hole (visible above the correct bottom left hole in the photo) was drilled in the wrong place, into the center of the compression post.


Seth
"Outlier" 1987 Catalina 25 SR/SK/Traditional Interior #5541
"Zoo" 1977 Morgan Out Island 30
"Nomad" 1980 Prindle 16
"Lost" 1988 Catalina Capri 14.2 (sold - yay!)
"Marine Tex 1" Unknown Origin POS 8' Fiberglass Dinghy
https://whichsailboat.com/2014/07/27/catalina-25-review/

Edited by - sethp001 on 09/15/2017 22:04:44
Go to Top of Page

sethp001
Mainsheet C-25 Tech Editor

Members Avatar

814 Posts

Response Posted - 09/15/2017 :  21:54:10  Show Profile
quote:
Originally posted by Voyager

Epoxy will work well, but cosmetically, how would you suggest the surface be blended with the 30+ year old gelcoat?


The good news is that the metal plate will hide the epoxy completely. The bad news is the cracks that extend beyond the mast step area are not covered by the plate.

I plan to fill the cracks beyond the mast step area with gel coat patch. I'll report back some long time later about how those repairs hold up.


Seth
"Outlier" 1987 Catalina 25 SR/SK/Traditional Interior #5541
"Zoo" 1977 Morgan Out Island 30
"Nomad" 1980 Prindle 16
"Lost" 1988 Catalina Capri 14.2 (sold - yay!)
"Marine Tex 1" Unknown Origin POS 8' Fiberglass Dinghy
https://whichsailboat.com/2014/07/27/catalina-25-review/
Go to Top of Page

sethp001
Mainsheet C-25 Tech Editor

Members Avatar

814 Posts

Response Posted - 11/13/2017 :  18:49:00  Show Profile
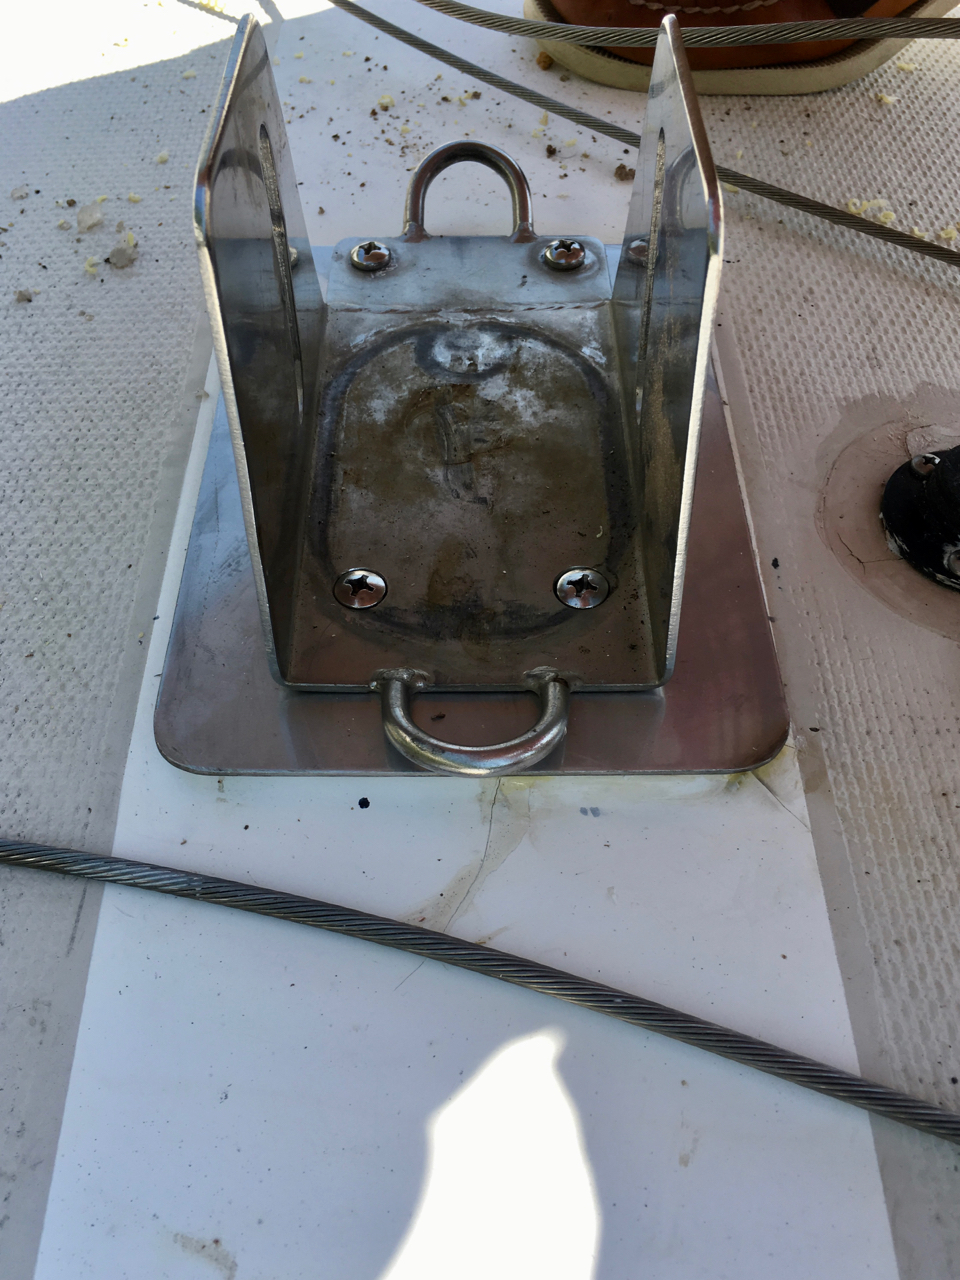
I ended up getting the stainless steel plate from onlinemetals.com. They cut it to size. I rounded off the corners and bevelled the edges.

Photos Update:

(I swapped out the bolts with the rounded heads in this photo for bolts with flat heads before putting the mast up.)


Seth
"Outlier" 1987 Catalina 25 SR/SK/Traditional Interior #5541
"Zoo" 1977 Morgan Out Island 30
"Nomad" 1980 Prindle 16
"Lost" 1988 Catalina Capri 14.2 (sold - yay!)
"Marine Tex 1" Unknown Origin POS 8' Fiberglass Dinghy
https://whichsailboat.com/2014/07/27/catalina-25-review/

Edited by - sethp001 on 11/13/2017 18:54:18
Go to Top of Page

islander
Master Marine Consultant

Members Avatar

USA
3992 Posts

Response Posted - 11/15/2017 :  15:29:12  Show Profile
Looks like a good durable fix that will probably outlive the boat.

Scott-"IMPULSE"87'C25/SR/WK/Din.#5688
Sailing out of Glen Cove,L.I Sound


Go to Top of Page

sethp001
Mainsheet C-25 Tech Editor

Members Avatar

814 Posts

Response Posted - 05/03/2018 :  16:21:49  Show Profile
Afterthought: do folks sailing our boats in salt water have galvanic corrosion issues with the aluminum mast in contact the stainless steel mast step? (I didn't observe any corrosion on my boat and wonder if that's because it's usually on fresh water.) If it's a potential problem, do you isolate the mast from the step with a rubber pad or something else?


Seth
"Outlier" 1987 Catalina 25 SR/SK/Traditional Interior #5541
"Zoo" 1977 Morgan Out Island 30
"Nomad" 1980 Prindle 16
"Lost" 1988 Catalina Capri 14.2 (sold - yay!)
"Marine Tex 1" Unknown Origin POS 8' Fiberglass Dinghy
https://whichsailboat.com/2014/07/27/catalina-25-review/
Go to Top of Page

odonnellryanc
Navigator

Members Avatar

108 Posts

Response Posted - 05/03/2018 :  20:08:17  Show Profile
My mast step was not even through-bolted. believe it or not, the bolts were literally screwed into the wood.

I replaced my step to give me places to connect additional blocks (adding in a single-line reefing system) and I didn't put through-bolts. I did however drill out the holes larger than the bolts, fill with epoxy, then I drilled and tapped into the epoxy. Then I sealed the holes along with the bottom of the step with some 5200.

> have galvanic corrosion issues with the aluminum mast in contact the stainless steel mast step?

My boat is in the Hudson so somewhat salty. I actually noticed discoloration on the bottom of the mast after I stepped it. It isn't so bad so I'm not too worried. I'd guess any kind of marine-grade sealant or possibly even a bit of MareLube would be good enough until the next time you stepped the mast?

I've been using MareLube on all these types of things around my boat at the suggestion of a Harken salesman.
Go to Top of Page
  Previous Topic Topic Next Topic  
 New Topic  Topic Locked
 Printer Friendly
Jump To:
Association Forum © since 1999 Catalina Capri 25s International Association Go To Top Of Page
Powered By: Snitz Forums 2000 Version 3.4.06
Notice: The advice given on this site is based upon individual or quoted experience, yours may differ.
The Officers, Staff and members of this site only provide information based upon the concept that anyone utilizing this information does so at their own risk and holds harmless all contributors to this site.