Catalina - Capri - 25s International Assocaition Logo(2006)  
Assn Members Area · Join
Association Forum
Association Forum
Home | Profile | Register | Active Topics | Forum Users | Search | FAQ
Username:
Password:
Save Password
Forgot your Password?

 All Forums
 Catalina/Capri 25/250 Sailor's Forums
 Catalina 25 Specific Forum
 Stays and shrouds
 New Topic  Topic Locked
 Printer Friendly
Previous Page | Next Page
Author Previous Topic Topic Next Topic
Page: of 4

Stinkpotter
Master Marine Consultant

Members Avatar

Djibouti
9013 Posts

Response Posted - 03/01/2014 :  08:47:08  Show Profile
<blockquote id="quote"><font size="1" face="Verdana, Arial, Helvetica" id="quote">quote:<hr height="1" noshade id="quote"><i>Originally posted by Voyager</i>
<br />...One of the brackets is a little bent - it'll probably withstand some straightening.<hr height="1" noshade id="quote"></font id="quote"></blockquote id="quote">Are you saying that because one spreader is not at the same angle as the other? There's some play in there--you can slide the spreader tip up and down on the shroud somewhat. It should be angled upward slightly so it bisects the angle of the bend in the shroud at the spreader tip.

I'd be really careful about bending the bracket--it's a SS tube welded to a plate. But I'd be very surprised if it was actually bent--the spreader would almost certainly break before the bracket bent.

Edited by - on
Go to Top of Page

Voyager
Master Marine Consultant

Members Avatar

USA
5231 Posts

Response Posted - 03/01/2014 :  21:39:10  Show Profile
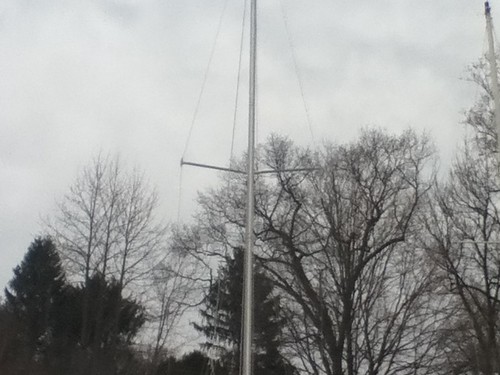
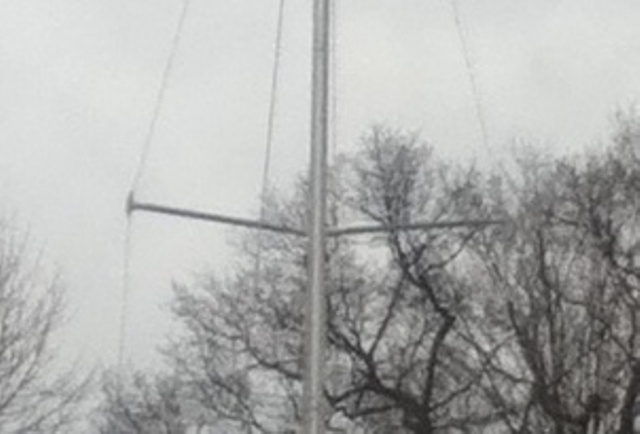
Looks like one spreader is at the correctly canted angle (80-85° vs 90°) while the other one is closer to horizontal. Could have been a very big cormorant or osprey sat up on it. The tube itself looks straight. Hopefully it just slid down the upper shroud a wee bit, and is not actually bent.
Long view of the spreaders.


And the closeup

Edited by - Voyager on 03/02/2014 21:01:11
Go to Top of Page

Voyager
Master Marine Consultant

Members Avatar

USA
5231 Posts

Response Posted - 03/24/2014 :  20:13:55  Show Profile
Scott traveled up from LI to Shelton to help me drop the mast on Passage. He brought his trusty 2x4 A-frame, we prepped everything and viola, we got the mast down in under an hour. Drop time was about 2 minutes. That was the easy part, but could not have done it without him. A real great guy!
I bought a replacement forestay, new sheaves with ball bearings, a wind vane and new cotter pins and clevis pins in advance. Had prepped the boat, removed the excess stuff. We were all set!
Now the hard part. Started to disassemble the furler and I pulled on the forestay. It slid up into the furler foil, and thwack! It got stuck. Cleverly we attached a nylon string to the end of the forestay so we could pull it back out. After a lot of squinting, flashlights and other neck craning, we deduced that the center hole was too small to fit through. We could have clipped off the swaged-on turnbuckle bolt to get it out, but the replacement forestay comes with a swaged-on piece. No way we could finesse the replacement back through the foil.
The foil came in six sections, pop-riveted together and the entire thing had to be fully disassembled to replace the stay. No way it could be done in the field without special tools, so we drilled out the center rivets and I was able to fold the foil in two - just short enough to fit in my car.
Scott had to get back so we finished securing the boat, and I took the foil home. Once on the bench - it was a piece of cake! I found some matching replacement poprivets at Sears and I ought to have it back together by this weekend, barring any unforeseens.
Definitely not trivial, not even easy, but doable - and I should be able to get a few more years' service out of the furler with any luck. No guarantees, but hopeful.
I'm also hopeful that I can repair the mast wiring and anchor light, the windvane & support bracket and replace the sheaves correctly.
Have to get the mast back up correctly positioned - perpendicular with a bit of rake. Therein lies a challenge. I will post a few pix on the gallery once I have pictures.
It's always an adventure!

Edited by - Voyager on 03/24/2014 20:16:54
Go to Top of Page

islander
Master Marine Consultant

Members Avatar

USA
3992 Posts

Response Posted - 03/25/2014 :  06:02:50  Show Profile
<blockquote id="quote"><font size="1" face="Verdana, Arial, Helvetica" id="quote">quote:<hr height="1" noshade id="quote">could not have done it without him. A real great guy! <hr height="1" noshade id="quote"></font id="quote"></blockquote id="quote">
Oh go on, Your making me blush.. Really glad to hear you found some replacement rivets, I had my doubts about that. How were the rest of the plastic inserts? I am still amazed that Hood would design a furler that in order to replace the fore-stay you have to completely disassemble it by drilling out @24 rivets.Also that Hood doesn't provide any info/Manuals/Diagrams on the internet. Talk about NOT user friendly. Keep the A-frame for as long as you need it and if you need a hand putting the mast back up just give me a shout.

Edited by - on
Go to Top of Page

Stinkpotter
Master Marine Consultant

Members Avatar

Djibouti
9013 Posts

Response Posted - 03/25/2014 :  07:23:28  Show Profile
Way to go, Scott! Bruce, I wish I'd been there when the rigger at Norwalk Cove Marina replaced the forestay in your furler (when it was mine) back around maybe 2001, using one from CD. He said it was a little tricky, but I'm pretty sure he didn't disassemble the foil. I think he used the old stay, with the turnbuckle cut off, as a messenger to pull it through...

Dropping the mast was a lot easier--he used a crane.

Edited by - on
Go to Top of Page

pastmember
Master Marine Consultant

Members Avatar

2402 Posts

Response Posted - 03/25/2014 :  09:54:36  Show Profile
Halyard sheaves should not be ball bearing sheaves. Halyards should be on a bushing sheave so the high constant load does not deform the race or the ball bearings. Ball bearing sheaves are for low angle running as in trimming applications. I think deck organizers are about the only either or location. Genoa cars, vangs, purchases and the like are great applications for ball bearings.

Edited by - on
Go to Top of Page

islander
Master Marine Consultant

Members Avatar

USA
3992 Posts

Response Posted - 03/25/2014 :  11:40:10  Show Profile
Well after searching the internet some more I came up with a diagram. The problem we encountered was that the plastic bearings #4 are one piece, barrel shaped, with a hole in the center that is just big enough for the wire but not big enough for the swaged stud to fit through. The wire is inserted into them by laying the wire into a groove on one side then rotating it 180 deg. and inserting the wire again into a grove on the other side. Its hard to explain here but when you see how its done it is simple. #3 are the rivets. This diagram is for one of the joints.As to the ball bearing sheaves,They are the ones CD sells.http://www.catalinadirect.com/index.cfm/product/11_407/masthead-sheave-ball-bearing-c-25-c-27-c-28.cfm

Edited by - islander on 03/25/2014 12:05:55
Go to Top of Page

sdpinaz
Navigator

Members Avatar

USA
193 Posts

Response Posted - 03/25/2014 :  13:15:56  Show Profile
Frank,
I have ordered this ball bearing sheave crom CD:
http://www.catalinadirect.com/index.cfm/product/11/masthead-sheave-ball-bearing-c-25-c-27-c-28.cfm
and plan on replacing the broken plastic sheave in my mast head for the main halyard. do you recommend something other than this one? does catalaina direct sell a bushing sheave that I should use instead?
Thanks

Edited by - on
Go to Top of Page

islander
Master Marine Consultant

Members Avatar

USA
3992 Posts

Response Posted - 03/25/2014 :  13:29:25  Show Profile
Scott, Your boat is an 88 with internal halyards I believe. If so those sheaves you are showing are wrong for your boat. They are for the earlier external halyard boats with 4 sheaves. What you want is the two sheave set up for internal halyards. These replace the white plastic ones.http://www.catalinadirect.com/index.cfm/product/171_407/masthead-sheave-for-internal-rope-halyards-c-25-and-c-250.cfm

Edited by - on
Go to Top of Page

Voyager
Master Marine Consultant

Members Avatar

USA
5231 Posts

Response Posted - 03/25/2014 :  18:56:05  Show Profile
Frank
When I was looking at replacement sheaves I read the CD marketing literature and the plastic sheaves were portrayed as "good", while the BB sheaves were rated "better". Now to find out not only are they 2x the price but they're the WRONG ones, well I am disappointed and don't understand why they sold them to me. I talked to a very nice woman and explained my application and she did not correct me. In the past, CD has never tried to steer me wrong just to try and make a buck. Would plastic sheaves do me just fine? - I imagine they would. Will BB sheaves fail sooner? I hope not.

Edited by - on
Go to Top of Page

Voyager
Master Marine Consultant

Members Avatar

USA
5231 Posts

Response Posted - 03/25/2014 :  19:04:57  Show Profile
Wow Scott- you did find the foil diagram for the Hood! Amazing. Simply put, it's a bear and not user-friendly. Had I had a bare forestay it would have been cake, but swaging the end in the field is a major challenge.
Once I got the foil home, I drilled out all the damned rivets, but some of the holes inside got dinged a little. I will try the pop rivets with AL washers and I think that'll do it, or I can re-drill smaller holes offset from the originals. I will see how it goes.

Edited by - Voyager on 03/25/2014 19:12:36
Go to Top of Page

islander
Master Marine Consultant

Members Avatar

USA
3992 Posts

Response Posted - 03/26/2014 :  09:12:41  Show Profile
Bruce, you can find diagrams and parts at this site but the problem is what model you have.I believe it is the 700SL. In the parts list for the 700SL the rivets are a package of 30 For the other models they are 40. 40 rivets would be for a longer forestay. Larger wire and a bigger boat. The 700SL was probably sold to boats with forestays within the Cat 25's 28ft range. The 700SL would cover a forstay of say 26-32ft as an example. http://www.pompanette.com/pomp.nsf/Products_lookup/FBED233C976314878525762400165BAD?OpenDocument

Edited by - islander on 03/26/2014 10:02:08
Go to Top of Page

pastmember
Master Marine Consultant

Members Avatar

2402 Posts

Response Posted - 03/26/2014 :  19:39:45  Show Profile
The primary consideration is do they fit so CD probably did the best they could. You will notice the correct internal replacements are solid delrin so they should be great.

Edited by - on
Go to Top of Page

Voyager
Master Marine Consultant

Members Avatar

USA
5231 Posts

Response Posted - 03/27/2014 :  20:04:29  Show Profile
Frank
(Update - 3/29)
The original sheaves are fine. The Delryn was 100% fine, no wear, no chips and they run smoothly on the masthead clevis pins. They seem to last forever!
I bought them because wanted to be sure I had replacement parts if I needed them.
Now I have to return the ball bearing replacements for a refund and have to figure out how to get an RMA # from Catalina Direct. Probably just a phone call (I hope).

Edited by - Voyager on 03/29/2014 12:04:00
Go to Top of Page

Voyager
Master Marine Consultant

Members Avatar

USA
5231 Posts

Response Posted - 03/28/2014 :  05:20:49  Show Profile
Scott -
Thanks for the link and your advice on the Hood furler products. Looking at the foil sections and construction, there is a short section at the top end (#2) with the cap (#1) and an internal plastic bearing (#4), then there a four 6 foot lengths of foil, each with its own bearing, then a "cut to length" section at the bottom to fit into the rotor section. Each boat model in the range, say 24-28 ft LOA would cut the last length to custom fit their forestay.
In my case, that is done for me, so all I have to do is put it all back together (and pray I didn't get anything out of sequence!). I numbered everything so i cant go too far wrong. Still plenty to do on the rest of the to-do list before that tho (lights, VHF, wires, spreaders, windex).

Edited by - on
Go to Top of Page

Voyager
Master Marine Consultant

Members Avatar

USA
5231 Posts

Response Posted - 03/29/2014 :  11:58:14  Show Profile
Took care of many items on my to-do list yesterday (between April showers).

The clevis pins were all good, the rigging tangs no problem, but several of the cotter pins were badly deteriorated. One literally crumbled in my hand. Just in time - a miss is as good as a mile.

I replaced the Anchor light with a 2nm LED. I sanded the fixture contacts and bent them to make good physical and electrical connection. Luckily the new LED bulb and the old incandescent bulb had approximately the same weight, so it should not move.

The mast-top VHF antenna seems fine, but the cable and connectors were shot. I plan to replace these.

I replaced the topping lift with a single line - just like the original. I decided NOT to use a block up top with a doubled line. To secure it, I used a [url="http://www.sailingcourse.com/videos/fishermans_bend.htm"]"Fisherman's Bend"[/url] with a double hitch to tie the top end to the clevis pin. I might hit it with some epoxy to prevent it working itself loose.

Next I plan to clean the spars and spreaders with soap and water, maybe some solvent. Years of crud on them.

Before I put the furler back on, I've got to tape the spreader boots, the spreader brackets, the pins. I've got rigging tape for a base and will cover that with white vinyl tape.

Last thing to do is reassemble the furler foil, attach it to the mast, then raise it back up. A week or two, then onto PoliGlow, engine test and bottom paint.

Edited by - on
Go to Top of Page

islander
Master Marine Consultant

Members Avatar

USA
3992 Posts

Response Posted - 03/29/2014 :  12:26:44  Show Profile
I'm surprised you got that far on the to-do list, This rainy weekend isn't helping though.

Edited by - on
Go to Top of Page

Lee Panza
Captain

Members Avatar

USA
465 Posts

Response Posted - 03/30/2014 :  07:35:32  Show Profile  Visit Lee Panza's Homepage
Bruce:

I'm shamed/motivated by reading all that you're doing. But one thing jumped out at me when I read your posting, and I wanted to express a caution about it:

You wrote: "I sanded the fixture contacts and bent them to make good physical and electrical connection."

What started as just a quick word of advice wound up being a long-winded reply, so I'm posting it as a new topic rather than hijack this thread in a new tangent. Good luck with your extensive to-do list, and thanks for stimulating me to do something productive today.

Edited by - on
Go to Top of Page

Dave5041
Former Mainsheet Editor

Members Avatar

USA
3754 Posts

Response Posted - 04/03/2014 :  21:03:52  Show Profile
I bent a spreader bracket once and CD only sold pairs, so I might have one good used one if I can find it when I get home. (Stuck in Montgomery since Sunday with a broken trailer. I should be on the road Saturday.)

Edited by - on
Go to Top of Page

Voyager
Master Marine Consultant

Members Avatar

USA
5231 Posts

Response Posted - 04/04/2014 :  11:33:39  Show Profile
Dave B,
Thanks for your kind offer, however the spreaders turned out to be OK. The brackets are springy, so I tightened up the bolts and they straightened out. I replaced the cotter pins on the spreader spars, so its really solid once again.
Hope you can effect repairs and get outta Dodge soon.

Edited by - Voyager on 04/04/2014 12:21:32
Go to Top of Page

Voyager
Master Marine Consultant

Members Avatar

USA
5231 Posts

Response Posted - 04/11/2014 :  21:01:34  Show Profile
Foil is reassembled with forestay and all bearings. Time to reconnect it to the mast and secure it. Need to do last checkout of the lighting fixtures, VHF antenna, wind vane, halyards (didn't replace sheaves), all clevis and cotter pins and the topping lift. I'd like to add a burgee halyard block to the backstay or spreader. What's the protocol, if any?
Next step is step the mast & crank her up. Maybe Sunday?

Edited by - on
Go to Top of Page

Voyager
Master Marine Consultant

Members Avatar

USA
5231 Posts

Response Posted - 05/17/2014 :  20:15:54  Show Profile
Damn! I thought this chapter was closed - but NOOOOO! I tried to bend the genoa onto the furler today and she went up to the bottom of the top segment and got jammed!!! The top spinner hoist for the halyard- which fits snugly on the furler tube - did not slide all the way up, but got hung up on a pop-rivet. Being up about 25 ft, there was no way for me to reach it to file it down smooth.
Today, I tried to heel the boat over at the dock at low tide, but try as I would, could not get the mast down far enough to reach the rivet from the raised dock. Lots of rigging, pulling and winching - and of course a bunch of locals kibbitzing all day, but no dice.
Tomorrow, the mast comes back down! Aaarrrggg!
Glad I still have the A-frame.

Edited by - on
Go to Top of Page

islander
Master Marine Consultant

Members Avatar

USA
3992 Posts

Response Posted - 05/18/2014 :  12:54:08  Show Profile
<blockquote id="quote"><font size="1" face="Verdana, Arial, Helvetica" id="quote">quote:<hr height="1" noshade id="quote">Glad I still have the A-frame<hr height="1" noshade id="quote"></font id="quote"></blockquote id="quote">
Good thing we didn't do the Bridgeport ferry thing and you still have it.

Edited by - on
Go to Top of Page

Voyager
Master Marine Consultant

Members Avatar

USA
5231 Posts

Response Posted - 05/18/2014 :  16:30:13  Show Profile
And I appreciate it.
So, as things go, my efforts at heeling the mast over using my mainsheet and several other lines at the local dock did not go unnoticed! A local sailor who was over at the bayside watering hole watched as I methodically set up my fenders, hoisted a pulling line up the mast and brought the boat step-by-step over to 45 degrees of heel. He and his guests had no idea what the problem was at the time, but had all been in similar circumstances at one time or another.
I said I should have put out the tip jar for the sheer entertainment value!
His suggestion was to hire a 100 lb teenager to hoist up on a boatswains chair and let him do the deed! For $50 or $100 it's cheap insurance.

Edited by - on
Go to Top of Page

DavidBuoy
Admiral

Members Avatar

USA
707 Posts

Response Posted - 05/19/2014 :  05:24:09  Show Profile
Bruce,

When I was trying to get a halyard un-jammed recently we sent my buddy- who seemed to be the lightest/ most compitent person- that weighed 180lb all the way to the top and did not have an issue. We just made sure the keel was down and raised him up with no problems. The boat would rock a little bit but nothing dangerous. Probably wouldn't do it on a windy day though. We attached him to the other halyard, ran it down through the genoa track and to the jib sheet winch (biggest on the boat with self-tailing). Also followed him up with the spinnaker halyard for safety. Let me know if you'd like any other recommendations on the process.

-Robert

Edited by - on
Go to Top of Page
Page: of 4 Previous Topic Topic Next Topic  
Previous Page | Next Page
 New Topic  Topic Locked
 Printer Friendly
Jump To:
Association Forum © since 1999 Catalina Capri 25s International Association Go To Top Of Page
Powered By: Snitz Forums 2000 Version 3.4.06
Notice: The advice given on this site is based upon individual or quoted experience, yours may differ.
The Officers, Staff and members of this site only provide information based upon the concept that anyone utilizing this information does so at their own risk and holds harmless all contributors to this site.