Catalina - Capri - 25s International Assocaition Logo(2006)  
Assn Members Area · Join
Association Forum
Association Forum
Home | Profile | Register | Active Topics | Forum Users | Search | FAQ
Username:
Password:
Save Password
Forgot your Password?

 All Forums
 Catalina/Capri 25/250 Sailor's Forums
 Catalina 25 Specific Forum
 Shower Drain In Head Not Draining
 New Topic  Topic Locked
 Printer Friendly
Author Previous Topic Topic Next Topic  

BobBarnes
Deckhand

Member Avatar

USA
4 Posts

Initially Posted - 01/06/2015 :  10:39:03  Show Profile
1977 C25 SK Std Rig

There is a shower style drain in the floor of the head area and it has stopped draining to the bilge. I have poked around with a coat hanger and cannot seem to find the hole that leads to the bilge. Does anyone have experience with this and if so where do I find the drain hole that is under the floor? I am guessing some debris has built up under there somewhere. Help or pictures would be greatly appreciated.

Edited by - on

islander
Master Marine Consultant

Members Avatar

USA
3992 Posts

Response Posted - 01/06/2015 :  11:00:40  Show Profile
The C25 did not come with a shower or a drain in that area. I think what you are looking at was installed by a PO. Why? That's the mystery.

Edited by - on
Go to Top of Page

BobBarnes
Deckhand

Members Avatar

USA
4 Posts

Response Posted - 01/06/2015 :  11:19:29  Show Profile
Thanks Islander. That may explain a few things! The storage area under the v-berth has drain holes leading to the bilge so I assumed that it was just open under the floor in the head area. Maybe not. There is only about 2" of clearance to probe around through the drain hole. I guess I can see if there is an easy way to create a drain hole to that area from the head holding tank side.

Has anyone done that before and have advise?

Edited by - on
Go to Top of Page

Stinkpotter
Master Marine Consultant

Members Avatar

Djibouti
9013 Posts

Response Posted - 01/06/2015 :  14:35:45  Show Profile
Welcome Bob! I agree it's non-standard, almost to the extreme. Somebody here might be interested in some details on the shower--for example, what did the PO do about the teak-veneered plywood bulkheads on sides of that space? (Since two of them anchor your upper shroud chainplates, it wouldn't be wise to soak it on a regular basis.) Just curious...

Edited by - on
Go to Top of Page

BobBarnes
Deckhand

Members Avatar

USA
4 Posts

Response Posted - 01/12/2015 :  12:18:32  Show Profile
There was no shower. Which also begs the question of why a drain then? I replaced the old pump faucets with new ones and installed a 12 volt pump. I was considering installing a small shower head. I replaced the old paper laminate plywood bulkheads with marine plywood painted to match the gel coat.

Edited by - on
Go to Top of Page

jduck00
Captain

Members Avatar

USA
313 Posts

Response Posted - 01/12/2015 :  12:21:37  Show Profile
I would love to have a drain there. My boat isn't quite water tight. Don't know where it comes from, but I always have a little water to clean up in front of the head. I just haven't been brave enough to drill a hole in it. I have no idea how much clearance there is from the liner to the hull. I don't want a I'm going to install a drain moment to turn into oops I have a hole in the boat moment.

Edited by - on
Go to Top of Page

islander
Master Marine Consultant

Members Avatar

USA
3992 Posts

Response Posted - 01/12/2015 :  13:03:29  Show Profile
quote:
considering installing a small shower head

You might consider installing an aft shower rather than trying to put one inside the boat. I just see that as being very problematic. Most of us try to keep water outside of our boats. An aft shower in the cockpit has the water going out of the scuppers and is easy to install.

Edited by - on
Go to Top of Page

pastmember
Master Marine Consultant

Members Avatar

2402 Posts

Response Posted - 01/12/2015 :  13:21:34  Show Profile
Probably a vent solution to help the area dry out from water intrusion in the v-berth area caused by a leaky anchor locker drain.

Edited by - on
Go to Top of Page

DavidBuoy
Admiral

Members Avatar

USA
707 Posts

Response Posted - 01/12/2015 :  14:32:06  Show Profile
quote:
Originally posted by jduck00

I would love to have a drain there. My boat isn't quite water tight. Don't know where it comes from, but I always have a little water to clean up in front of the head. I just haven't been brave enough to drill a hole in it. I have no idea how much clearance there is from the liner to the hull. I don't want a I'm going to install a drain moment to turn into oops I have a hole in the boat moment.


I swear I've thought the same thing. I get nervous playing with a drill around the hull.

Edited by - on
Go to Top of Page

BobBarnes
Deckhand

Members Avatar

USA
4 Posts

Response Posted - 01/12/2015 :  15:20:36  Show Profile
I think the issue is that the hull is beefed up where my swing keel pivots. Finding access may be an issue.I will know more Saturday after a closer inspection.

Edited by - on
Go to Top of Page

Lee Panza
Captain

Members Avatar

USA
465 Posts

Response Posted - 01/12/2015 :  20:39:24  Show Profile  Visit Lee Panza's Homepage
I've got a couple of things to offer, here, Bob.

First, when you say that it's not draining to the bilge, are you referring to the area under the sole in the saloon as the bilge? Technically, the area under the sole in the vicinity of the head is also a bilge area. However, I believe you'll find a hull stiffener between the two.

I know from my own explorations that there is space between the hull and the liner, and it's contiguous from behind the head itself down past the step-up that the head sits on. It gets pretty skinny below that, but there is room for water to get through, and then it widens up as the hull turns down to the vee under the centerline. I believe that's the area that your drain leads to. It's not really voluminous, so it wouldn't store a whole shower's worth of drainage, but it could accept minor spills. However, the compression post under the mast is right next to there, and I'm pretty certain that there's a solid support below the level of the sole to pass the stress from the mast, and from the main transverse bulkhead, through to the hull.

I remember seeing a video of someone who had torn out the sole in the saloon area, and I think I remember seeing a solid hull stiffener running transversely in line with the compression post and the bulkheads. If you were to drill a large enough hole through it for effective drainage I'm afraid you would significantly weaken it.

Finally, any water that's allowed to collect and stand for any length of time is likely to become a source of odors, especially if it's grey water. If you don't have a way to pump it out you're better not putting it there.

Hope that's helpful.

Edited by - on
Go to Top of Page

Tomas Kruska
Admiral

Members Avatar

Czech Republic
522 Posts

Response Posted - 01/13/2015 :  02:31:37  Show Profile  Visit Tomas Kruska's Homepage
Just for your inspiration how I fixed the leaky [url="http://www.kruska.cz/C25_High_Anxiety/Anchor_locker_repair/index.html"]anchor locker[/url]

I would also suggest to drill a bigger drain hole so it won't be easily clogged - see more photos from Frank [url="https://www.catalina-capri-25s.net/cgi-local/MBR_gallery.cgi?Album+2052+50"]here[/url].

Edited by - Tomas Kruska on 01/13/2015 02:36:04
Go to Top of Page

OLarryR
Master Marine Consultant

Members Avatar

USA
3367 Posts

Response Posted - 01/13/2015 :  04:38:55  Show Profile  Visit OLarryR's Homepage
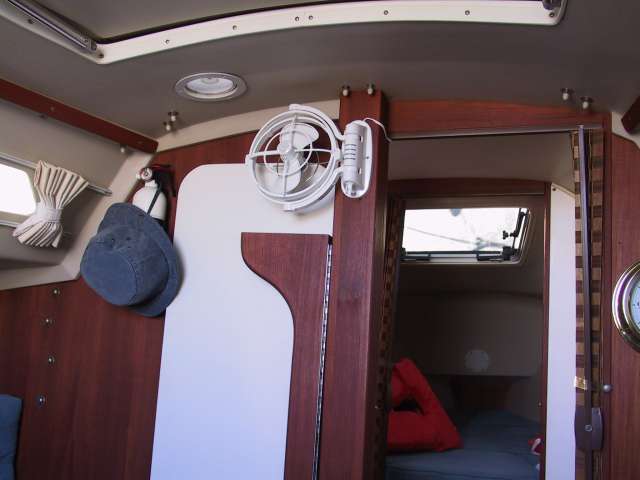
Not exactly sure of where this so called drain is but it is possible the PO drilled a hole for wiring to pass through that area. But then why no wiring ? I believe I drilled a hole toward the rear of the head area for passing a anchor/steam light wire down that hole. I had re-wired my mast but drilled a hole inside the mast deck connector opening and angled to come out in the head area. From there, I used one positive lead to go to a fan I installed at the top of the main cabin mast column. Then I am almost positive I attached the mast anchor/steam light wire along the head/main cabin bulkhead leading to the rear of the head, then thru the drilled hole toward the rear of the head. From there, I pulled the wire into the main cabin area along the hull behind the main cabin bunk adjacent to the galley and then to the new switch panel I installed in the panel in front of the galley sink. I do not have a photo of the head area with the drilled hole behind the head but you can see from the first photo, below, the wire that leads to the fan. I used an "Anchor" brand mast wire which I believe had 5 wires inside it's core - One negative and 4 positive leads. One positive lead was for the fan and the other 3 positive leads were for the anchor, steam and deck lights on the mast.
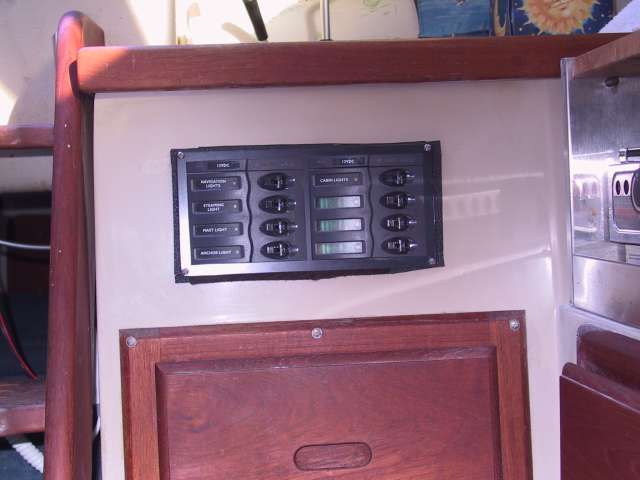
I desired a switch panel that was easier to get to than the original under and behind the steps and so with the new switch panel (second photo), I could easily just reach in from the cockpit area (not having to go into and fiddle with switches below the steps) and easily access the new switch panel with the first switch at the top of the panel for the navigation lights and the second switch below it was for the steaming light.


Edited by - OLarryR on 01/13/2015 04:41:29
Go to Top of Page

islander
Master Marine Consultant

Members Avatar

USA
3992 Posts

Response Posted - 01/13/2015 :  09:12:12  Show Profile
I think the PO had a leak with water pooling on the floor in front of the head and got tired of mopping it up so rather than finding the leak and fixing it properly his fix was to put a drain in the floor thinking the water would then just go into the bilge. Somthing like this guys problem. You can see the water on the floor in front of the head....Or I hope that's water and not poor aim.

Edited by - islander on 01/13/2015 13:31:05
Go to Top of Page
  Previous Topic Topic Next Topic  
 New Topic  Topic Locked
 Printer Friendly
Jump To:
Association Forum © since 1999 Catalina Capri 25s International Association Go To Top Of Page
Powered By: Snitz Forums 2000 Version 3.4.06
Notice: The advice given on this site is based upon individual or quoted experience, yours may differ.
The Officers, Staff and members of this site only provide information based upon the concept that anyone utilizing this information does so at their own risk and holds harmless all contributors to this site.