Catalina - Capri - 25s International Assocaition Logo(2006)  
Assn Members Area · Join
Association Forum
Association Forum
Home | Profile | Register | Active Topics | Forum Users | Search | FAQ
Username:
Password:
Save Password
Forgot your Password?

 All Forums
 Catalina/Capri 25/250 Sailor's Forums
 Catalina 25 Specific Forum
 Stays and shrouds
 New Topic  Topic Locked
 Printer Friendly
Next Page
Author Previous Topic Topic Next Topic
Page: of 4

Voyager
Master Marine Consultant

Member Avatar

USA
5231 Posts

Initially Posted - 12/26/2013 :  22:48:04  Show Profile
Was inspecting my stays and shrouds today. I checked the bottom swages and all looked fine and got my binocs to check the top swages. Upper and lower shrouds looked fine - cotter pins seemed ok. The backstay looked fine but I was a bit worried about the forestay: the cable carries the Hood furler and foil sections. The bottom of the shroud looks ok but looking at the top end I noticed the wrap of the cable was somewhat un-twisted. Can't tell whether it's weakened but I need to check it before next spring. When I replace it I hope the pre-swaged end will fit inside the foils and furler (I have no idea what looks like until I drop the mast). This weekend I plan to build an A-frame and a stern-end brace to support the mast using 2x4s.
Any suggestions are welcome.

Bruce Ross
Passage ~ SR-FK ~ C25 #5032

Port Captain — Milford, CT

Edited by - Voyager on 12/26/2013 22:54:58

Stinkpotter
Master Marine Consultant

Members Avatar

Djibouti
9013 Posts

Response Posted - 12/27/2013 :  09:11:15  Show Profile
Hi Bruce... I had a rigger install my replacement standing rigging from CD. He said threading the forestay through the foil was tricky, I think because of the rivets that hold the sections together. The old stay can be the messenger for the new one--I presume you'll need to cut off the old turnbuckle. The untwisted cable at the top is a sign of halyard wrap--have you been running the halyard through the restraining block on the mast?

BTW, I think he shortened the backstay a little to get some rake--the turnbuckle couldn't quite do it. (For other readers, I'm mentioning these things because Bruce's boat was once mine. )

Edited by - Stinkpotter on 12/27/2013 09:15:39
Go to Top of Page

sfsmith
Navigator

Members Avatar

USA
120 Posts

Response Posted - 12/27/2013 :  09:37:13  Show Profile
Bruce, I had a Hood furler until a couple of years ago, when I replaced it with a CDI. I had to take apart the foil sections to get the forestay out, so I'd be surprised if a swaged forestay could be threaded through. If your furler is like mine was, it's in sections about 6 feet long, held together by aluminum cylinders that support the foil joints and keep the forestay centered with molded (nylon?) sections. The cylinders are formed in halves, and attached to the foil sections with pop rivets. I had to drill out the rivets to get the whole thing apart. A picture is worth a thousand words, and if you're interested I will email you a few I took of the disassembled furler when I sold it. Good luck.

Edited by - on
Go to Top of Page

Voyager
Master Marine Consultant

Members Avatar

USA
5231 Posts

Response Posted - 12/27/2013 :  22:32:13  Show Profile
Dave - thanks for the background on the forestay. I noticed the restraining block on the masthead and assumed that's what it was for. When I replaced halyards a few years back I just used the old halyard as the messenger line for the new and I noticed it was still securely underneath it. Perhaps the main halyard got wound up at some point in a blow???

Solomon, I'm going to try Dave's technique for rethreading the new forestay using the old one as a messenger line. I'd really prefer not to drill out five or six sets of poprivets, you know something will go awry.

If I must disassemble the foils, I'll have to be super careful, as they probably don't make parts anymore. I would be interested in photos - you could post them here, on another site (like Picasa or Flickr) or email to bruce 2 sail at aol dot com - the old standby.

Seems like a good winter project (if it don't snow) since I'd like it done before spring commissioning.

I just wonder - in its current state, is she ready to blow? I'd hate to lose my mast on the hard!

Edited by - Voyager on 12/27/2013 22:36:27
Go to Top of Page

Admin
Forum Admin

Members Avatar

460 Posts

Response Posted - 12/28/2013 :  05:30:36  Show Profile  Visit Admin's Homepage
Solomon, those pics sound like they would be of great archive value, so posting them in your account would be the best location. Perhaps make up a Project Album that explains what the pictures portray.

Paul.

Edited by - on
Go to Top of Page

Voyager
Master Marine Consultant

Members Avatar

USA
5231 Posts

Response Posted - 12/28/2013 :  06:52:01  Show Profile
Paul - excellent suggestion!

Edited by - Voyager on 12/28/2013 06:53:47
Go to Top of Page

Stinkpotter
Master Marine Consultant

Members Avatar

Djibouti
9013 Posts

Response Posted - 12/28/2013 :  10:40:53  Show Profile
When I bought Passage, the forestay was unwound and bent slightly at the top. The wire seemed sound, so it served me for the first year, and then I replaced the whole set
(2001). The other requisite for stabilizing the swivel is substantial halyard tension--enough to hold the drum up very hard against the shackle to the stem fitting. I checked that tension periodically, but found the Krypton lines didn't stretch even half an inch over the season.

There could also be some way that the lower (turning) part of the swivel is catching the wire and trying to unwind it... That might be detectable as you pull the stay out and the new one through. I'd watch for that. I don't know how or if the stay is protected from the swivel.

Edited by - Stinkpotter on 12/28/2013 10:49:58
Go to Top of Page

Voyager
Master Marine Consultant

Members Avatar

USA
5231 Posts

Response Posted - 12/28/2013 :  12:22:47  Show Profile
I went to the yard and tried to size up the situation. The top of the forestay is definitely twisted about 1/4 turn. I stood on the foredeck and stared at it through the binocs and while it's definitely twisted, I did not see any meathooks. I rigged the halyards to the base of the bow pulpit in case the cable happens to give out.
I measured the distance from the forward lower shroud chainplates to the base of the furler to make the legs of an A-frame. I measured 111" center-to-center on both sides. Bought two 10ft sections of 3/4" thinwall EMT electrical pipe and will cut it to 114" to provide for 1.5" overlap on both ends.
Not sure whether to use a single line through a block to drop the mast - I might be better off with a 2:1 or 3:1 block setup to lessen the load. Not sure whether to secure the stationary block to the base of the bow pulpit, the chainplate tang or the bow cleats.
However I go I realize there will be a lot of tension on the blocks when the mast gets near-horizontal.
My plan is to proceed with the project about mid-March when the threat of serious snow has passed since I have to remove the tarp/tent to remove the boom and bring down the mast.

Edited by - Voyager on 12/28/2013 12:25:09
Go to Top of Page

Voyager
Master Marine Consultant

Members Avatar

USA
5231 Posts

Response Posted - 12/28/2013 :  12:29:54  Show Profile
Where should I order a replacement forestay? What size and length is it? is it 7 strand wire or a compound wrapped cable?
should I order it with or without swaged ends? How would I swage an end on in the field?, I thought the pros use a vice-like tool to swage the ends in the field.
Hmmm...

Edited by - on
Go to Top of Page

islander
Master Marine Consultant

Members Avatar

USA
3992 Posts

Response Posted - 12/28/2013 :  13:24:15  Show Profile
Bruce, Standard rig and if you have a turnbuckle a the bottom then I would guess you have the standard forstay. CD has that. My forstay is non adjustable, No turnbuckle at the bottom due to the fact that I have a Furlex furler. When I replaced my standing rig I had to order a forstay for a tall rig, Cut the end off at the correct length and install a Norseman eye terminal. The Furler then clamps to this fitting. The Forstay gets tensioned by the Backstay. I was told by Brewers rigging shop that Furlers that ride on the forstay wire do take a beating over time and should be changed more frequently then the rest of the wires. My old one showed signs of wear although it wasn't untwisted.

Edited by - on
Go to Top of Page

Voyager
Master Marine Consultant

Members Avatar

USA
5231 Posts

Response Posted - 12/28/2013 :  16:28:39  Show Profile
Scott, thanks...
Just to confirm, all I'll need is a c-25 standard rig forestay out of the CD catalog? I see the business end has a skinny bolt - that should fit down through the furler foil. Perhaps I should pull things apart to see what's underneath the furler roller.

Edited by - on
Go to Top of Page

GaryB
Master Marine Consultant

Members Avatar

USA
4275 Posts

Response Posted - 12/28/2013 :  16:47:44  Show Profile
<blockquote id="quote"><font size="1" face="Verdana, Arial, Helvetica" id="quote">quote:<hr height="1" noshade id="quote"><i>Originally posted by Voyager</i>
<br />... Not sure whether to secure the stationary block to the base of the bow pulpit, the chainplate tang or the bow cleats...
<hr height="1" noshade id="quote"></font id="quote"></blockquote id="quote">
Chain plate tang.

Edited by - on
Go to Top of Page

islander
Master Marine Consultant

Members Avatar

USA
3992 Posts

Response Posted - 12/28/2013 :  19:56:18  Show Profile
Yes Bruce, If you have a turnbuckle on the chainplate end Then the standard forstay from CD should fit. You unscrew the body of the turnbuckle and remove it. This will leave just the skinny threaded stud that should be able to slide down through the foil starting from the top. This was how I did it on my furler, Maybe yours is similar. I would definitely take a look at the drum to see how it is mounted and if there is a turnbuckle or a swageless terminal like mine has. Take some photos of the drum, It would help.

Edited by - islander on 12/28/2013 20:00:58
Go to Top of Page

Stinkpotter
Master Marine Consultant

Members Avatar

Djibouti
9013 Posts

Response Posted - 12/28/2013 :  21:52:13  Show Profile
There's a turnbuckle under there, that came from CD with the stay. I'm not a fan of amateur swages on wires that hold up the mast--I would and did buy the pre-made rigging from CD. My rigger said it was first-rate.

Whether to pull the new one through from the top or bottom might depend on how you can make the most secure connection to the messenger--the old stay.

I'd check for any sorts of collars or bushings that might be intended to protect the stay at the drum or the top, and see about replacing them if they've "taken a beating". For example, I vaguely recall a plastic cap on the top of the foil...

Search for some other threads on lowering the mast. As you approach the point where the line and the mast are parallel, any tiny stretch in the line can cause a free-fall. You want some hands on it before then.

Edited by - Stinkpotter on 12/28/2013 21:56:32
Go to Top of Page

islander
Master Marine Consultant

Members Avatar

USA
3992 Posts

Response Posted - 12/29/2013 :  08:22:13  Show Profile
<blockquote id="quote"><font size="1" face="Verdana, Arial, Helvetica" id="quote">quote:<hr height="1" noshade id="quote">Whether to pull the new one through from the top or bottom <hr height="1" noshade id="quote"></font id="quote"></blockquote id="quote">
My furler also had plastic inner tubes that were about 1ft long at every joint and both ends. The foil slips over these to stiffen the joint and acts like a bearing for the foil to ride on the wire. These plastic inserts have a hole through the middle for the wire to pass through so depending on the size of the hole will determine if he will be able to get the threaded stud end through there or not. If you start from the bottom you will never get the swaged on eye terminal up through those holes. From sfsmith discription it sounds like the Hood foil has similar inserts

Edited by - on
Go to Top of Page

Voyager
Master Marine Consultant

Members Avatar

USA
5231 Posts

Response Posted - 12/29/2013 :  08:24:15  Show Profile
Dave
Thanks for the pointers. I assume that once the mast is down I'll have the forestay and furler refurbishment as project #1, anchor light, VHF antenna, windex, shrouds and sheaves to follow. Ought to take several weeks between getting parts and finding weather windows (and of course, work). I hope we get an early spring come March.

Edited by - on
Go to Top of Page

islander
Master Marine Consultant

Members Avatar

USA
3992 Posts

Response Posted - 12/29/2013 :  10:15:25  Show Profile
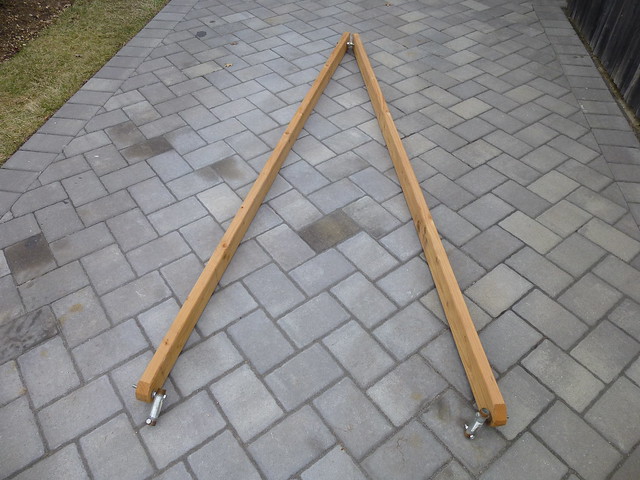
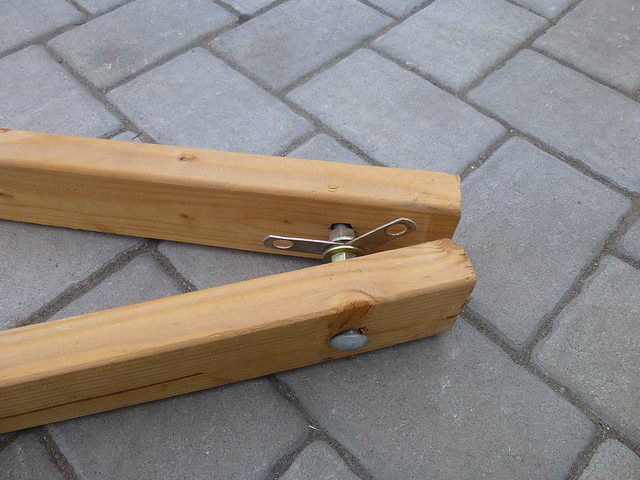
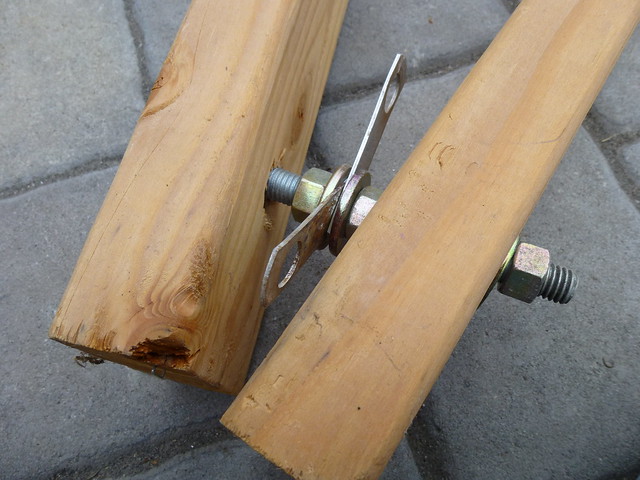
The A frame doesn't have to be as elaborate as some have made, Just has to do the job. I chose to use 2x4's because I didn't want steel tubing banging around on my deck and they are more than strong enough for the job. Mine are 8 1/2ft

I used a long carrage bolt at the top with two metal tangs in between. I atached my mainsheet from the stem fitting to one tang and the forstay/furler to the other. Using the mainsheet gives you total control. You can stop the decent any time by cleating it in the cam cleat on the mainsheet to check on anything that might be binding. Your mainsheet is a great block and tackle for this and since you are standing at the nose you have a perfect sightline to see if the mast is going one way or another. The furler wont sag because the forstay is attached to the A frame.


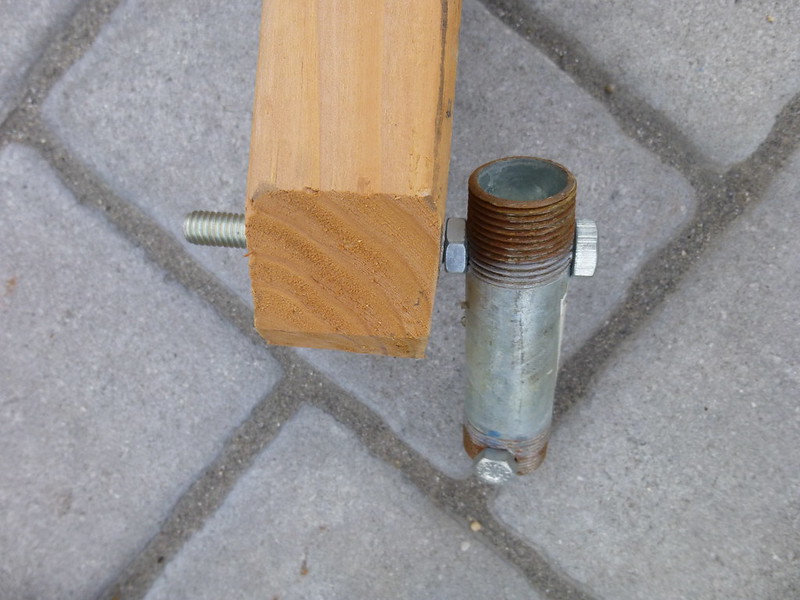
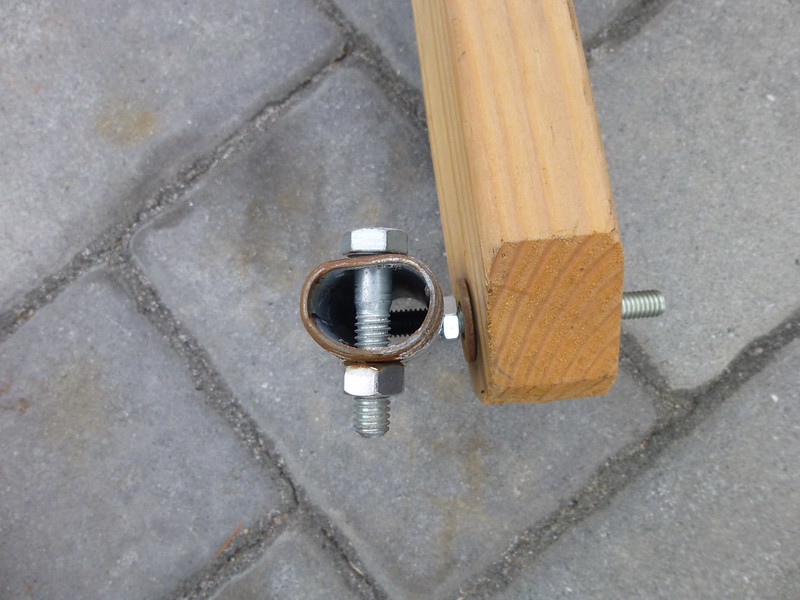
For the deck attachment I used 3/4 x 4" pipe nipples. You have to hit one end of the pipe nipple with a hammer to make it oval shaped so it will fit over the forward lower shroud chainplate.


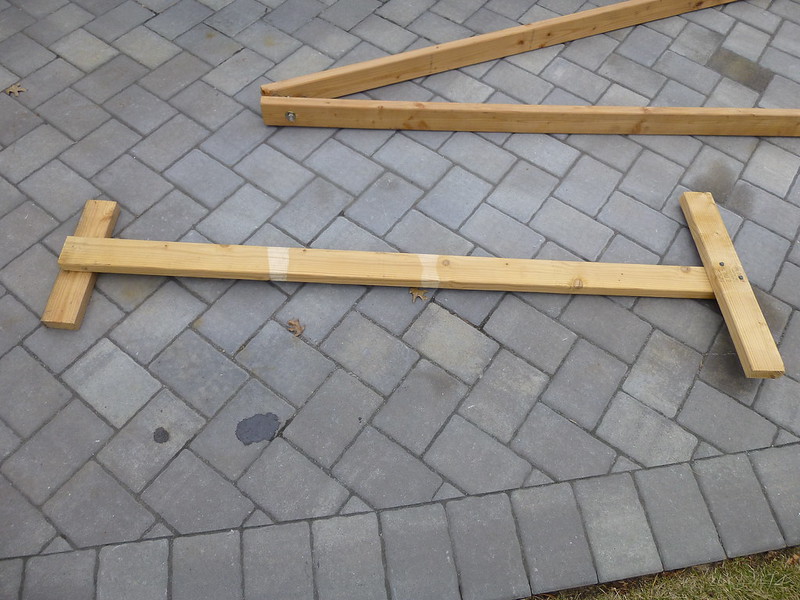
To catch the mast a simple T bar that sits on the floor and is tied to the pulpit railing and traveler railing is all that is needed.

Lowering the mast is not as scary as you are thinking, Once you do it you will say to yourself, Was that it?

Edited by - on
Go to Top of Page

sfsmith
Navigator

Members Avatar

USA
120 Posts

Response Posted - 12/29/2013 :  13:15:18  Show Profile
Bruce and Paul: As suggested, I just created an album of five photos showing the Hood furler components. If they're not close up enough to help, I can still email original photos. Hope it helps. Here's the link: [url="https://www.catalina-capri-25s.net/cgi-local/MBR_gallery.cgi?Album+2166+158"]
<b>Hood furler components</b>[/url]

Edited by - on
Go to Top of Page

Voyager
Master Marine Consultant

Members Avatar

USA
5231 Posts

Response Posted - 12/29/2013 :  17:03:40  Show Profile
Scott - I see your 2x4s and like the softness relative to the deck, but I already purchased 2 pieces of 3/4" EMT pipe. I plan to wrap some duck tape around the ends and in the middle to soften the blow. My thought on connecting the A-frame to the forward lower shroud chainplates is to simply pass a 4"-long carriage bolt thru and attach with a wingnut and washer.
So you recommend controlling the descent from the bow, as opposed to being in the cockpit? I'd assume from the cockpit, you could stand on the seats and just reach overhead to control the descent. I'd assume my compatriot would stand on the cabintop and guide the mast and hold onto the foils as they gently come to rest on- and are lashed to - the mast.

Edited by - on
Go to Top of Page

britinusa
Web Editor

Members Avatar

USA
5404 Posts

Response Posted - 12/29/2013 :  20:30:00  Show Profile  Visit britinusa's Homepage
Solomon, great job!
Did you know that if a viewer clicks on the Album Images, they open full size in a new window!


Paul

Edited by - on
Go to Top of Page

glivs
Admiral

Members Avatar

USA
822 Posts

Response Posted - 12/30/2013 :  05:31:51  Show Profile
Bruce....You note you plan to build your A-frame from "3/4" thinwall EMT". Hopefully others will chime in but early discussions regarding A-frames strongly recommended against thinwall EMT in favor of thickwall. Thinwall is easy to find at big box stores but the risk of it buckling under load was enough for me to go to an electrical supply to purchase the latter. I drop my mast so infrequently that in hindsight I could have gone with 2x4 construction. At the time, however, my current frame fit my needs and is easy to store. I also suggest "baby stays" as has often been recommended to control lateral movement of the mast. This was key to me as I was dropping the mast single handed. As already noted, you will be surprised at how easy it is to drop/raise the mast.

Edited by - on
Go to Top of Page

Davy J
Master Marine Consultant

Members Avatar

USA
1511 Posts

Response Posted - 12/30/2013 :  07:08:22  Show Profile
<blockquote id="quote"><font size="1" face="Verdana, Arial, Helvetica" id="quote">quote:<hr height="1" noshade id="quote">Hopefully others will chime in but early discussions regarding A-frames strongly recommended against thinwall EMT in favor of thickwall.<hr height="1" noshade id="quote"></font id="quote"></blockquote id="quote">
My a-frame is made of 3/4" EMT, which is the thin-walled conduit. Almost ten years of heavy use and no problems. I'm also about to build a new one, because mine is starting to look a little rusty. I'll be using the same material.


Edited by - on
Go to Top of Page

islander
Master Marine Consultant

Members Avatar

USA
3992 Posts

Response Posted - 12/30/2013 :  15:04:22  Show Profile
<blockquote id="quote"><font size="1" face="Verdana, Arial, Helvetica" id="quote">quote:<hr height="1" noshade id="quote">So you recommend controlling the descent from the bow, as opposed to being in the cockpit?<hr height="1" noshade id="quote"></font id="quote"></blockquote id="quote">
Honestly I didn't like the idea of anyone being under a falling mast should something go wrong. Using the mainsheet was just a simpler way in my opinion, Why complicate it by adding blocks, winches, cleats and a line running in multiple directions. I know Davy J uses the thin wall EMT and it works for him but when I went and looked at the EMT I could have bent it in half with very little effort. Didn't like it at all. The 2x4's were cheaper, Stronger and won't mar the boat. Davy J's is permanently on his boat so 2x4's wouldn't be very pretty so I can understand why he used the EMT. The reason for the nipples is you have two different angles, If you look at my photo of the nipples you will see that the two bolts run at different angles. The hole in the chainplate doesn't line up right to make a pivot point for the 2x4's or EMT.

Edited by - on
Go to Top of Page

Voyager
Master Marine Consultant

Members Avatar

USA
5231 Posts

Response Posted - 12/30/2013 :  19:15:09  Show Profile
Thanks for the discussion on a-frame struts. My thought is that the mast's weight is borne primarily by the block and tackle and the forestay, and the forces acting on the a-frame are (1) the mast's side-to-side forces that may result due to wind or tilt of the boat (minor but important) and (2) any force on the end of the forestay perpendicular to it (e.g.: the force pushing the forestay toward the mast as the mast descends). I plan to make the aft brace near the transom about 8 ft high to prevent the mast going fully horizontal as it drops. This should keep the forces to a manageable level.

Edited by - on
Go to Top of Page

Voyager
Master Marine Consultant

Members Avatar

USA
5231 Posts

Response Posted - 12/30/2013 :  21:35:17  Show Profile
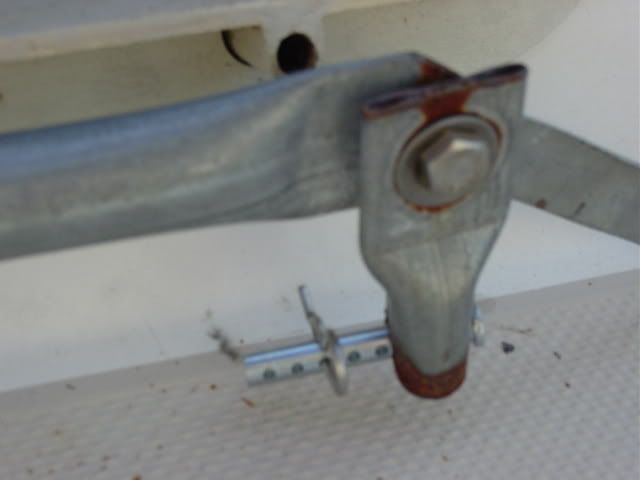
Here are a few photos I got of the Hood furler this weekend. Doesn't show much detail under the body however.

Front view

Looking up from underneath.

Forward view

A little fuzzy

Edited by - on
Go to Top of Page

islander
Master Marine Consultant

Members Avatar

USA
3992 Posts

Response Posted - 12/31/2013 :  15:08:53  Show Profile
Bruce, My aft brace is @6ft and sits on the cockpit floor. Due keep in mine that you will need about 15ft of clearance behind your boat. When it is down it is close to the balance point on the brace so keep a hand on the mast when you go to remove the bolt at the mast step. It might want to jump up a little.
As to the photos, I'm guessing that those two shackles going from the drum to the stem fitting keeps the furler from rotating and maybe if you disconnect them you might be able to lift the drum and foil up the forstay some assuming there is room at the top to get a look at the turnbuckle. Just a guess. The drum could have a bearing up inside that simply sits on top of the turnbuckle.

Edited by - islander on 12/31/2013 15:36:19
Go to Top of Page
Page: of 4 Previous Topic Topic Next Topic  
Next Page
 New Topic  Topic Locked
 Printer Friendly
Jump To:
Association Forum © since 1999 Catalina Capri 25s International Association Go To Top Of Page
Powered By: Snitz Forums 2000 Version 3.4.06
Notice: The advice given on this site is based upon individual or quoted experience, yours may differ.
The Officers, Staff and members of this site only provide information based upon the concept that anyone utilizing this information does so at their own risk and holds harmless all contributors to this site.