Catalina - Capri - 25s International Assocaition Logo(2006)  
Assn Members Area · Join
Association Forum
Association Forum
Home | Profile | Register | Active Topics | Forum Users | Search | FAQ
Username:
Password:
Save Password
Forgot your Password?

 All Forums
 Catalina/Capri 25/250 Sailor's Forums
 Catalina 250 Specific Forum
 Self Tacking Jib
 New Topic  Topic Locked
 Printer Friendly
Author Previous Topic Topic Next Topic  

simonhayes
1st Mate

Member Avatar

USA
34 Posts

Initially Posted - 06/21/2007 :  01:51:27  Show Profile
Hi,

I saw an article in Latitude 38 about rigging a self tasking jib using 3 blocks - two attached to stanchions and one to the jib clew. We went out for a sail Saturday and I thought I would give it a go, since I have to tack out of a narrow channel.

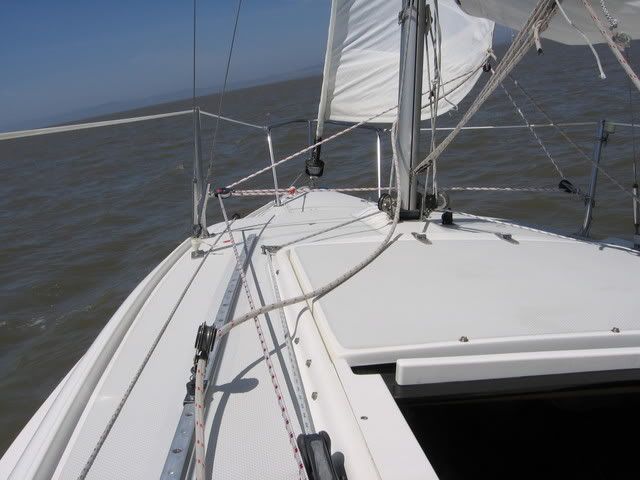
The 250 has eyes on the stanchions both sides to connect baby stays for mast raising so finding a place to connect the blocks and rigging it was easy. I have a WK with a 130 and so needed to furl it in (it was blowing 15-20 and with the family aboard I needed to reef early anyway). I used an old halyard to run through the blocks, tensioned, on the port winch and left sheets connected.

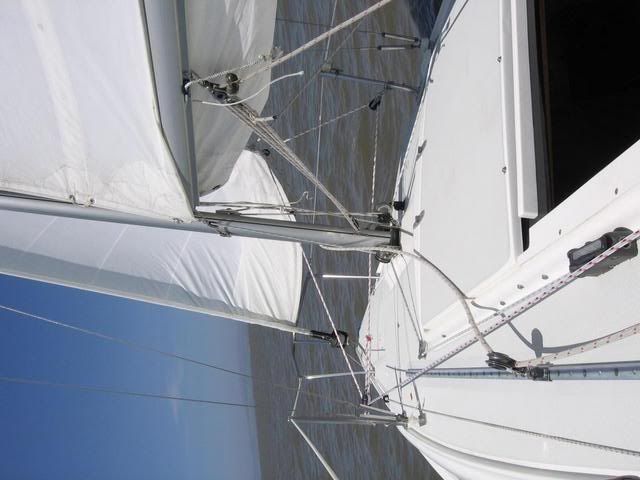
It ended up working pretty well - there was some twisting off as I thought there would be but for short tacks - it worked well enough. On longer tacks, you could use the sheets to tension and improve the sail shape. Major benefit was no flogging of the jib and quick tacks becomes easy without adjusting any control lines - great for single handing

Here are a few pics


<b>above without secondary sheet tension</b>


<b>above with with sheet tensioned</b>


<b>
Around the winch</b>

Hope you find that of interest. I would certainly develop this if I was keeping the boat. Sadly, this was our last sail - we have sold the boat now so "Caspian" will be moving on to new owners. I want to say a big "thank you" to everyone in this forum who has helped enormously over the last couple of years. Even if I didn't post that much - I searched and read a lot and it really helped me get to know, sail and fix my 250 WK. This forum is the model for user associations and you should all be very proud of it.

Thanks

Simon
PS - for those who want to know - I am buying a Telstar 28 - see http://www.geminicatamarans.com/Media_Telstar.htm. "Halcyon" will be ready in late July


Simon

Edited by - simonhayes on 06/21/2007 09:56:30

Nautiduck
Master Marine Consultant

Members Avatar

USA
3704 Posts

Response Posted - 06/21/2007 :  10:33:00  Show Profile
Simon, nice self-tacking setup! Have fun with that Telestar 28. Someone at our club is getting one. What a sweet ride!

Edited by - on
Go to Top of Page

AADIVER
Admiral

Members Avatar

USA
966 Posts

Response Posted - 06/21/2007 :  11:00:26  Show Profile  Visit AADIVER's Homepage
Simon, is this how you rigged it: control line begins attached to the port stanchion, leads to a starboard block, up thru the clew block, down to a block at the port stanchion, then back to the port winch? I assume when you furl the jib you simply release the line from the winch. What do you mean, "twisting off"? Thanks.

Edited by - on
Go to Top of Page

simonhayes
1st Mate

Members Avatar

USA
34 Posts

Response Posted - 06/21/2007 :  17:09:02  Show Profile
Randy - thanks ! Yes I am looking forward to getting her. It was a tough choice between moving up to something like a Catalina 310 and getting a faster trailerable trimaran as they are about the same price. I was leaning towards a 310 as the Corsair 28 was just too sparse for the admiral. When I went for a ride on the Telstar - we were sold.. lots of boat $$ but I am due for a mid life crisis so I decided to go for it

Frank - Yes you have the lay out right. The line starts on the becket block connected to the port stanchion, through the block on the starboard stanchion, back through a block on the clew of the jib, back through the port block and along to the port winch. You are right that this pulls against the furler and so you would release the control line (or take the block off the sail) to furl it

The twist off is the poor sail shape cause by poor sheeting angles, especially a lack of leach tension on the jib which cause the top part of the sail to twist and spill the wind. This jerry rig setup does not pull the jib clew out and down sufficiently and hence twist off occurs. You can fix this if you keep the sheet attached and, on longer tack, tension the sheets as normal

In order to fix this within the STJ setup, you would have to use something like a Hoyt boom for the jib or connect the clew to a curved track. If I kept the boat, I would think about putting a track on the cabin top as there is space for it there.

Having said that, this was a real easy set up/break down and worked pretty well. It certainly made tacking in narrow channels a lot easier so, even if you didn't want a permanent STJ - it might be an interesting mod to have in the kit bag . I certainly wish I had done it earlier when I still had the boat !

Cheers,

Simon

Edited by - on
Go to Top of Page

AADIVER
Admiral

Members Avatar

USA
966 Posts

Response Posted - 06/23/2007 :  00:31:14  Show Profile  Visit AADIVER's Homepage
Just realized why your setup wouldn't work for me except very close hauled and pinching: my jib sheets run OUTSIDE the shrouds, not inside like yours, and my truck blocks are 2/3rds forward on the tracks.

Edited by - on
Go to Top of Page

simonhayes
1st Mate

Members Avatar

USA
34 Posts

Response Posted - 06/23/2007 :  00:55:25  Show Profile
<blockquote id="quote"><font size="1" face="Verdana, Arial, Helvetica" id="quote">quote:<hr height="1" noshade id="quote"><i>Originally posted by FARMHAND</i>
<br />Just realized why your setup wouldn't work for me except very close hauled and pinching: my jib sheets run OUTSIDE the shrouds, not inside like yours, and my truck blocks are 2/3rds forward on the tracks.
<hr height="1" noshade id="quote"></font id="quote"></blockquote id="quote">

Not sure it would make any real difference - the principle is the same. You would leave the sheets and track blocks where they are. The only question is where you would run the STJ tensioning line to and that could go inside or outside the shrouds to either the winch or the cam cleat or even diagonally across the companionway to the winch on the other side.


Edited by - on
Go to Top of Page

AADIVER
Admiral

Members Avatar

USA
966 Posts

Response Posted - 06/23/2007 :  21:22:49  Show Profile  Visit AADIVER's Homepage
You be right, I be wrong; I see now how it works. How long is your tensioning line, from the base of the port stanchion to the port winch?

Edited by - AADIVER on 06/23/2007 23:04:44
Go to Top of Page

simonhayes
1st Mate

Members Avatar

USA
34 Posts

Response Posted - 06/24/2007 :  01:36:07  Show Profile
Didn't measure the tension line as it is an old halyard and therefore probably 60 feet long. As mentioned above - I have sold the boat now so can't do any measurements. Line needs to be long enough to do the triangle of blocks and then back to cockpit - 20ft in total should do it

Edited by - simonhayes on 06/24/2007 01:37:01
Go to Top of Page

AADIVER
Admiral

Members Avatar

USA
966 Posts

Response Posted - 06/24/2007 :  19:39:42  Show Profile  Visit AADIVER's Homepage
I set it up today with some old blocks and an old halyard line. Haven't sailed with it yet. I can furl the jib right to where the clew block touches the furl. Also, I secured the control line at the starboard mast step instead of the port stanchion, mainly due to the fact the halyard line was a wee bit too short. Will that be a problem? Wouldn't think so.
I'll get 'er up and running tomorrow and duly report the result. Thanks.

Edited by - AADIVER on 06/24/2007 22:50:42
Go to Top of Page

simonhayes
1st Mate

Members Avatar

USA
34 Posts

Response Posted - 06/24/2007 :  23:20:25  Show Profile
Frank,
Not sure I understand what you mean by securing the control line on the mast step. If you have a triangle with the port & starboard block on stanchions and the clew block between them with the control line running through the three - that should work regardless of where you finally run the control line from and to .
Let me know how it goes..
Simon

Edited by - on
Go to Top of Page

AADIVER
Admiral

Members Avatar

USA
966 Posts

Response Posted - 06/24/2007 :  23:44:34  Show Profile  Visit AADIVER's Homepage
The mast rests on a ss plate, the port and starboard sides of which have a series of holes. I simply secured the beginning of the control line to the forward hole on the starboard side. One advantage: no line to trip on going forward on the port side of the mast. I'll take a picture tomorrow.

Edited by - on
Go to Top of Page

AADIVER
Admiral

Members Avatar

USA
966 Posts

Response Posted - 06/25/2007 :  17:41:03  Show Profile  Visit AADIVER's Homepage
Simon, I'm just back from a trial run with your self-tacking rig and, wonder of wonders, it woiks! In fact it works so well, I've replaced my standard jib sheets with it. Of course, the sail has a light air trim to it; the foot bellows out, but since I'm a lazy cruiser and not a fanatic racer, I couldn't care less. And it works best with the jib furled a bit. Pictures next time out.

Edited by - on
Go to Top of Page

simonhayes
1st Mate

Members Avatar

USA
34 Posts

Response Posted - 06/26/2007 :  00:37:15  Show Profile
Frank,
Glad it worked for you too. Be interested to see pictures of your set up...

Edited by - simonhayes on 06/26/2007 00:40:55
Go to Top of Page

AADIVER
Admiral

Members Avatar

USA
966 Posts

Response Posted - 06/26/2007 :  13:52:53  Show Profile  Visit AADIVER's Homepage
Simon, the first of 4 pics; I have to add 'em one by one.


As you can see, the sail can't be flattened for close reaching on either tack. If this proves to be a problem I'll re-install the stock sheets and still run the self-tacking line through the stanchion blocks.


Using the sheet track block, this is how I secured the tension line; thru a hole in the ss mast foot plate.


Edited by - AADIVER on 06/26/2007 17:54:03
Go to Top of Page

John Russell
Master Marine Consultant

Members Avatar

USA
3444 Posts

Response Posted - 06/26/2007 :  14:37:05  Show Profile
Pretty clever, Frank and Simon. I'm guessing that gives you about and 85-90% jib. The advantages while tacking in a narrow channel are obvious. I, too, have that problem. What do you do once through the channel and want all of the sail out? Can it just be sheeted normally or does the self-tacker have to be disabled? I'm hoping to avoid the trip to the deck

Edited by - on
Go to Top of Page

AADIVER
Admiral

Members Avatar

USA
966 Posts

Response Posted - 06/26/2007 :  16:25:22  Show Profile  Visit AADIVER's Homepage
Simon has both the conventional sheets and the self-tacking sheets. When he wants to tack "normally", he simply releases the self-tacking tension line and controls the jib with our stock sheets. I just didn't want all those lines on the foredeck, and I seldom sail wing and wing.

Edited by - on
Go to Top of Page

simonhayes
1st Mate

Members Avatar

USA
34 Posts

Response Posted - 06/27/2007 :  00:02:44  Show Profile
Frank - Nice set up - certainly keeps it simple and with minimal lines on the foredeck. Thanks for posting.

John - As Frank indicated, my setup was in addition to the existing sheets so for longer tacks, you can sheet in the job normally .The major advantage is that the jib will not flog and will self tack . You can then adjust the trim once settled on the new tack.

I think this idea has real merit on a boat like the 250 which is primarily a cruiser, where the mainsail provides the majority of the "drive" and hence the jib can be relatively small, and ease of use should be a priority. I hope we keep developing it..

Edited by - on
Go to Top of Page

Mike013
1st Mate

Members Avatar

USA
64 Posts

Response Posted - 07/02/2007 :  18:26:57  Show Profile
I went out this weekend and purchased the necessary hardware and line to set up the self-tacking jib. It worked like a charm. I plan on attaching the blocks to the sail and stanchions using some quick connect hardware. That will make rigging the self-tacker a very quick process.

Once again, this forum has come through with real useful and practical information. Thanks to all for your input.

Edited by - on
Go to Top of Page

soulfinger
1st Mate

Members Avatar

USA
29 Posts

Response Posted - 07/02/2007 :  18:37:05  Show Profile
This sounds great, but could it be putting too much tension on the chainplates? The chain plates are designed to be strong in a vertical sense, and now your adding a bunch of horizontal tension to them. Could this be a problem?

Edited by - on
Go to Top of Page

AADIVER
Admiral

Members Avatar

USA
966 Posts

Response Posted - 07/02/2007 :  19:22:53  Show Profile  Visit AADIVER's Homepage
The blocks are attached to the lifeline stanchions, not to the shroud chainplates, so horizontal tension is not an issue. No problemo.

Edited by - on
Go to Top of Page

bbriner
Captain

Members Avatar

349 Posts

Response Posted - 10/30/2007 :  00:02:37  Show Profile
Simon
There's a C250 2 slips away from me in Berkeley - it's "Caspian". I guess it must be the new owners. Are the new owners here - in the forum yet...?

Edited by - bbriner on 10/30/2007 00:05:15
Go to Top of Page

SCnewbie
Navigator

Members Avatar

166 Posts

Response Posted - 06/25/2008 :  12:00:07  Show Profile
How is this for raising a thread from the dead? I figured I would ask AADiver the question here so that others wouldn't have to search to know what I was talking about.

AADIVER,
I am planning to do this on my boat tomorrow if my rudder is in tact(I'll tell you all later.) I know you connected your control line to the mast step and I may do the same. Why couldn't it just be attached to the starboard stanchion, then to the block on the clew, block on the port stanchion and back to the winch? Would that work or does it need a block on the starboard side? How long did you figure the control line needs to be. What size would you suggest?
Thanks for posting your picture of your quick disconnect. I would have never seen this idea and I think it is going to make the wife very very happy that I don't need her to help tack anymore. We certainly don't race so this will be fun.

Edited by - on
Go to Top of Page

AADIVER
Admiral

Members Avatar

USA
966 Posts

Response Posted - 06/26/2008 :  01:08:14  Show Profile  Visit AADIVER's Homepage
"Why couldn't it just be attached to the starboard stanchion..."

I dunno; I'll rig it that way next time out. If it works as well, then we won't have a line to trip on going forward starboard and I'll have a spare block!

Edited by - on
Go to Top of Page

frog0911
Master Marine Consultant

Members Avatar

USA
1349 Posts

Response Posted - 06/27/2008 :  22:16:04  Show Profile
Frank, what happened to your pictures? They are all tiny on my computer.

Edited by - on
Go to Top of Page

AADIVER
Admiral

Members Avatar

USA
966 Posts

Response Posted - 06/28/2008 :  14:53:02  Show Profile  Visit AADIVER's Homepage
Final self-tacking setup: the sheet begins attached to the base "hook" of the starboard stanchion, runs up to the jib clew attached with a pelican hook, down to the port stanchion block, then aft. The pelican hook gives me the option to either use self-tacking or remove it for the conventional sheets.

Edited by - on
Go to Top of Page
  Previous Topic Topic Next Topic  
 New Topic  Topic Locked
 Printer Friendly
Jump To:
Association Forum © since 1999 Catalina Capri 25s International Association Go To Top Of Page
Powered By: Snitz Forums 2000 Version 3.4.06
Notice: The advice given on this site is based upon individual or quoted experience, yours may differ.
The Officers, Staff and members of this site only provide information based upon the concept that anyone utilizing this information does so at their own risk and holds harmless all contributors to this site.